Using the BackOffice Inspection File
I. Generate a File Number
From the sidebar, select “Inspections”.
For a video tutorial on the Inspections List interface, go to Liciel.us and watch our “Using the LICIEL BackOffice” video.
To get started, open an inspection file.
Click the file number for the inspection file you would like to open or right-click the file and select "Edit".
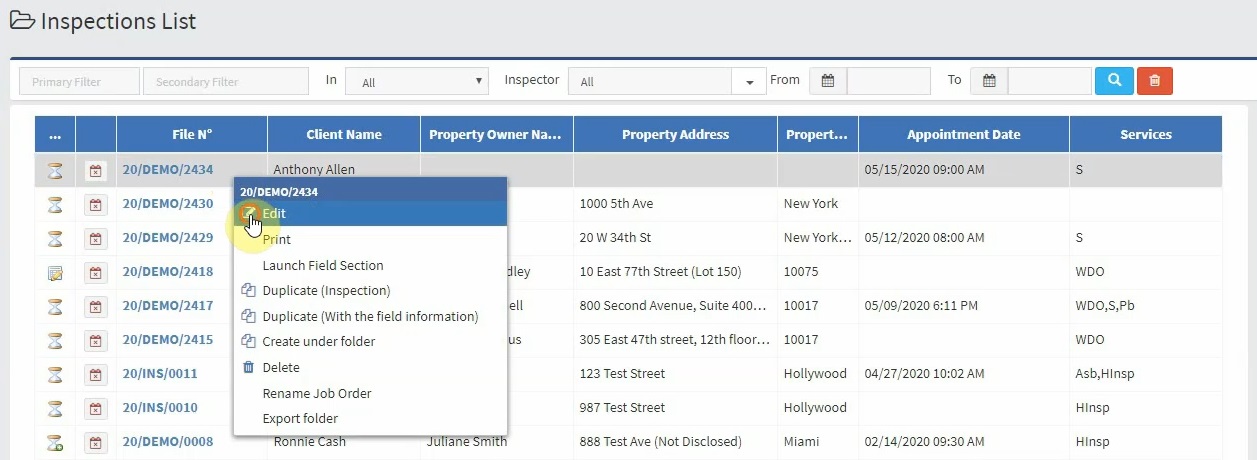
This will open the Inspection File.
Return to the inspections list at any time by clicking the home icon in the top left corner.
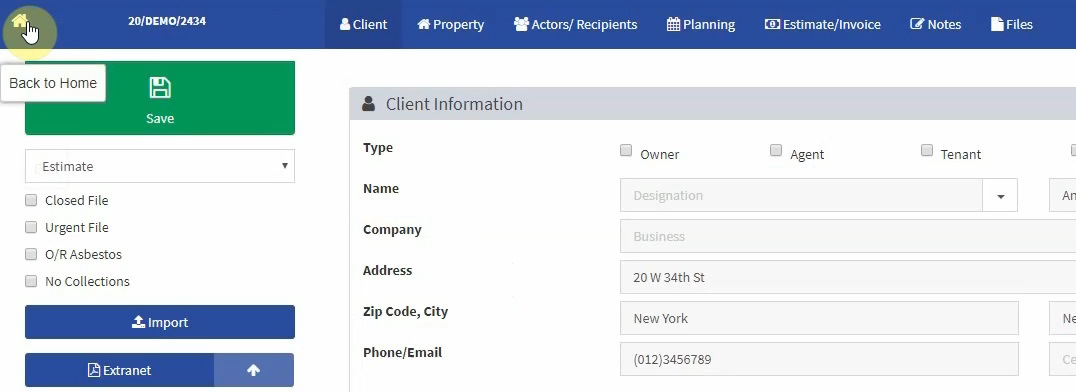
Save any changes before exiting by clicking the GREEN save button.
Next to the home icon, you will see the inspection file number.
Orders that have not been assigned a file number will say “NEW” in this area.
If your inspection file has not been assigned a file number, click the “Planning” tab.
Click the “Generate Folder Number” button in the “Report Number” section.

If the inspection file has never been saved before, a popup will open asking you to please save your inspection file.
Click “Save and Create a Report Number” to save the file and generate a report number.
To navigate through the inspection file we will use the top bar.
II. Inspection File "Client" Tab
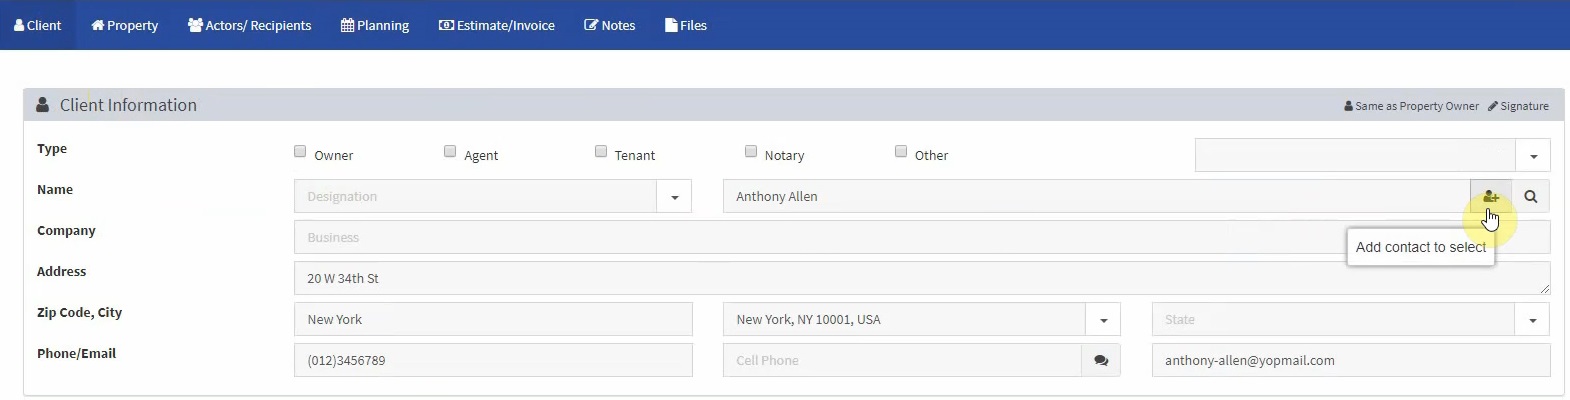
Click the “Client” tab.
This is the information that was entered during the order creation.
To create a contact using the information here, click the “Add Contact” icon.
This can be done with the client information, the property owner information, and the tenant information.
Click the search icon in any section to import a contact from the address book.
This will open the address book.
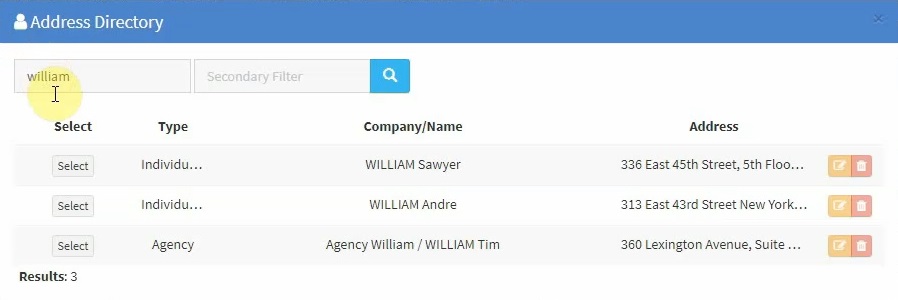
Search for a contact using the search boxes.
Edit or delete a contact by using the corresponding icons.
Click “Select” to import this contact into the inspection file.
If the information repeats and you would like to save time, use the “Same as Client” or “Same as Property Owner" buttons.
This will copy the information from that area into the desired location.
For example, if the tenant information is the same as the client information, click “Same as Client” in the tenant information box.

Notice that the tenant box was filled in with the data in the client box.
III. Inspection File "Property" Tab
Select “Property” from the top bar.
Enter the “Property Information” manually or use the “Same as…” buttons.
Click “Check Address” to check if the address exists on the map.
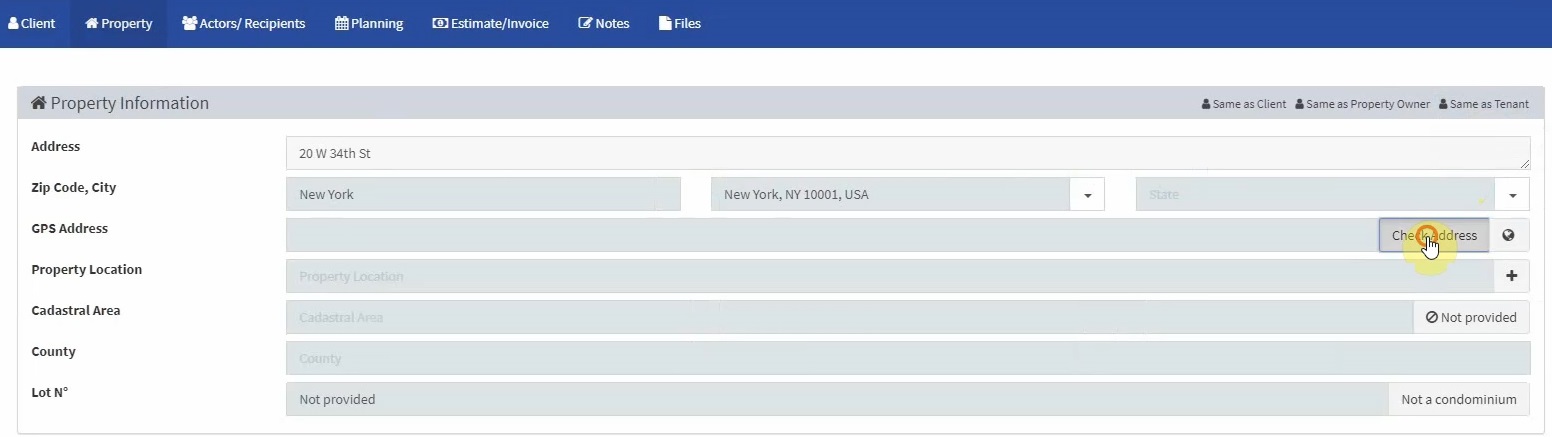
To view the location on Google Maps, click the "Globe" icon.
This will open a new page with the pinpointed location on Google Maps.
Enter the property description and scope of the inspection.
Keep in mind that these are the same fields available in the LICIEL Inspection Software.
When this inspection file is imported into the LICIEL Inspection Software, all of this information will be available.
IV. Inspection File "Actors / Recipients" Tab
Click the next tab, “Actors / Recipients”.
The agent information area will store the information pertaining to the real estate agent, if there is one involved in this inspection file.
If the Agent is already save as a contact, click the “Search” icon to view your address book.
Below that is the administrative management.
Use the drop-down to assign this inspection file to one of your administrative managers.
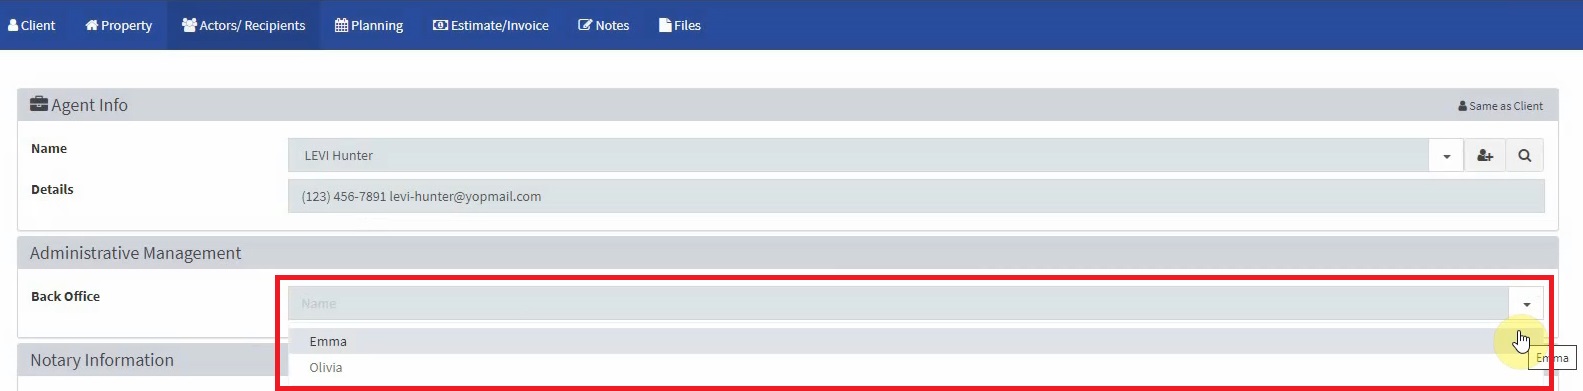
To edit the list of available administrative management, go to your BackOffice settings.
Click “Databases” and select “Drop-down Menus Company”.
Use the drop-down to select “List of BackOffice”.
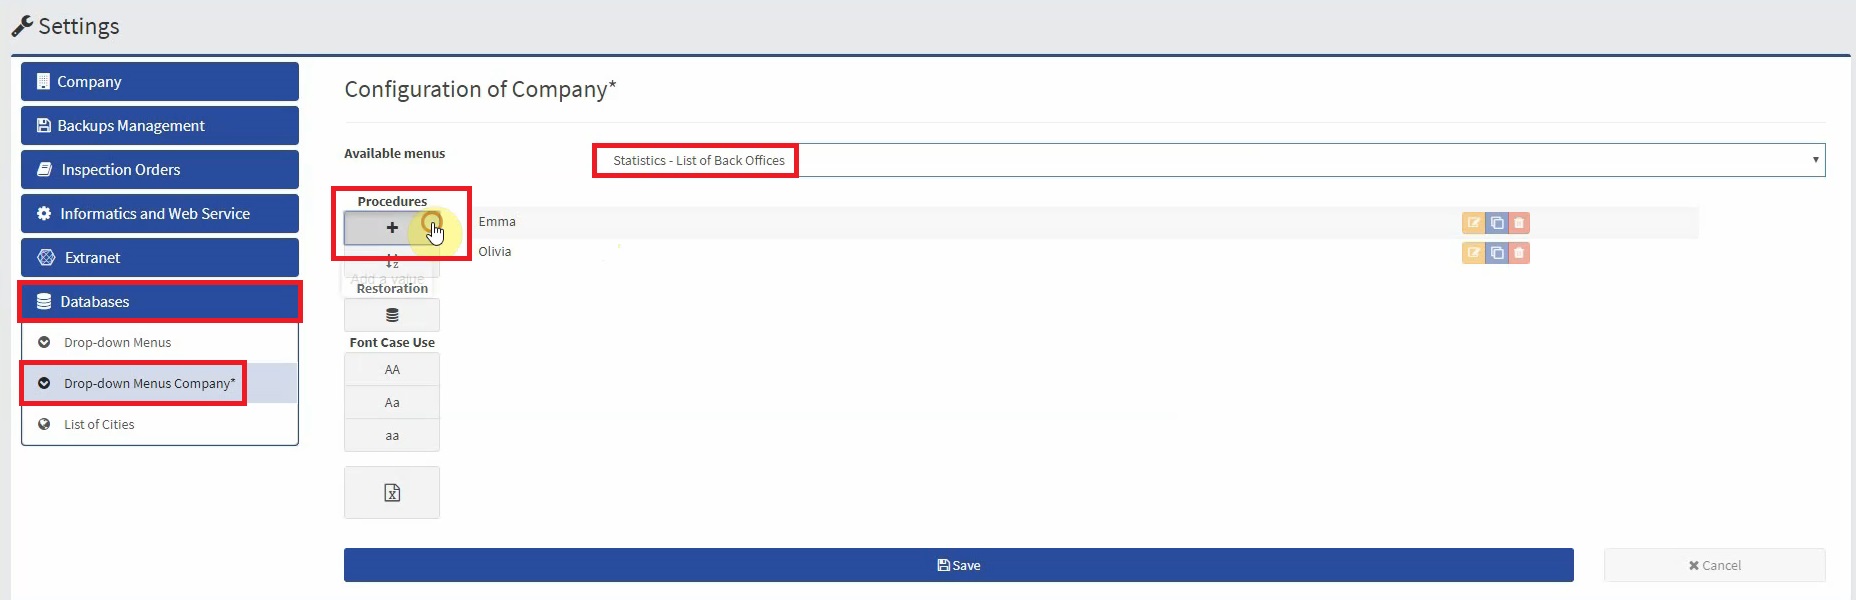
Add a user to the list and click “Save” so it will become available in the Inspection File.
In the inspection file, click “Save” and then refresh the page to see the updated list of available administrators.
Enter notary information if necessary.
The report and email recipients section keeps track of who is supposed to receive a physical copy of the report and who is supposed to receive an email copy of the report.
Notice that using the checkboxes will add the correspondence information from that section.

Click the search icon to select a contact from the address book.
Information here can also be typed manually.
If needed, clear the contents of this box by clicking the garbage bin icon.
Do the same in the recipient email area just below.
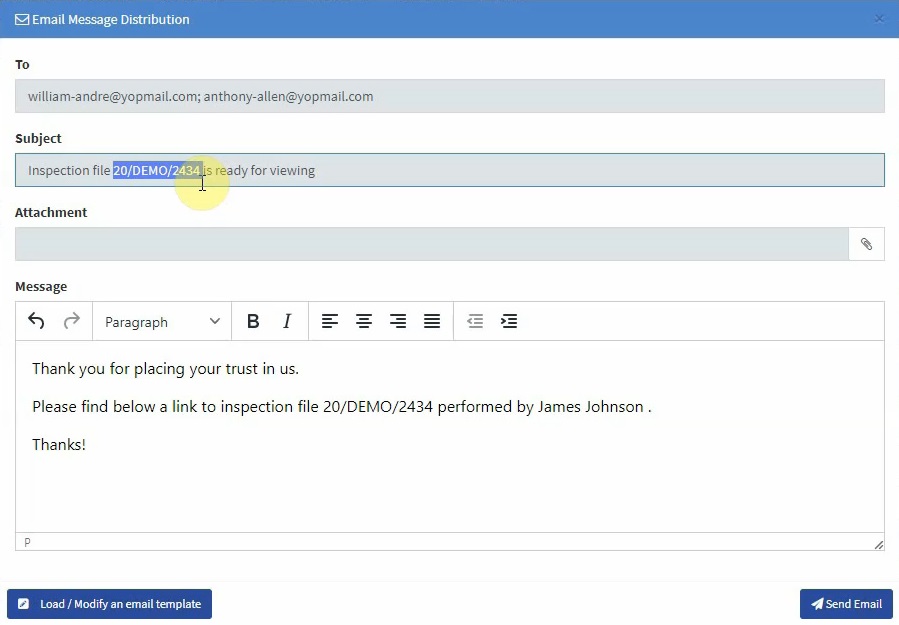
Click the email icon.
This opens a popup with a pre-written email.
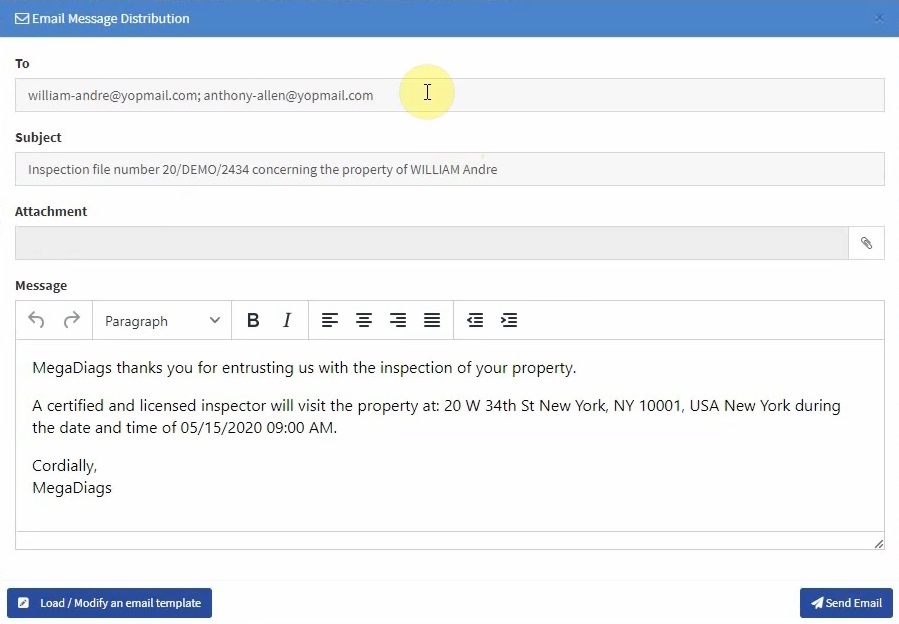
The email recipients have been inserted into the “To” portion of the email.
Add any attachments if needed by clicking the paper clip icon.
The attachments popup lets you add a file from your computer by clicking “Choose File” or it provides a list of attached files.
Currently there are no attached files for this inspection file, so our list is empty.
Close the attachment popup.
Notice that the email has the inspection file information including address and appointment information.
The email is generated using an email template.
The base template is then personalized with the information related to this inspection file.
To create a new template, which will become the default whenever you click the email icon in this section, click “Load / Modify an Email Template”.
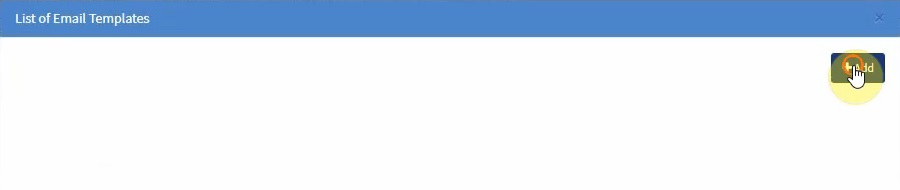
The first time you do this, the email template list will be empty.
Create an email template by clicking the “Add” button.
Enter a file name and click “Add”.
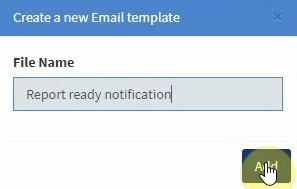
The template has been created but it is empty.
Click the edit icon to edit the base template.

This will open a new tab.
Enter the subject name for the email.
Use the text fields on the right-hand side to add dynamic information to your email template.
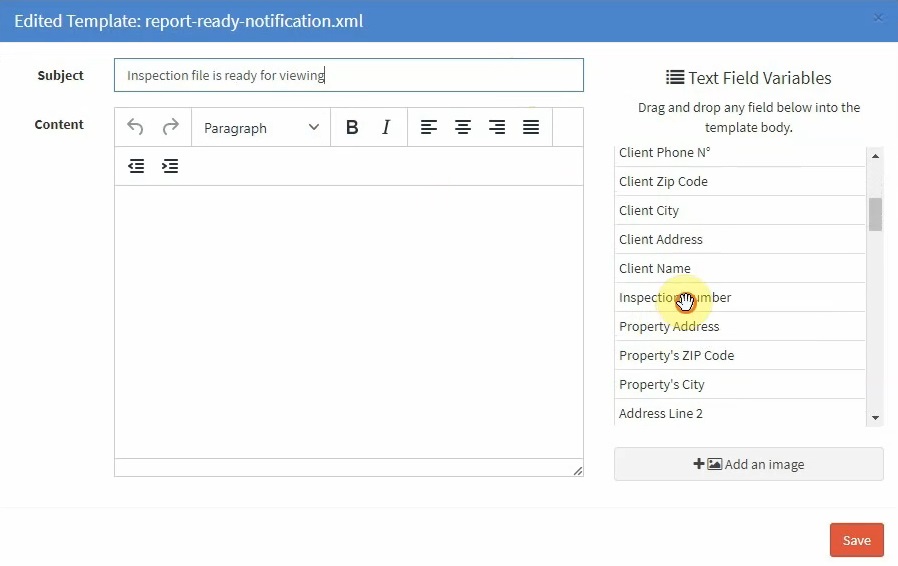
For example, if you would like the email template to say the Inspection Number of the file, find “Inspection Number” from the text field list.
Then drag and drop it where you would like it.
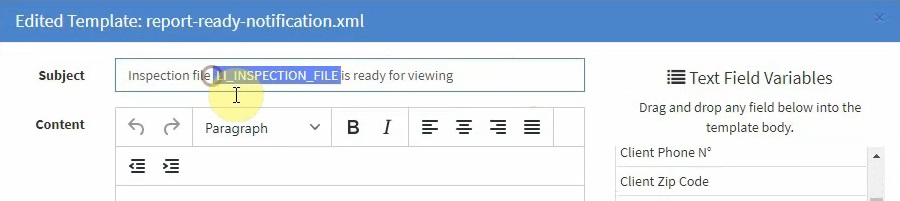
Text fields can be dropped into the email subject or into the email content.
Notice that when the text field is dropped into the subject or the content, it no longer says “Inspection Number”.
Instead, the special key will be inserted into the email.
This special key will then be replaced with the information from the inspection file.
Click “Save” to save your changes.
Clicking “Save” will close the template edition tab.
Select the new template from the email template list.
Click “Select”.

Notice that the subject and the message have changed.
This email is now using the template that was just created.
The text fields have been replaced with the inspection file data.
Click “Send” to send your email.
V. Inspection File "Planning" Tab
Click the next tab, “Planning”.
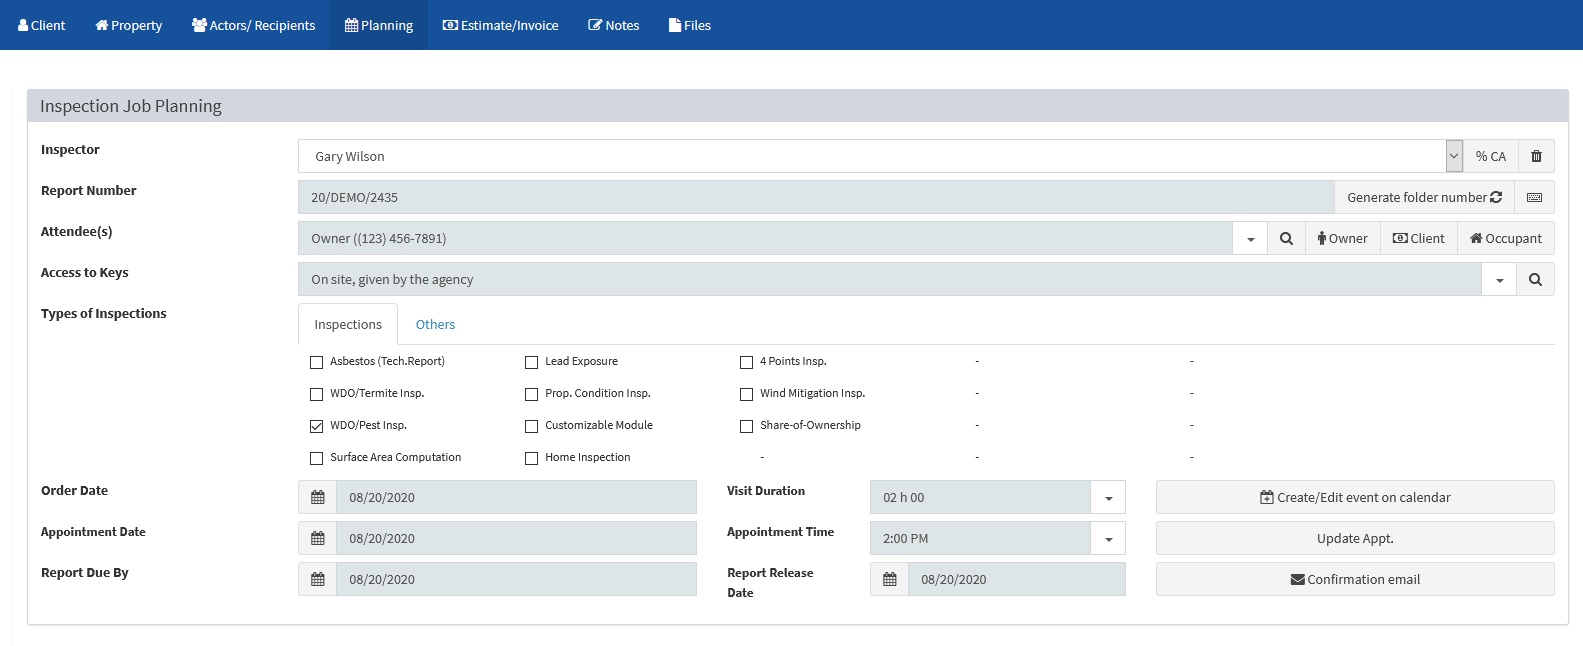
Use the drop-down to select an inspector for this inspection file.
Remember that the first thing we did was assign a report number to this file.
Specify who will attend the inspection by using the drop-down, or use the buttons on the side to insert the owner, client, or occupant information.
Below that, enter who will have access to the keys for this inspection.
Most importantly, select which inspections will be performed.
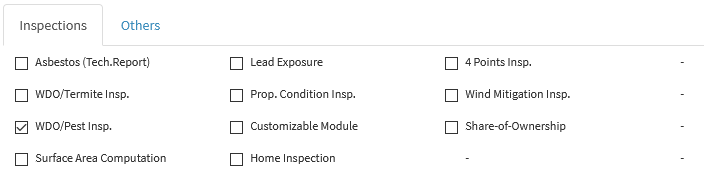
Check the checkboxes for the desired inspections.
When this inspection file is imported into the LICIEL Inspection Software, it will have the modules for these inspections activated.
If the order was submitted with a particular appointment date and time, that information will be visible here.
If these fields are empty, select an appointment date.
Then choose an appointment time.
The visit duration will be calculated based on the inspections that will be performed.
Click “Create/Edit Event on Calendar”.
![]()
If an appointment has never been created for this inspection file, a new tab will open with the calendar and a popup with the inspection information.
Notice that the date and time matches the date and time we selected.
Also visible is the assigned inspector and the inspection file number.
Click “Save” to add this appointment to the calendar.
Return to the inspection file, if the appointment is already on the calendar, clicking “Create/Edit Event on Calendar” will open a popup displaying the appointments that are linked to this inspection file number.
Click “Edit” if you would like to edit this appointment.
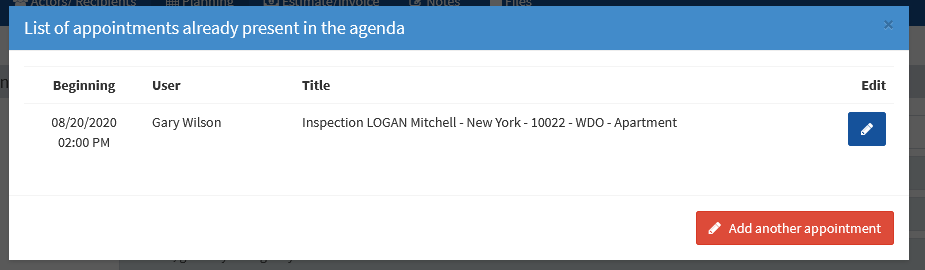
For example, change the time of the inspection.
Instead of 9:00AM the appointment will be set to 12:00PM.
Click “Save”.
Notice that the calendar reflects the change.
Return to the inspection file and close the popup, click “Update Appointment” to see the change reflected here.
VI. Inspection File "Estimate / Invoice" Tab
From the top bar click “Estimate / Invoice”.
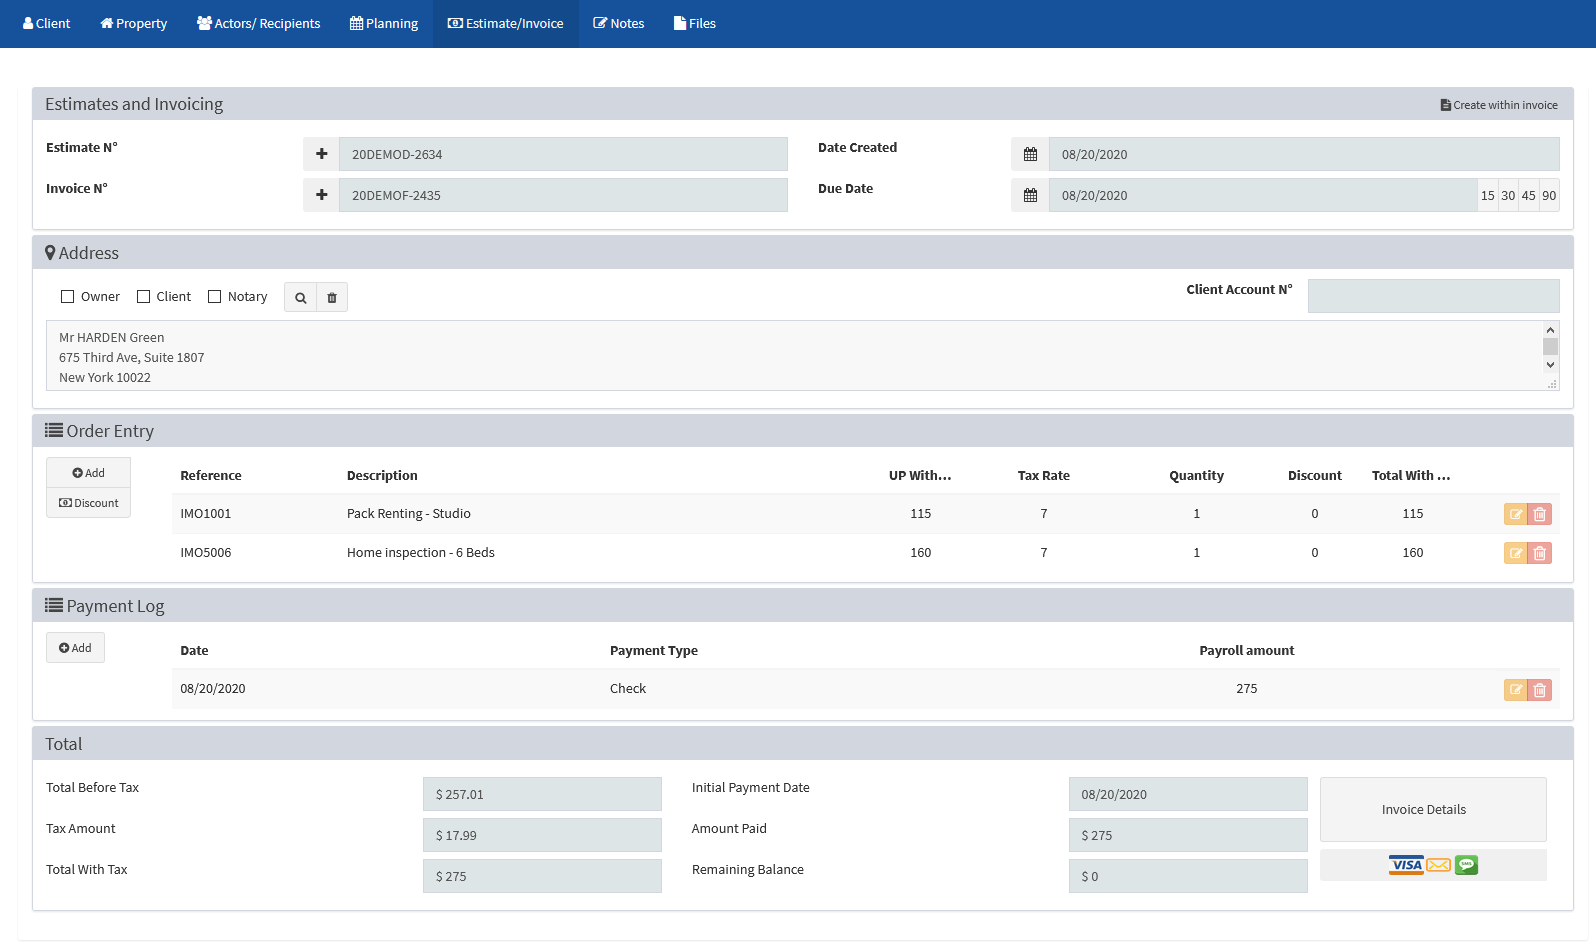
Assign an estimate and invoice number by using the corresponding plus signs.
Estimate and invoice numbers will be generated using the naming conventions specified in the BackOffice settings.
For more information on the naming conventions, go to Liciel.us and watch our “Setting Up the BackOffice” video.
Set an invoice due date easily.
Click “15,30,45, or 90” to automatically set the invoice due date “X” many days after the creation date.
Notice when "15" is clicked, the invoice due date will be due 15 days after the creation date.
Below that enter the billing address.
Enter the information manually or use the check boxes to insert the correspondence information.
The order entry section allows the addition of the services that will be listed on the invoice.

This can be edited by clicking the “Edit” icon.
Notice that the information that was submitted through the wizard is visible, including estimated square footage and which service was originally ordered.
Make any changes necessary and click “Save”.
Services can be added to the order entry list manually too.
For example, if the client has decided to add a service, click the “Add” button.
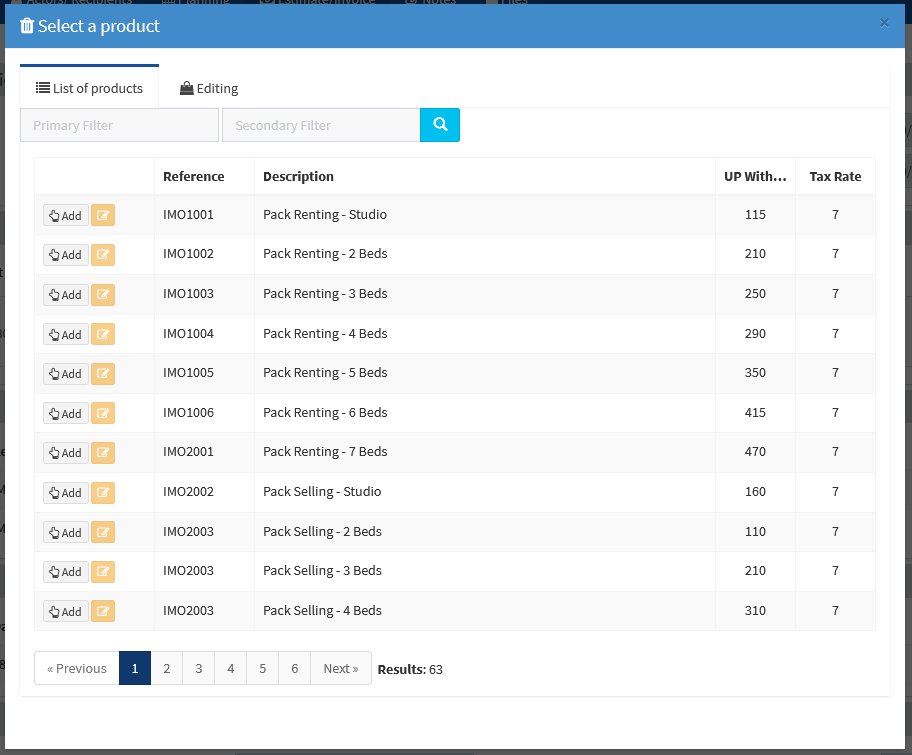
This product list can be edited in the BackOffice settings.
Use the search boxes to search for a product or use the arrows.
When you find the correct product or services, click “Add”.
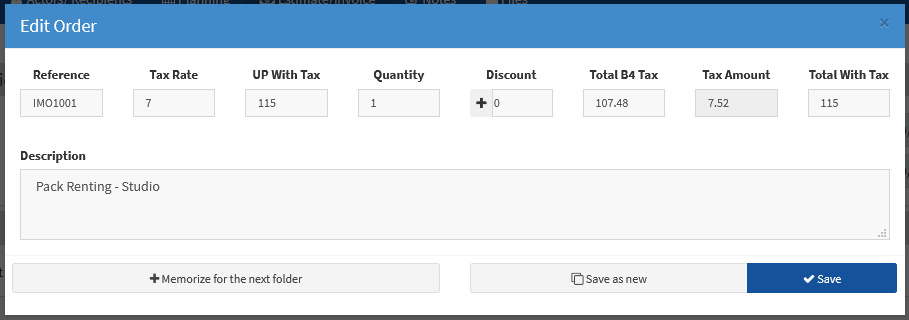
If you want to use a product from the product list but need to make a small change to it, click the “Edit” icon next to the product.
Once the edition boxes are filled in with the product info, make any changes and click “Save”.
Any modifications done here will not be saved in the database.
Close the popup.
When the client submits payment, you may add that information in the payment log.

Click “Add” to add a payment.
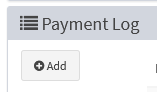
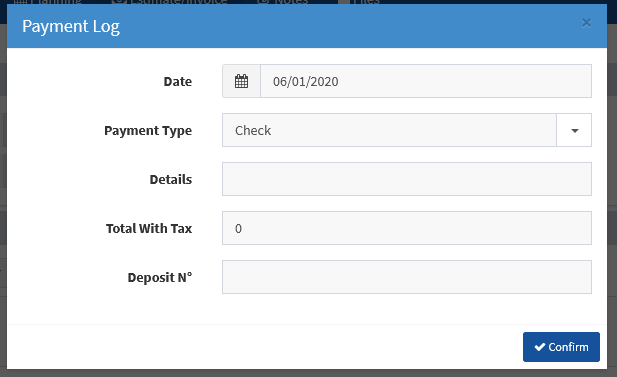
Select the payment date, payment type, and the payment amount.
If needed add details, or a deposit number if applicable.
As products are added and payments are made, you will see the information in the bottom area change.
The bottom area shows the total before and after tax, the amount paid so far, and the remaining balance if any.
To send an updated inspection agreement with the correct total, click the button in the bottom right corner.
Select “Send Email” under “Job Order Template 1”.
This will insert the email recipients we specified earlier and it will generate a new inspection agreement with the new information.
Click “Send Email”.
VII. Inspection File "Notes" Tab
From the top bar, click “Notes”.

To keep track of the mileage covered to perform this inspection, enter that information here.
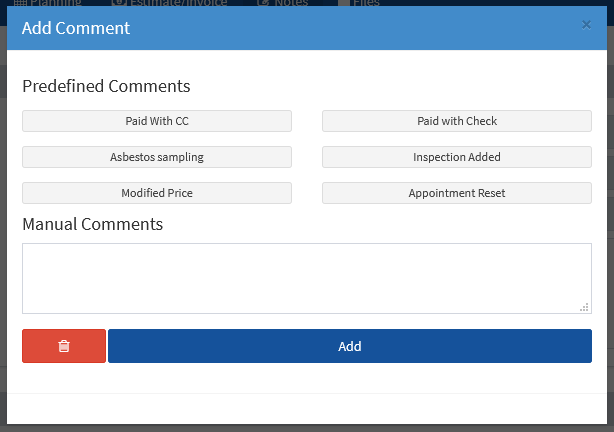
Also add any comments by clicking “Add” in the comments section.
Use the buttons to select a comment or enter one manually and then click “Add”.
VIII. Inspection File "Files" Tab
Click the last tab, “Files”.
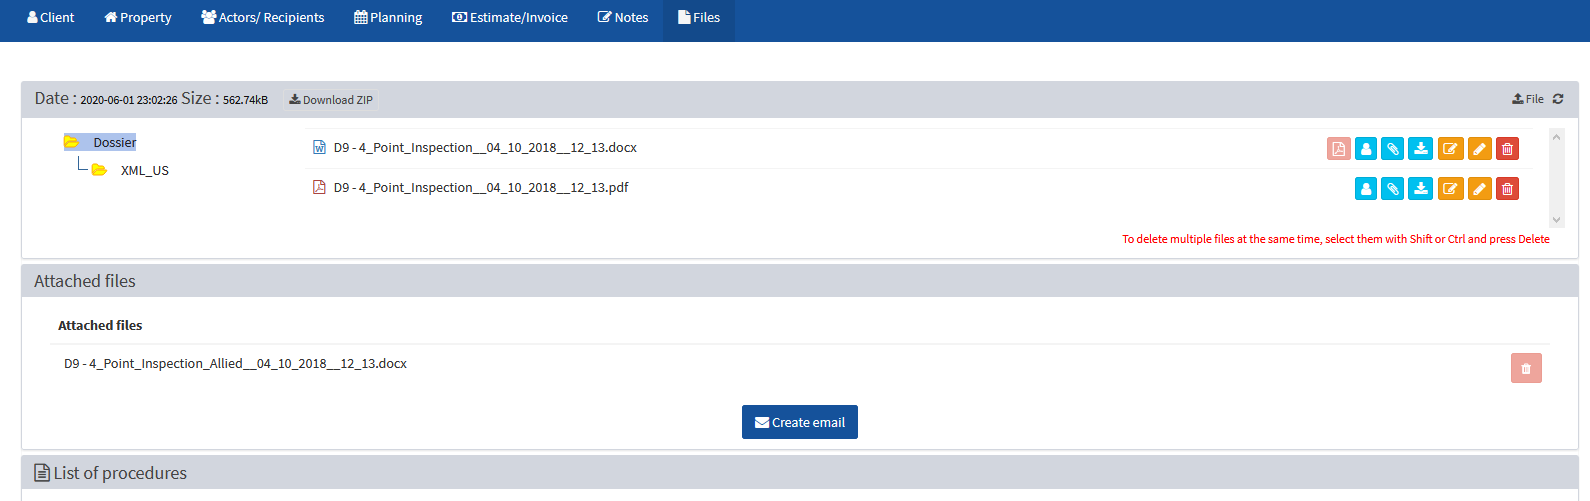
Here see any files that were generated for this inspection file.
Files in this list have several potential actions.

From right to left, the file can be deleted using the garbage bin icon.
The file can be renamed by clicking the pencil icon.
This will open a popup.
Make any changes and click “Rename”.
The document can be downloaded for viewing by clicking the “Download” icon.
To generate an email with specific attachments, click the “Paperclip” icon for the files you would like to attach.
Notice that the files are added in the “Attached Files” section.
Finally, send the file to the Extranet by clicking the “User” icon.
To show how this works, open the Extranet.
Use your credentials to log in.
Click “Inspections” from the ribbon.
Find the same inspection on the Extranet.
Scroll down to see the list of files.
Add a file to this list.
In the BackOffice, click the upload button.

Select a file from your computer.
In the BackOffice, click the “User” icon for that file to send the file to the LICIWEB.

Refresh the Extranet and the file will be available.
The list of attached files can be attached to an email.
Files can be removed from this list by clicking the “Garbage Bin” icon.
Once all the files are attached, click “Create Email”.
This will create an email with the attached files.
Enter the email message and click “Send Email” to send the email.
IX. Inspection File Side Bar
Finally, let’s go over the inspection file side bar.
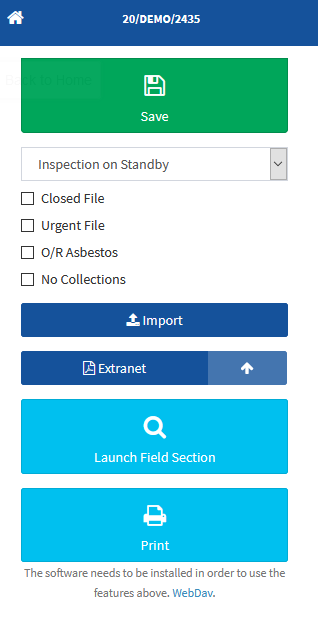
You may have noticed that the left-hand side of the screen remained the same as we went through the tabs in the top bar.
For your convenience, the left-hand side is home to the large green “Save” button.
This makes it easy to save any changes to your inspection file as you go.
Below the save button, you will see a drop-down that lets you control the state of the inspection file.
This can also be changed from the preview pane in the inspections list.
Once the inspection has been completed and paid for and the report has been delivered to the appropriate recipients, we can close the inspection file.
To do this, check the checkbox for closed file.
The “Import” button, lets you replace the information in this inspection file with the information from another inspection file.
Click the “Import” button.
Keep in mind that this will override any information, so be sure that you want to import so no important information is lost.
If you are sure you would like to import the information from another file, select it from the list.
Under the “Import” button, you will see the “Extranet” button.
Clicking this will open a new tab with the Extranet.
X. Launch the Field Section
Finally, click “Launch Field Section” to open the inspection in the LICIEL Inspection Software.

Go to Liciel.us to find video tutorials for the LICIEL Inspection Software.