 Asbestos Diagnostic Module - Exhaustive Identification
See Wikiliciel: Asbestos diagnostic module - simplified identification
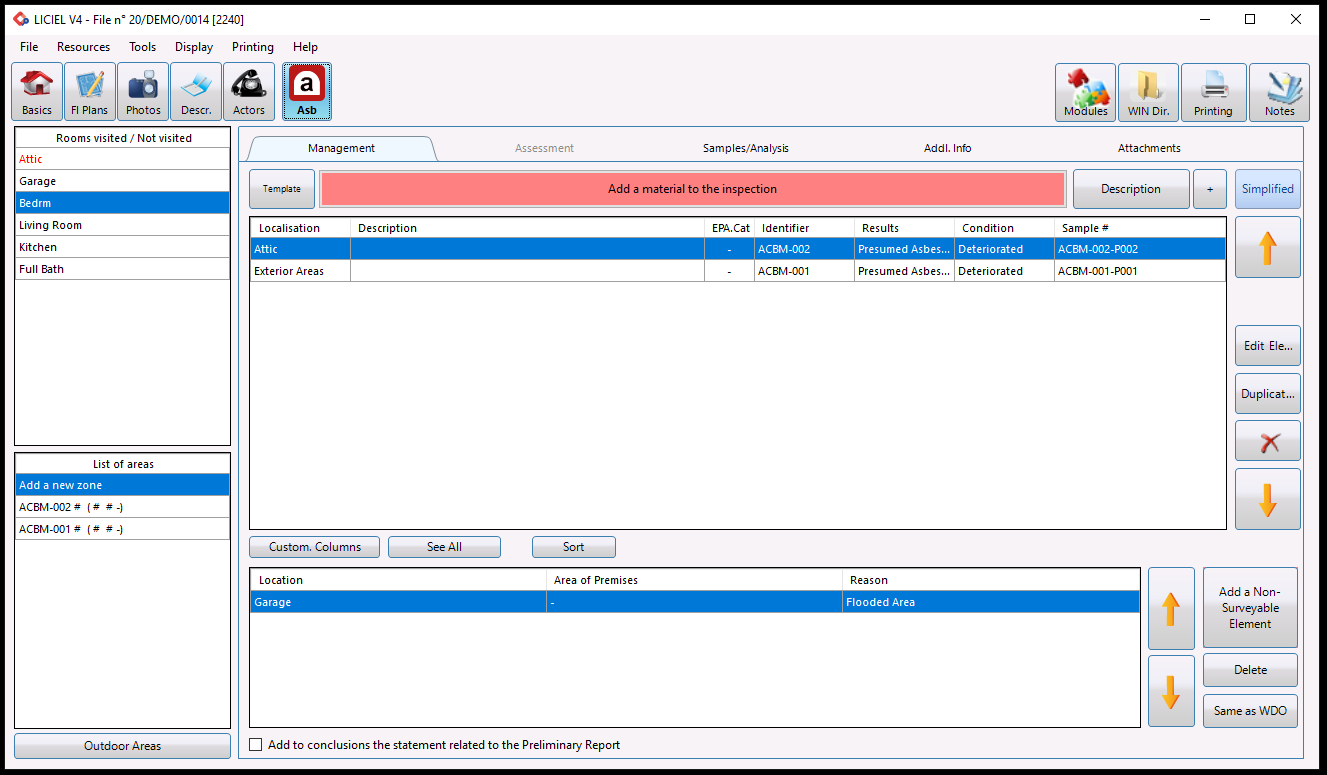
I. "Management" tab
The asbestos module allows you to enter ACBMs, areas and materials that may contain asbestos, contain asbestos, or do not contain asbestos.
You can also enter comments and recommendations concerning asbestos in the home and use the plan module to identify your asbestos materials.
Top of page
First select your part from the side panel of the parts visited, then click on the button " Add a material to the diagnosis ", which starts the marking of a new element in the diagnosis.
If an existing zone is selected from the list of zones (table bottom left), the software will add a component to the selected zone.
The " Exterior parts " button (located at the bottom left of the page) allows you to describe an element located outside the frame. By clicking on it, you access the “ Study ” tab in order to proceed to the description of the element.
The " Simplified " button is used to set up simplified tracking.
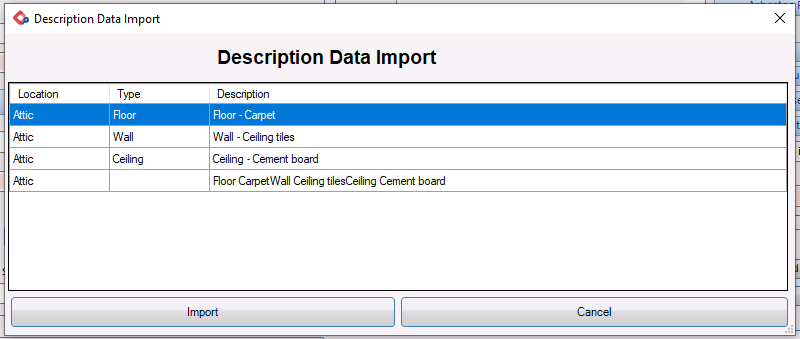
The " Description " button is used to import the description made in the description module automatically.
The " + " button next to the description allows you to select and validate the part (s) you want to import by checking the boxes associated with the parts of your selection.
The " Modify " button allows you to modify the selected component by accessing the " Study " tab . You will also be able to double click on the selected component.
The " Duplicate " button allows you to duplicate the selected component.
| The button |
|
allows you to delete the selected item (s). |


Middle of page
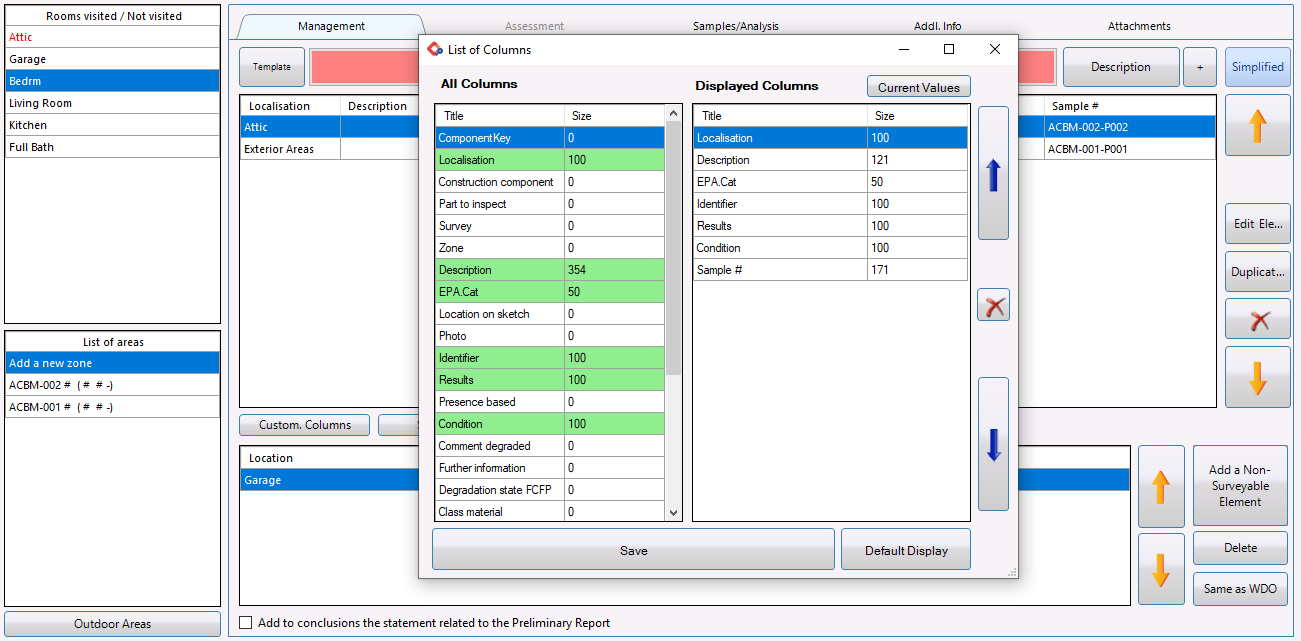
The " Customize Columns " button is used to display or hide the number of visible columns of the main table.
By clicking on the " No Filter " button you have options to hide buildings and rooms from elements in the central table.
The " Sort " button is used to sort the elements of the central table by part and / or conclusions.
Footer

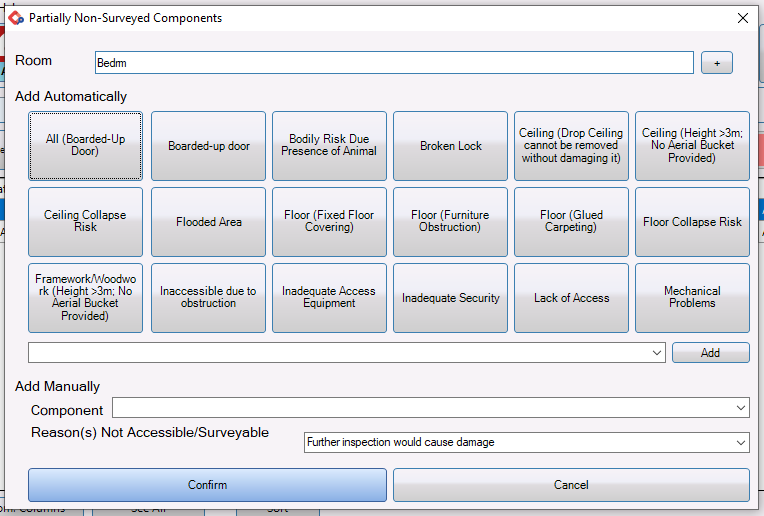
The " Delete " button allows you to delete a non-controllable component relating to the part.
The button " = Termites " allows you to transfer the non-controllable components from the termite diagnosis to the asbestos diagnosis.
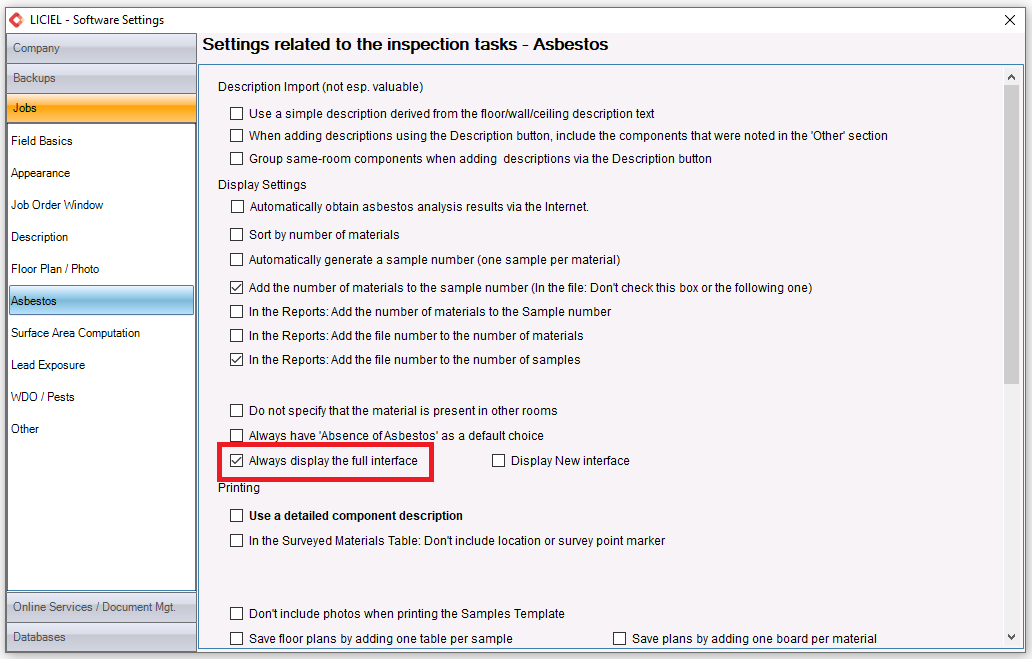
The checkbox " Add the sentence relating to the preliminary report to the conclusions " allows you to insert the following in your report in the conclusion paragraph:
" The mission described on the cover page of the report could not be completed: it is necessary to carry out in-depth investigations " - Field: li_Amiante_conclusion
II. "Study" tab
The " Add a material to the inspection " button, after having chosen the material, allows you to access the location of a new element in the asbestos diagnosis.
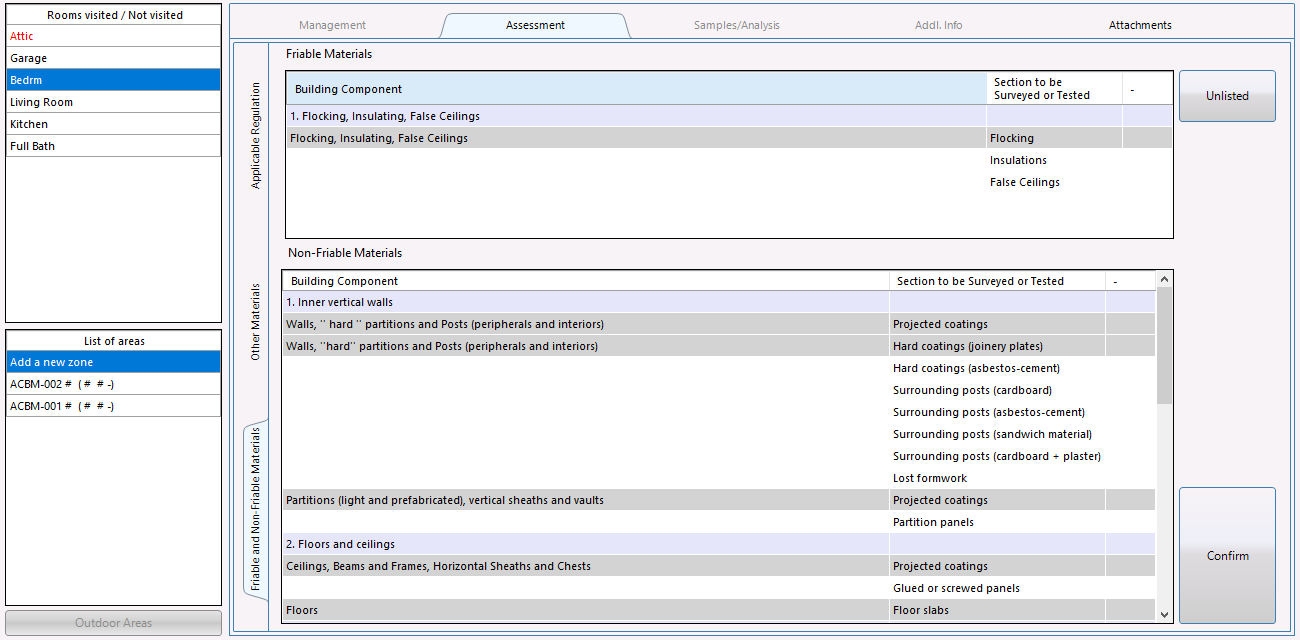
II. A .1 “Materials” section
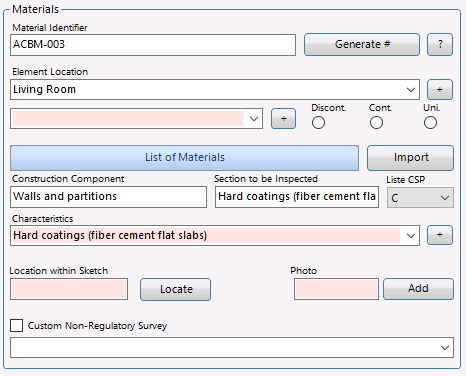
The " Material identifier " field indicates a number which will allow you to identify the material.
The " Element Location " field is used to indicate the location in the asset of the item being diagnosed. You can choose the part from the list on the left.
The " + " button located to the right of the " Element location " field is used to select and validate the part (s).
The field below the location represents the Zone in the selected part which concerns the component.
The " + " button located to the right of the " Zone " field allows when the zone is located on several rooms to define the precise zone of each room.
The software will indicate "Multiple" in the zone field and will automatically check the box on the button "Validate and add a diagnostic" allowing to add a line per room by assigning the right zones to each room.
It is always possible to uncheck the box to allow printing of the ACBM on 1 single line.
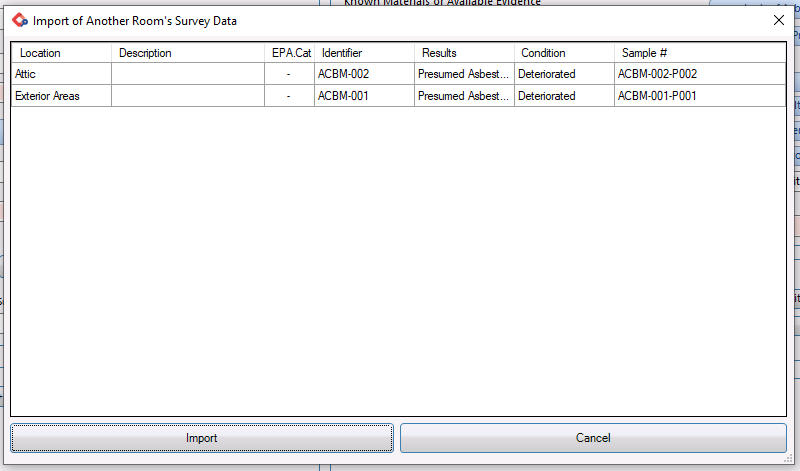
The " Import " button allows you to import the description information or from an existing component.
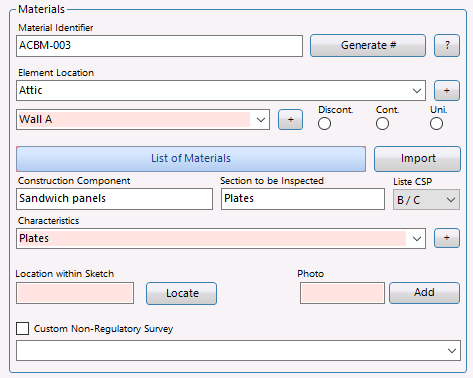
The " Construction component " field allows you to indicate which of the construction components you are studying (Do not modify).
The " Part to inspect " field indicates which part of the component you are studying (Do not modify).
The “ Description ” drop-down menu allows you to select the part you are inspecting and can be changed as needed.
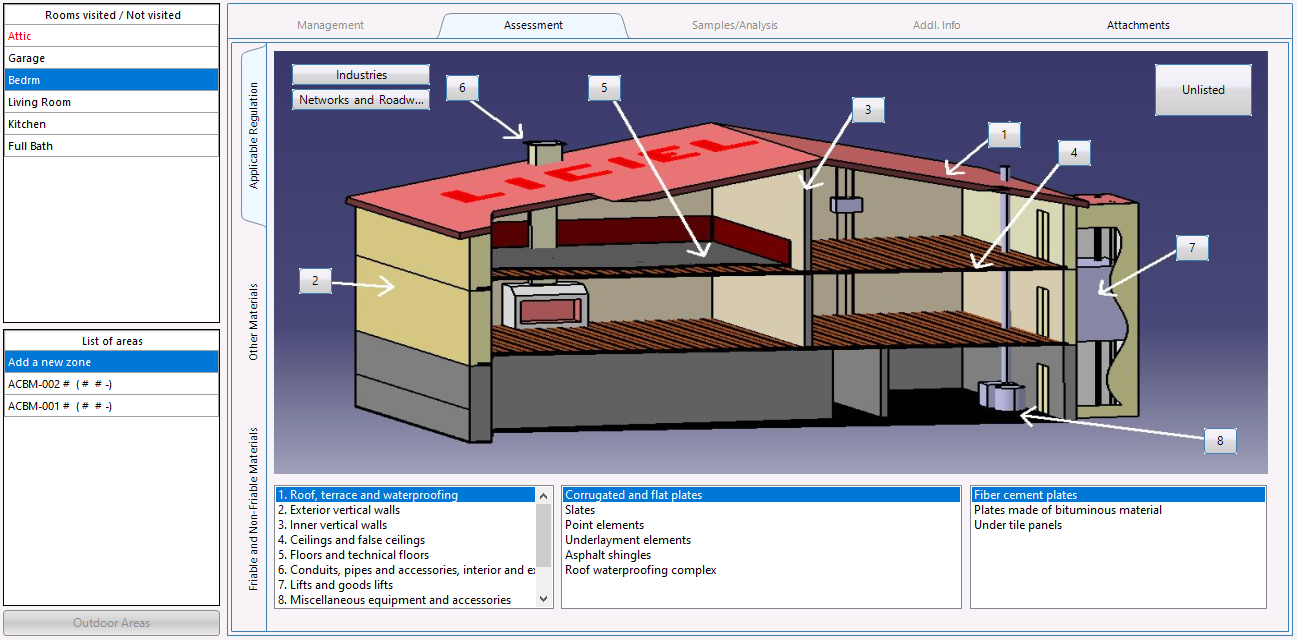
The " Location on sketch " field allows you to indicate a reference mark on your plan of the location of the material.
The " Generate number " button is used to automatically increment a number for locating the sketch.
The " Place " button allows you to place the generated number on the asbestos layer of the sketch.
The " Photo " section allows you to add a photo corresponding to your material.
-> -> See article " Photo " for the description of the selection of images.
II. A .2 "Surveys" section
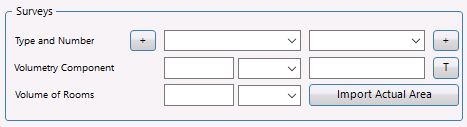
The check boxes allow you to select the type of survey carried out. Note that the field below is completed automatically. You can also enter it manually.
The " T " button Allows you to display the help for calculating the volume and tonnage of materials.
II. A .3 "Findings" section
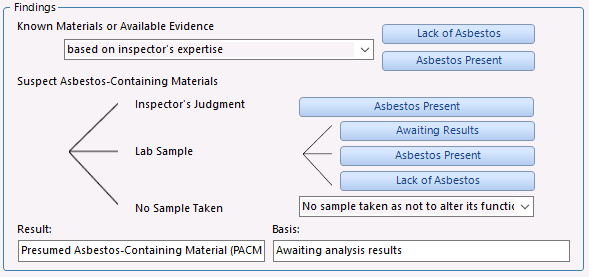
The “ Known materials or existing evidence ” drop-down menu allows you to indicate the presence or absence of asbestos in the material diagnosed.
The “ No asbestos ” button is used to indicate that there is no asbestos in the material diagnosed.
The " Presence of asbestos " button is used to indicate that there is asbestos in the material diagnosed.
The " Operator's decision / presence of asbestos " field is used to indicate that for a class A material likely to contain asbestos, you declare it in the diagnostic report as containing asbestos.
The " Laboratory / pending sample " field is used to indicate that for a class A, B, C material likely to contain asbestos you declare it in the diagnostic report as being pending laboratory results.
The " Lab sample / Presence of asbestos " field is used to indicate that for a class A, B, C material likely to contain asbestos, you declare it in the diagnostic report as containing asbestos following the analysis of a laboratory.
The " Lab sample / Absence of asbestos " field is used to indicate that for a class A, B, C material liable to contain asbestos, you declare it in the diagnostic report as not containing asbestos following laboratory analysis.
The " No sampling " drop-down menu allows you to select a justification for the absence of sampling.
The " Result " field is used to indicate the result of the diagnosis. Note that this field is completed automatically, but that it is also modifiable.
The field " Justification based on " allows the justification of the diagnosis of the material. Note that this field is completed automatically, but that it is also modifiable.
II. A .4 “Sample” Section

The " Class according to the standard to be considered for taking samples " field is automatically indicated according to the type of material selected.
The " Add a new sample " button allows you to add a sample for the material diagnosed using the following " Samples " window
The " Edit Sample " button allows you to make the necessary changes to the debit.
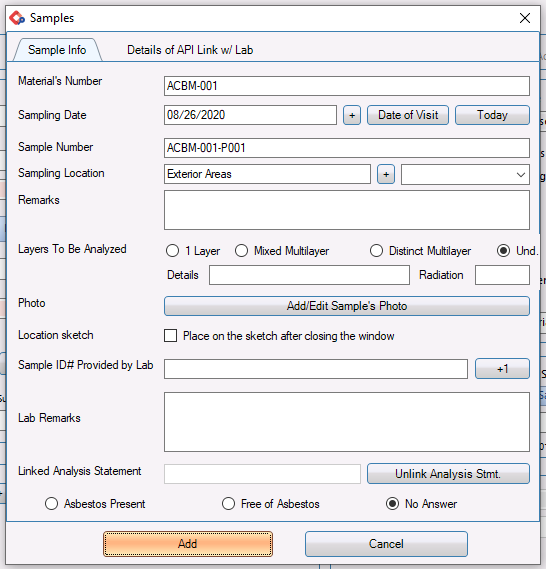
The window above allows you to enter information relating to the direct debit in the 1 st tab " Direct debit info " by filling in the fields:
- In the " Material number " field, the number you generated when identifying the material will be displayed.
- In the " Date of withdrawal " field, you can manually enter the date of the withdrawal or use the calendar made available to you by clicking on the " + " button associated with the field.
- The " Direct debit number " field automatically displays a number in increasing order of magnitude according to the number of withdrawals already made.
- The “ Direct debit location ” field indicates the location of the direct debit.
- In the " Comments»You can freely enter your observations.
- Please select the layers to analyze from the checkboxes and fill in the details if applicable in the field below. - The button “ Add / Edit Sample's photo ” in the “ Photo ” section allows you to attach an image to the material of the sample diagnosed.
- The " Sample ID # (provided by lab) " field allows you to manually enter the number received from the laboratory after having set up your asbestos bridge.
- The " +1 " button associated with the " Identification number (given by the laboratory) field)»Allows you to increase the number entered.
- If you had linked an analysis result to the selected sample, it will be displayed in the “Linked analysis report” field.
- The "Delete link to report" button allows you to delete the data from the "Linked analysis report" field.
- The check buttons allow you to indicate whether there is presence / absence of asbestos or no response.
- The "Add" button allows you to validate your modification.
If you wish to represent this direct debit, please click on the " Unlock " button and a new identifier will be sent to you.
The “ Asbestos Laboratory Name ” field allows you to enter the name of the laboratory you have chosen for your asbestos samples.
II. A .5 “Condition” section
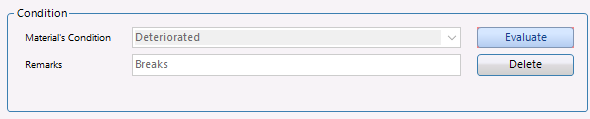
By clicking on the " Evaluate " button you access the interface below which allows you to discover the degradation score of your " Flocking, Insulation, Drop Ceilings or Other materials ".
1- Select the state of surface and degradation.
2- Select physical protection.
3- Select the air circulation.
4- Select the shocks and vibrations.
5- Visualize your score.
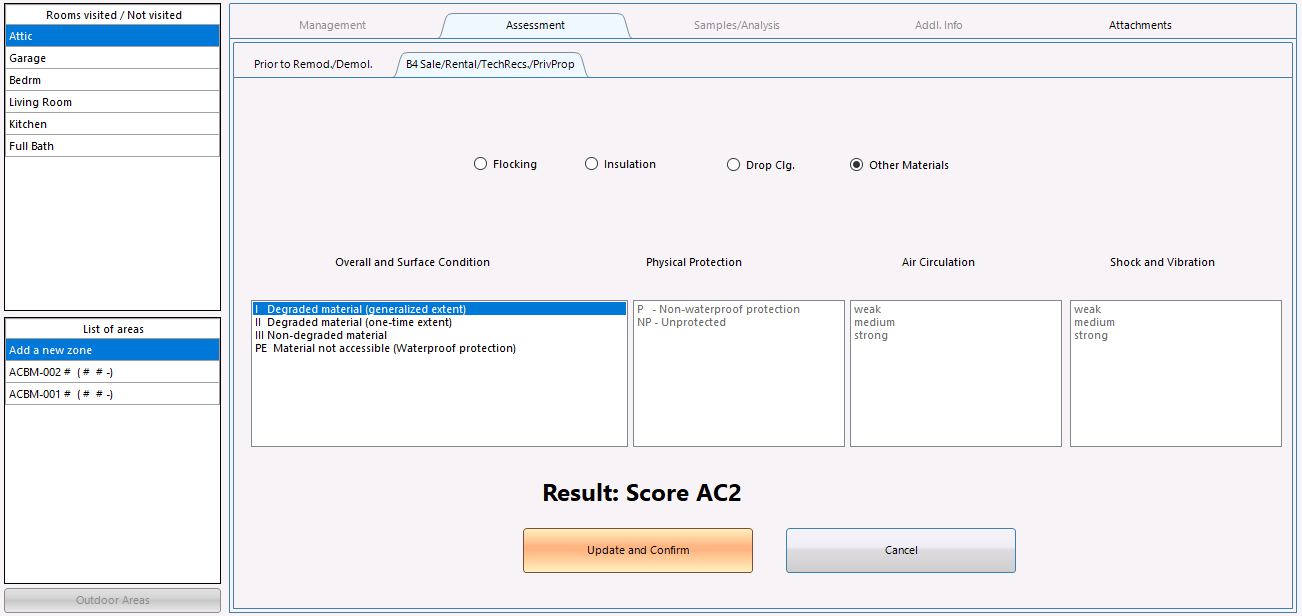
The “ Update and Validate ” button automatically fills in the “ Material status ” and “ Comments ” fields .
II. A .5 Footer

The " Validate and add to diagnosis " button is used to end the identification of the material and to add it to the diagnosis and brings you back to the "Management" tab.
If the box is checked, the button becomes: " Confirm and add (1 line per piece) " allowing to add a result per part with the assignment of "multiple" zones.
The " Model " button is used to save this numbering as a model or to load an existing model.
The button " Display survey in remarks format " allows to transfer the component in the starting "non-controllable element" of the "management" of the elements.
The " Clear identification " button is used to reset all the fields of the identification sheet.
The " Additional information " drop-down menu is used to indicate other information or remarks and recommendations on marking.
The " Cancel " button is used to remove the numbering of the component.
III. "Samples / Analysis" tab
See Wikiliciel: Asbestos Asbestos Module - Simplified Identification
IV. "Other information" tab
See Wikiliciel: Asbestos Asbestos Module - Simplified Identification
V. "Annexes" tab
See Wikiliciel: Asbestos Asbestos Module - Simplified Identification