Setup the BackOffice
I. Transfer Software Settings to the BackOffice
The LICIEL BackOffice is the perfect tool to improve your workflow automation.
The LICIEL BackOffice offers a shared calendar for saving and editing your appointments, optimized inspection routes to save time and expenses, a cloud service for synchronizing inspections made in LICIEL Software, advanced statistics to track your company’s performance, and much more!
Open the LICIEL BackOffice and enter your credentials to login.
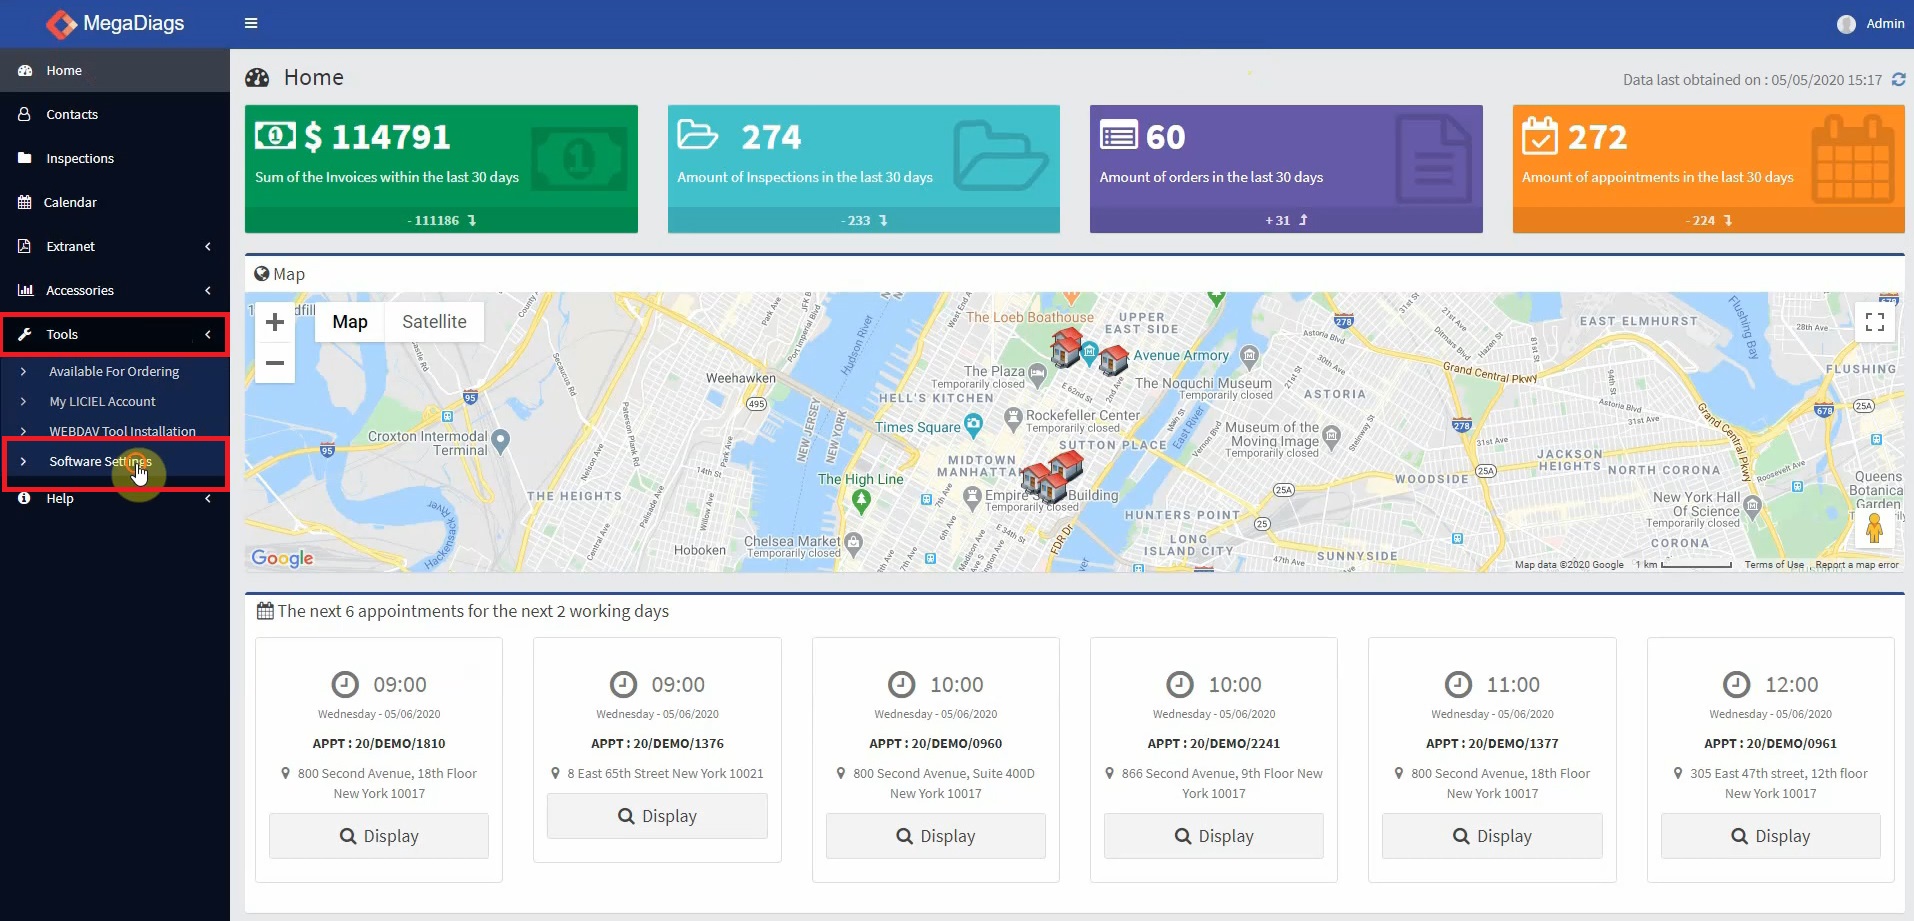
The homepage will give you a quick glance at numbers for the last 30 days.
This includes the sum of the invoices, the amount of inspections, the numbers of orders, and the quantity of appointments.
You will also have access to a map that will display the locations of the upcoming inspection appointments.
Under that you will be able to see the next 6 appointments for the next two working days.
To configure the settings for the BackOffice, click “Tools” and select “Software Settings” from the side bar.
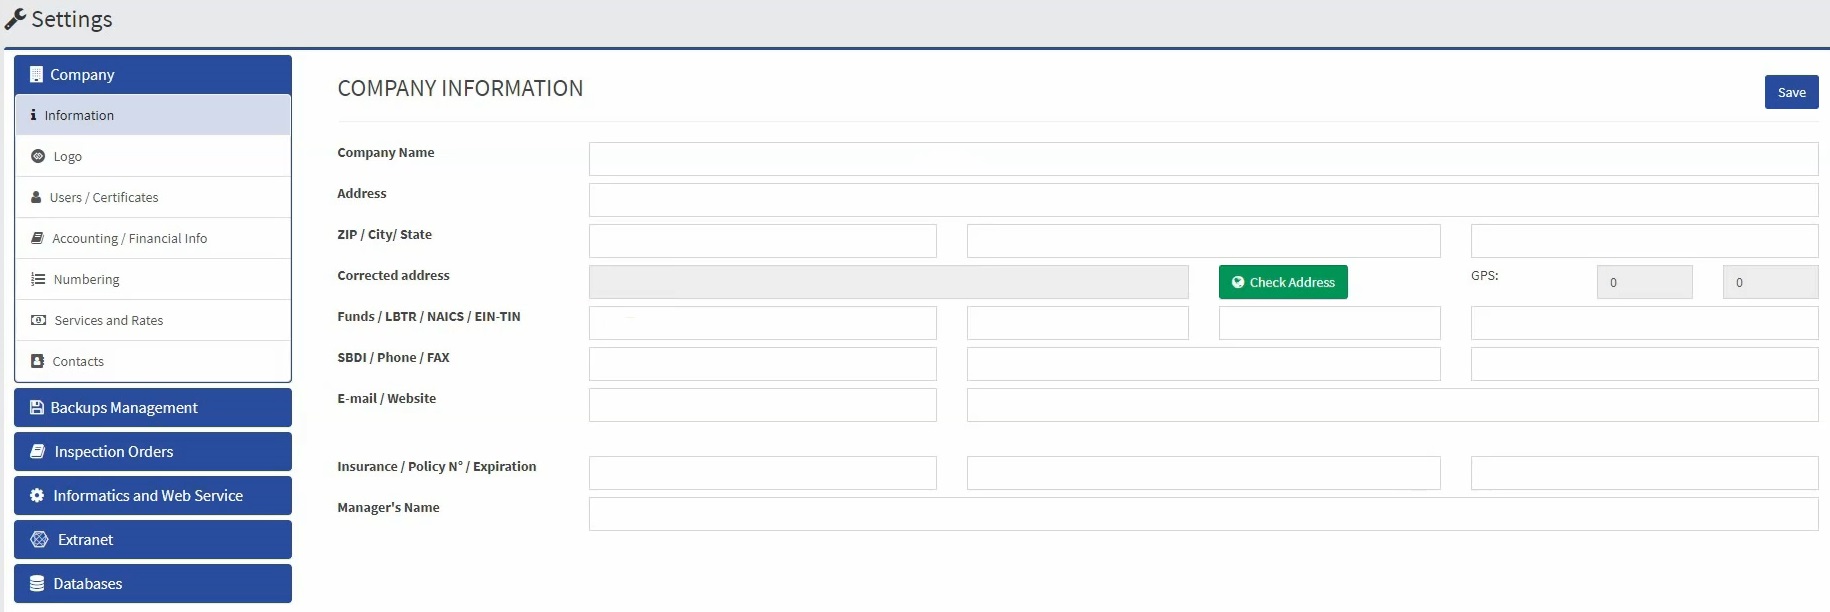
Notice that the company information fields here are the same fields that the LICIEL Inspection Software has in the software settings.
To save time, transfer the information available on the LICIEL Inspection Software via the internet into the back office.
Open your LICIEL Inspection Software.
From the toolbar, click “Tools” and select “Software Settings”.
From the sidebar, click “Backups” and select “Software Settings Section”.
To transfer your LICIEL Inspection Software settings via the internet, click “Transfer All Settings Via the Internet”.
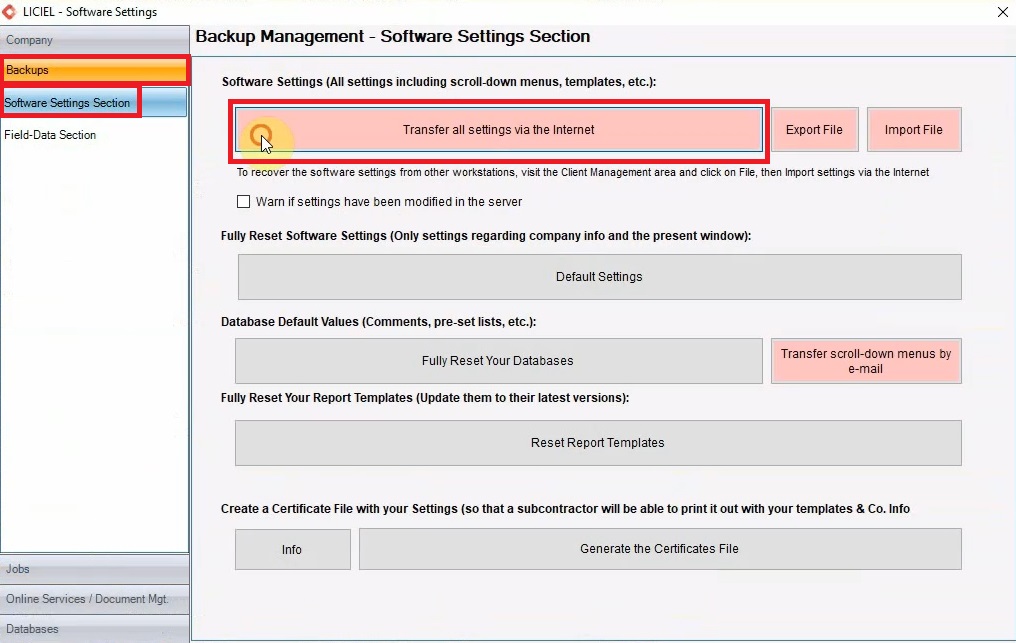
This stores things like Company Information, drop-down menus, and more.
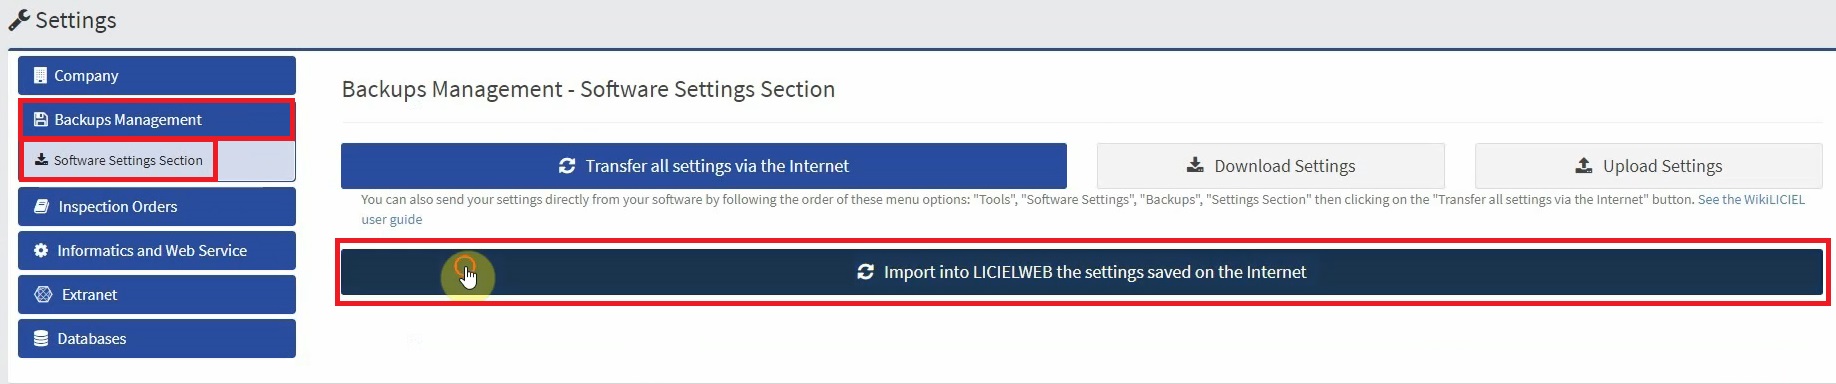
In the back office, from the sidebar click “Backups Management” and select “Software Settings Section”.
Here we will import the data that was just transferred.
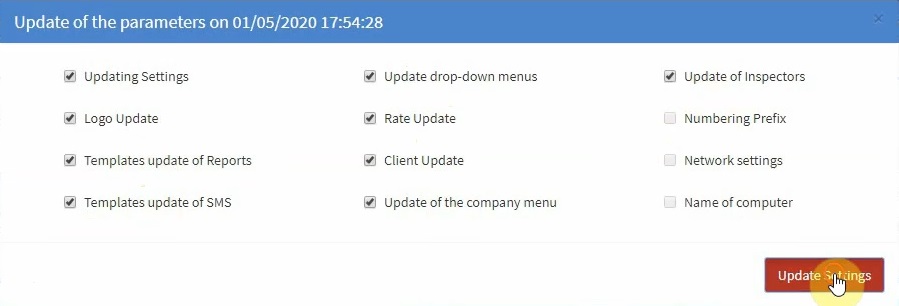
Click “Import Into LICIWEB the Settings Saved on the Internet”.
Select the settings you would like to import and click "Update Settings".
II. Company Settings
Go back to the Company Information, by clicking “Company” from the sidebar and selecting “Company Information”.
The data has been filled in with the same information that is available on the LICIEL Inspection Software.
Click "Check Address" to geolocate the company address that was imported from the LICIEL Inspection Software.
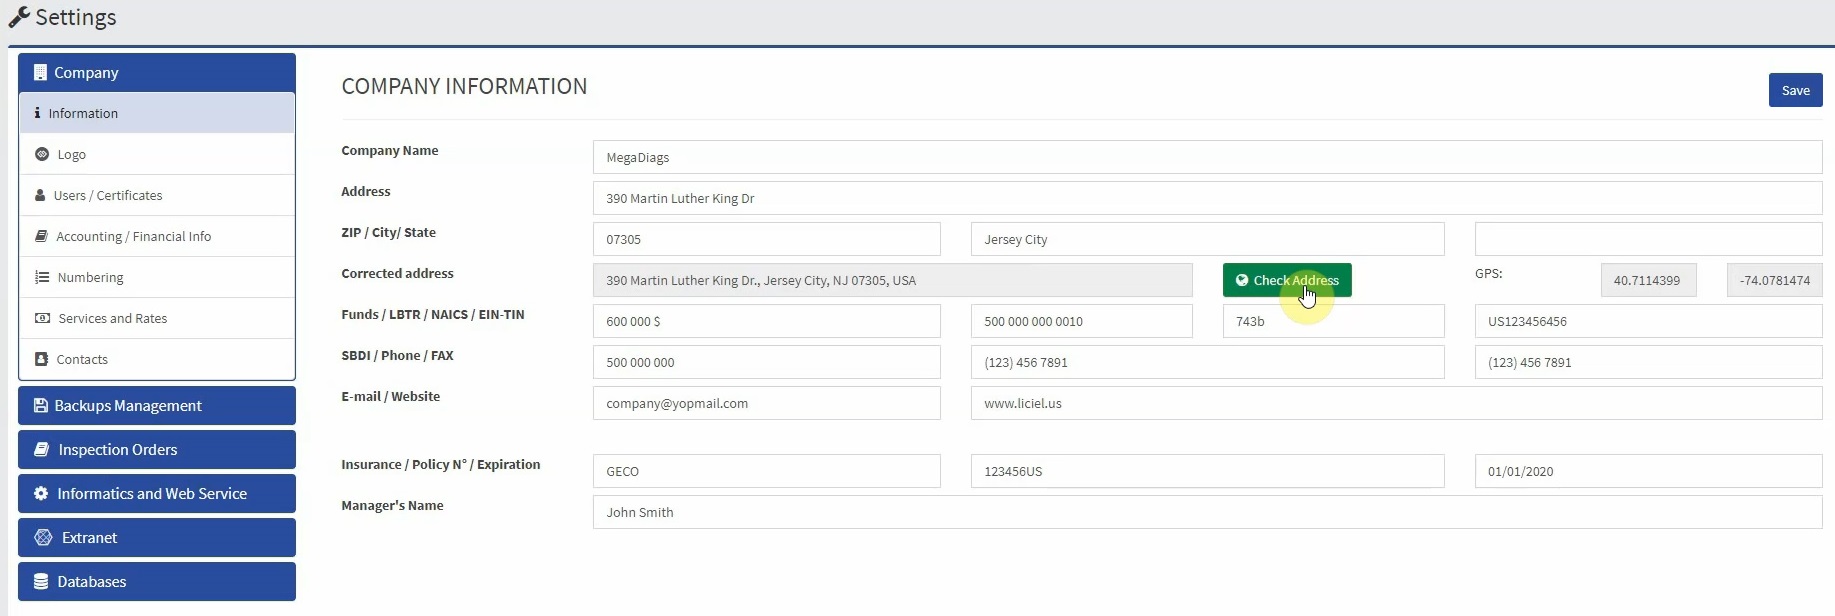
Enter your company information and click “Save”.
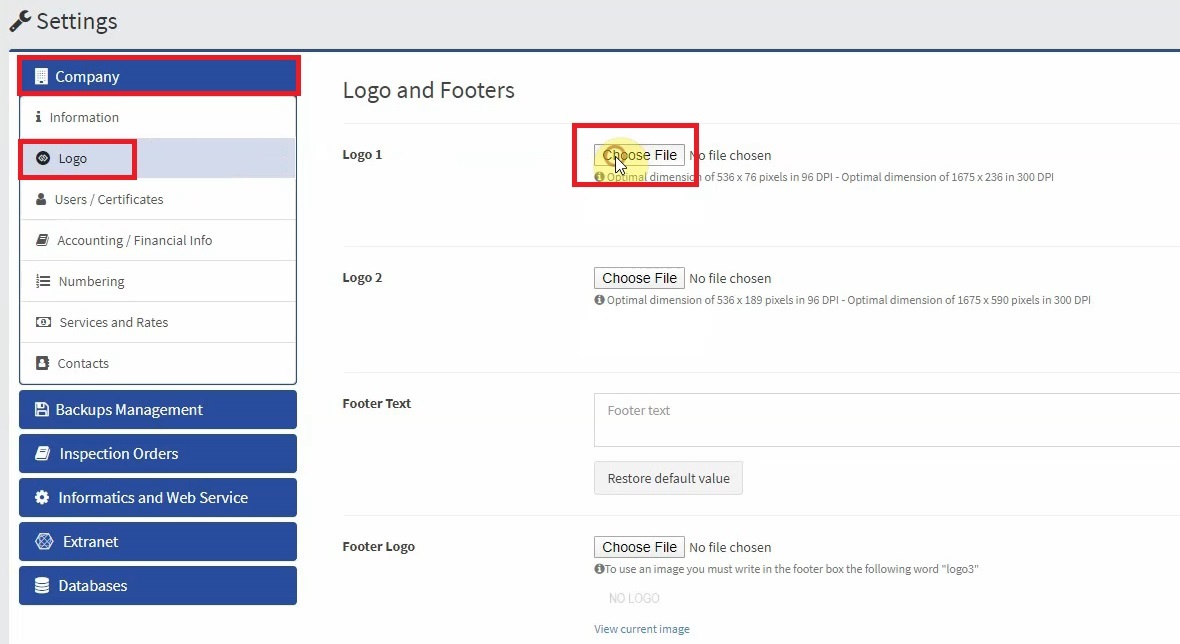
From the Settings Menu, under the “Company” tab, select “Logo”.
Notice the recommended dimensions.
Click “Choose File” to upload a new logo.
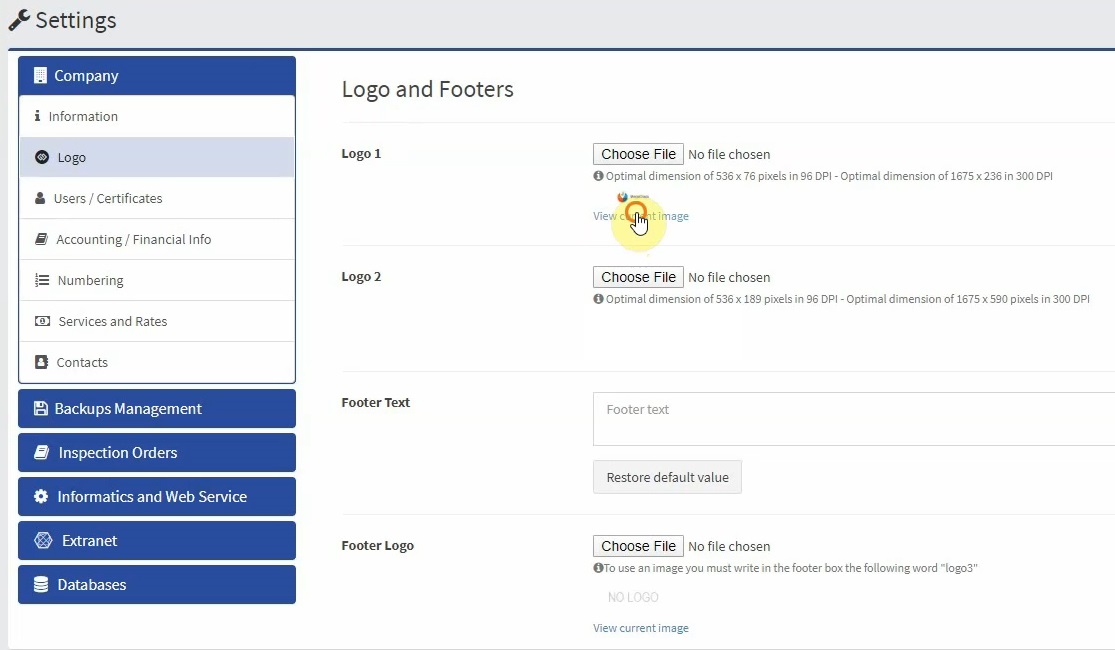
Click “Save” to save you changes.
Refresh the page.
If you click “View Current Image”, the image will open in a new tab.
From the sidebar click “Users / Certificates”.
Click the "Edit" icon to view the User information popup.
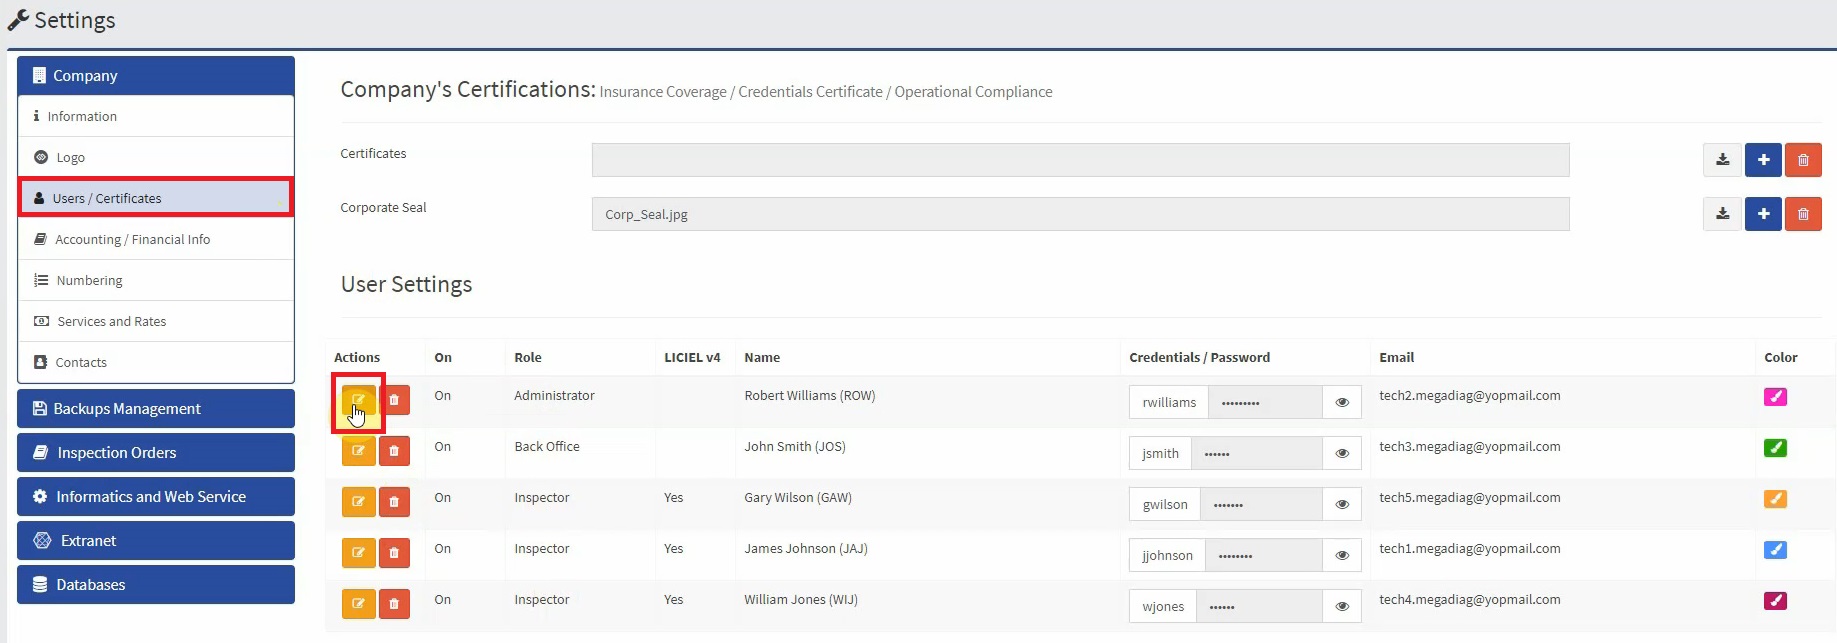
If needed, save any changes to the user by clicking "Edit".

Users can have different roles.
Different roles have different access rights.
User can be removed by clicking the "Garbage Bin" icon.
To setup important accounting information click “Accounting / Financial Info” from the sidebar.
This area lets you setup how to display monetary figures and store important information regarding the business finances.
Select “Numbering” from the sidebar.
Similar to the software, you may use or list of codes to generate the report numbers, invoice numbers, and more.
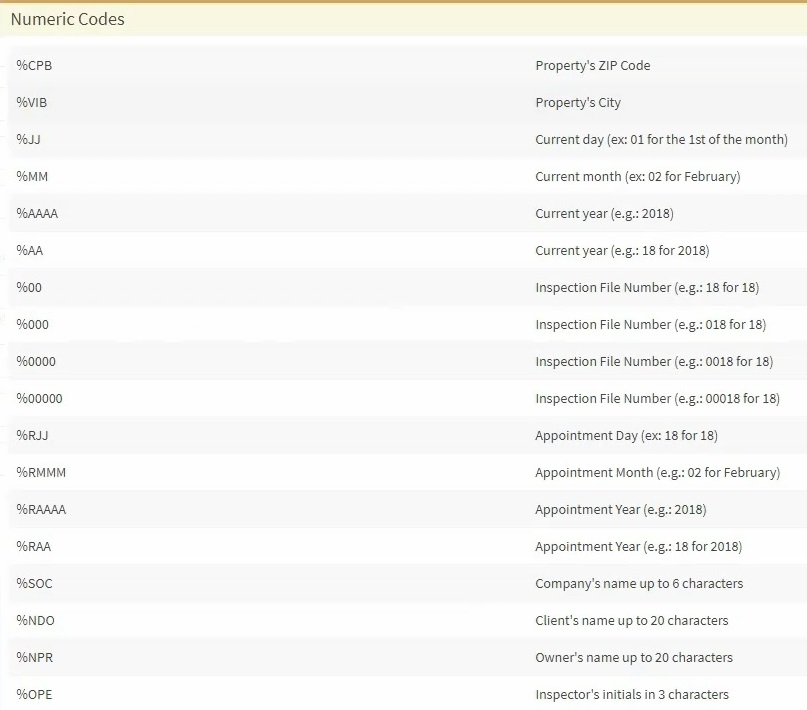
Click “Available Codes” to view the list of codes.
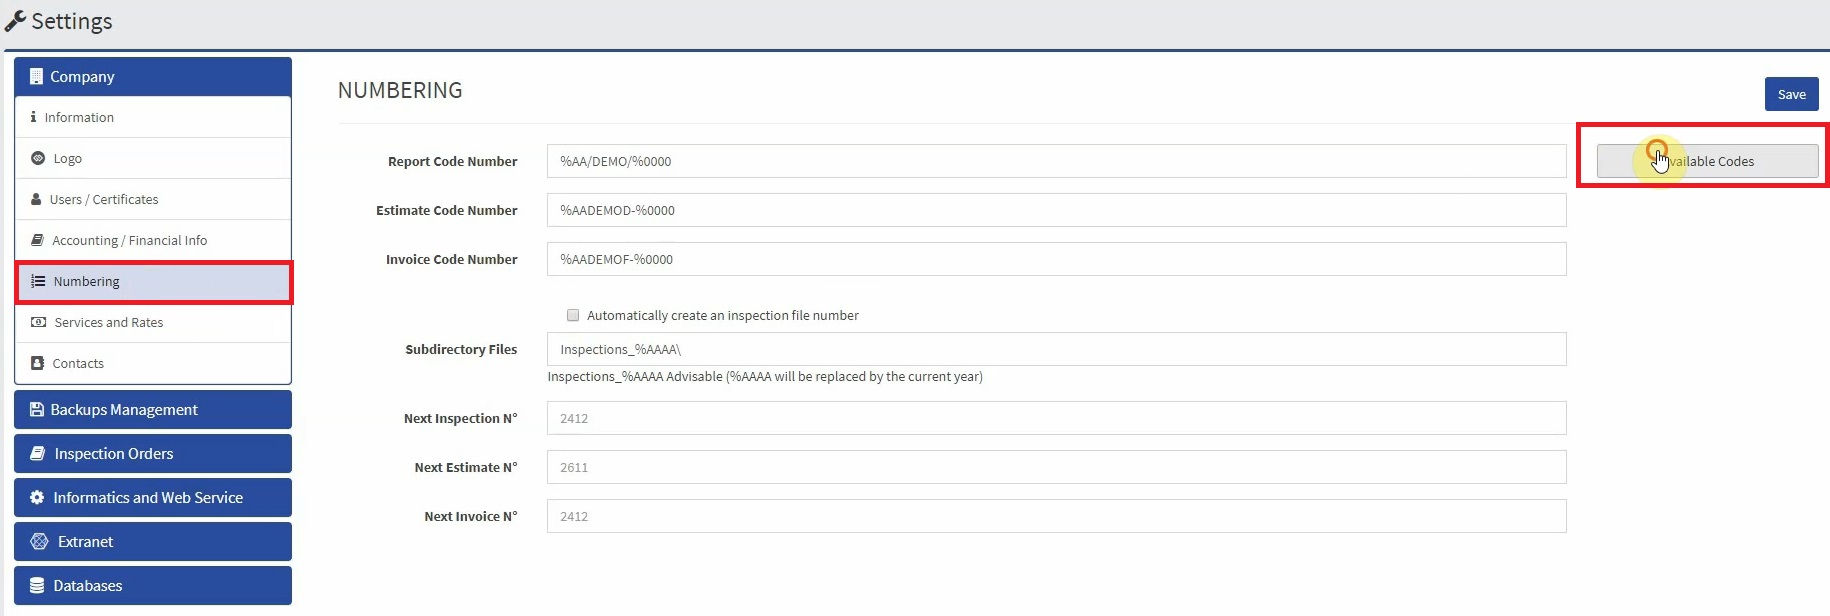
Next to each code, you will see a description.
For example, if you would like the report number to have the initials of the inspector, highlight the code, percentage sign included, and copy it by right-clicking the mouse and selecting “Copy”.
Close the numeric code popup and paste the code where you would like it.
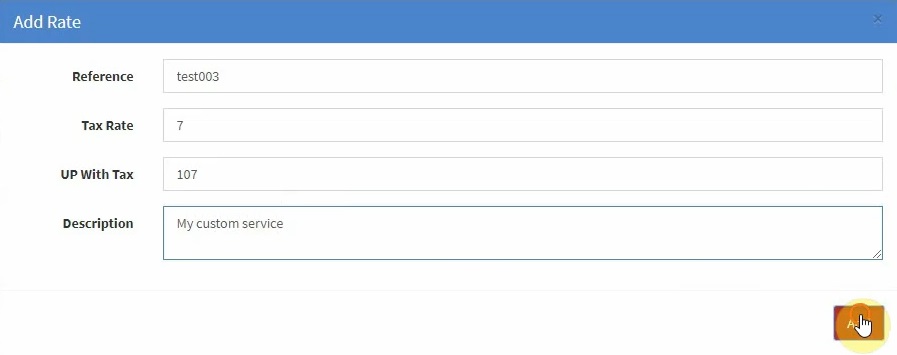
From the sidebar, click “Services and Rates”.
When creating an invoice, you will be able to select items from this list.
To add a new item, click “Add”.
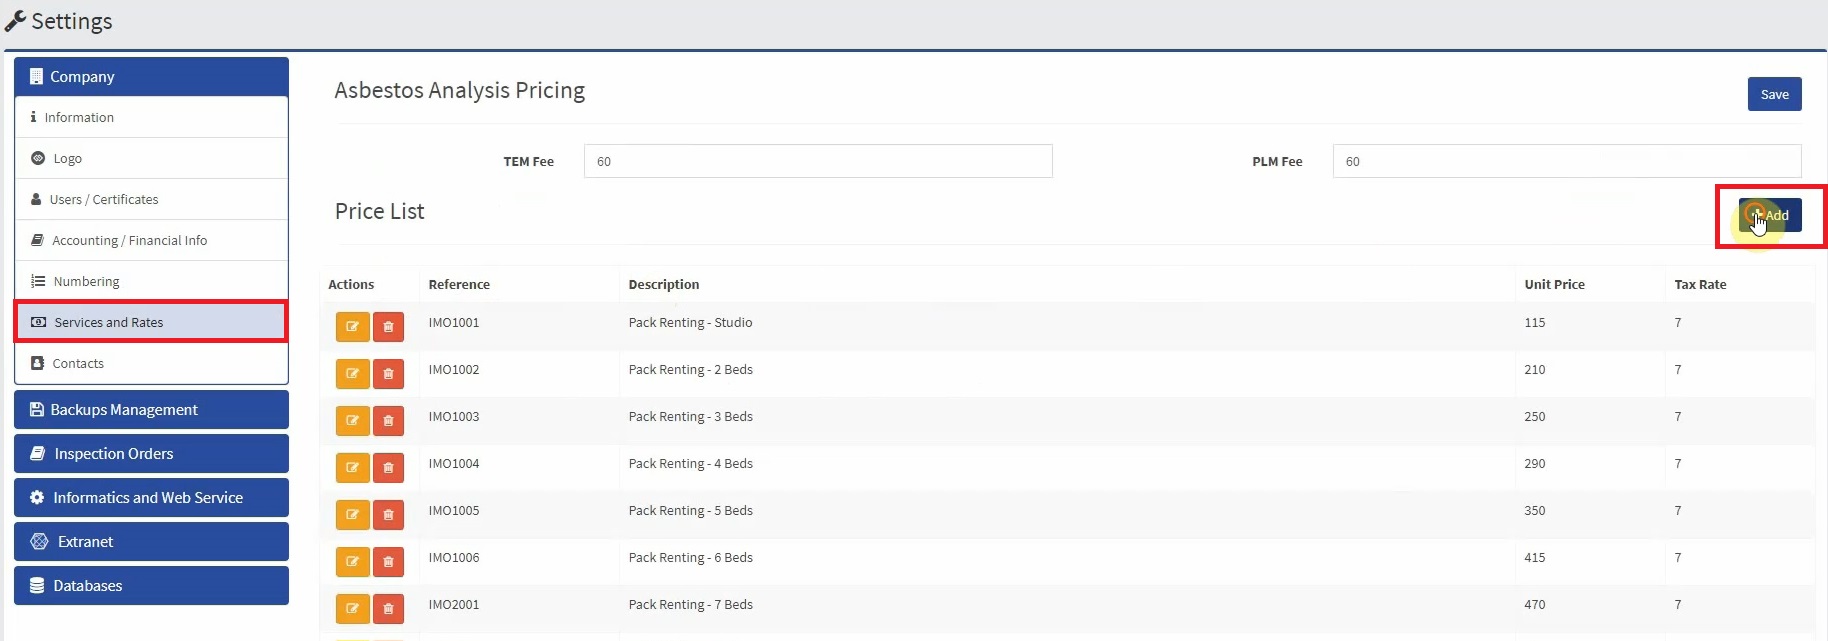
Enter a reference number, the tax rate, the unit price with tax, and a description for the item.
Click “Add” to add the service to the list.
Items in the price list may be edited by clicking the edit icon.
Items can also be deleted by clicking the garbage bin icon.
Click “Contacts” from the sidebar.
Import contacts from your LICIEL Inspection Software or export your contacts easily.
The contacts will be exported into an Excel file that can easily be imported by Gmail or Microsoft Outlook.
III. Backups Management Settings
Continuing with the setup, click “Backups Management” and select “Software Settings Section”.
For consistent and uniform results we give you the option to store your settings.
This makes it easy to have the same settings on all of the machines with the LICIEL Inspection Software.
Transfer settings including company information, logos, drop-down menus, and more.
For example, if you update the company logo here in the back office and would like the logo to be transferred to the LICIEL Inspection Software, click “Transfer All Settings Via the Internet”.
Similarly, if you change your company phone number on your LICIEL Inspection Software, you can transfer those settings to later be uploaded into the software.
To upload settings INTO the Backoffice, click “Import Into LICIWEB the Settings Saved on the Internet”.
To save a backup of your settings onto your computer, click “Download Settings”.
This file can later be uploaded by clicking “Upload Settings”.
IV. Inspection Orders Settings
From the sidebar, click “Inspection Orders”.
Then, select “Appearance”.
Customize the appearance of your back office here.
Use the color picker to choose a color for the top bar or enter the color manually into the box.
To add a logo of your choosing, click “Choose File” next to Application Icon.
This will be visible in the top left corner of the back office.
You can also change the favicon which is the icon shown by the browser, typically in the tab above the address bar.
V. Extranet Settings
Click “Extranet” from the sidebar and select “Display”.
Notice that these are the same exact settings that are available from the “Extranet”.
If you have already setup your “Extranet” settings, you will see that information here.
For example, the logo was set in our “Setup the Extranet” video, therefore it is visible here in the “Extranet” portion.
Changing the “Extranet” settings from here will update the “Extranet” settings.
To go through the “Extranet” settings in detail, watch out “Setup the Extranet” video available on Liciel.us.
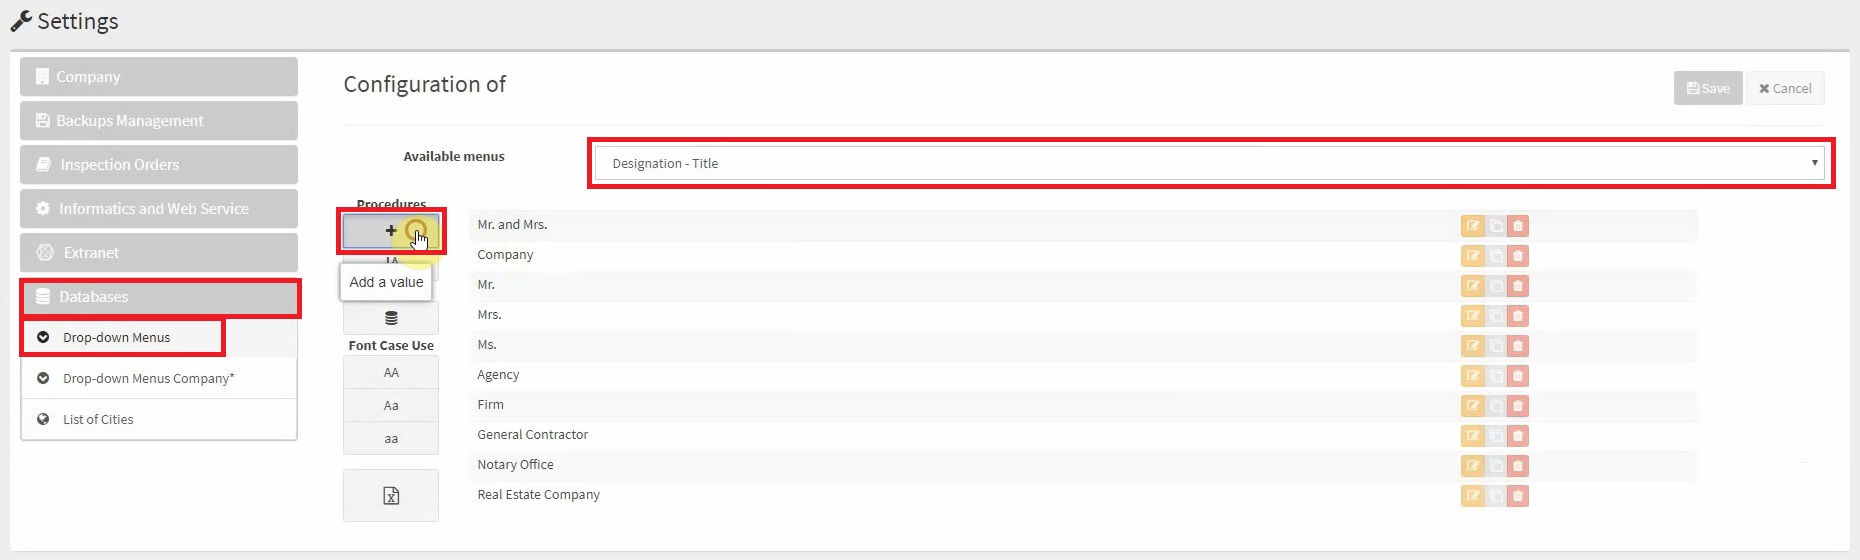
VI. Databases Settings
Finally, from the sidebar click “Databases” and select “Drop-down menus”.
These are the drop down menus available to you as you create an order or move through an inspection.
For example, the “Designation –Titles” drop down.
These are the prefixes for contacts.
Modify the lists easily.
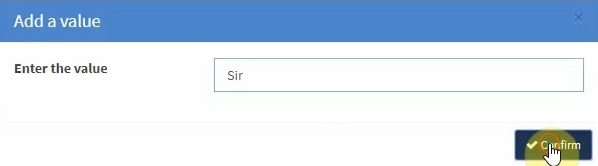
To add a new item to the list, click the “Plus” sign.
Enter a value and click “Confirm”.
To remove an item from the list, click the “Garbage Bin” icon next to the item you would like to delete.
Edit an item by clicking the “Edit” icon next to the item you would like to edit.
Click “Save” to save your changes.
Notice that these are the same lists available on the LICIEL Inspection Software.
Make any changes to this list available on your LICIEL Inspection Software by transferring the settings to the internet using the “Backups Management” tab.