|
|
EXTRANET, Online office |

0. Identification
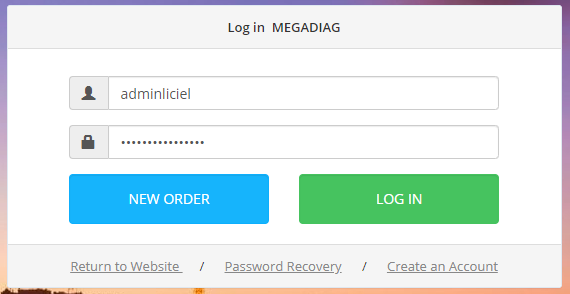
Access to the site is via a secure connection using a username and password.
To identify yourself, fill in the User and Password fields.
(which were sent to you when you registered).
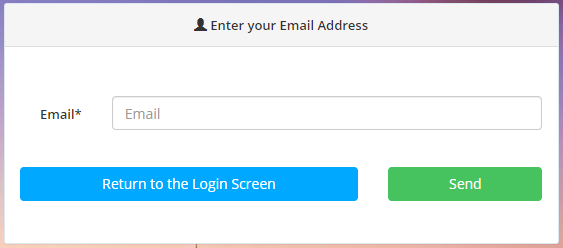
To retrieve your Password, click on Forgot password? and enter his email address
I. Home

The summary banner shows the number of files, orders and contacts as well as the total amount of outstanding payments
They are also buttons for quick access to the folders, commands and contacts menus.
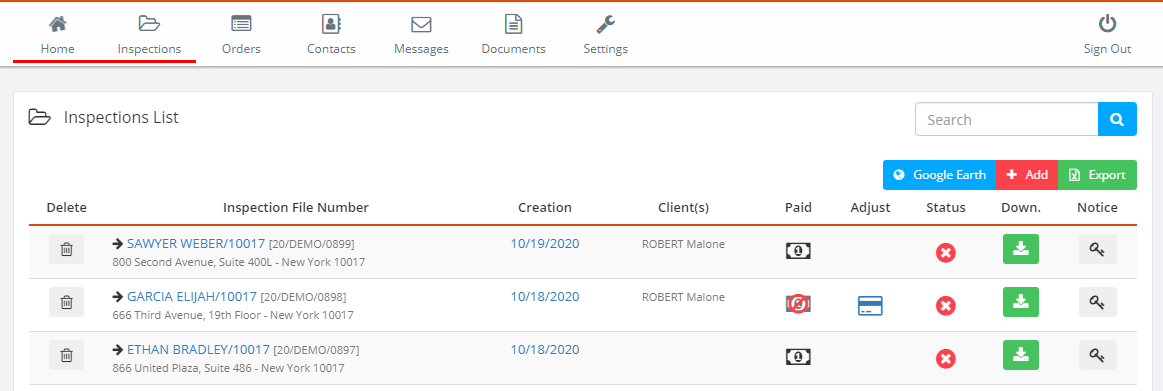
II. The Inspection Files
“Inspections” menu : Used to display the list of folders.
"Add" button: It allows you to add a new folder.
"Export" button: It allows you to export the list of files in Excel format.
When you have several online files, a page navigation system is activated.
To export the list of files click on the button of the same name.
Use the search bar to refine your search.
The states :
 Not downloaded
 Downloaded
 Partially downloaded
Online payment is available via the logo![]()
Notify the customer of the availability of the file by email
II. 1 Search for folders
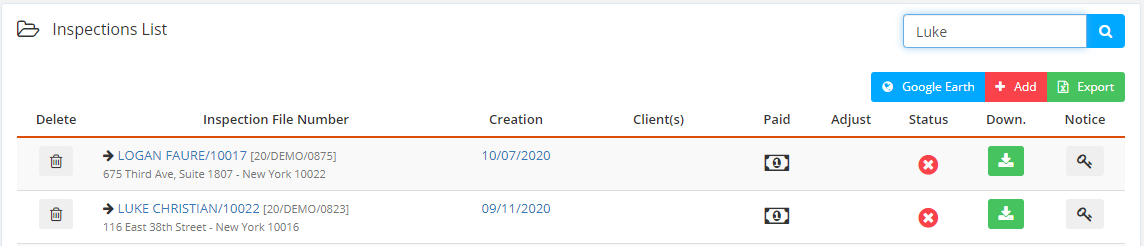
Using the search box, you can display the folder (s) containing one or more thermal baths.
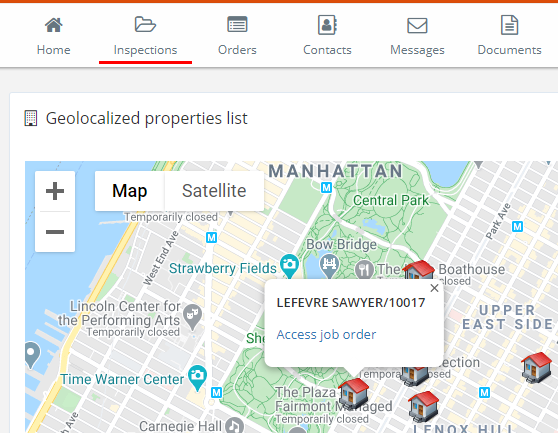
II.2. Geolocation
Clicking on GOOGLE EARTH allows you to view the properties on a map.
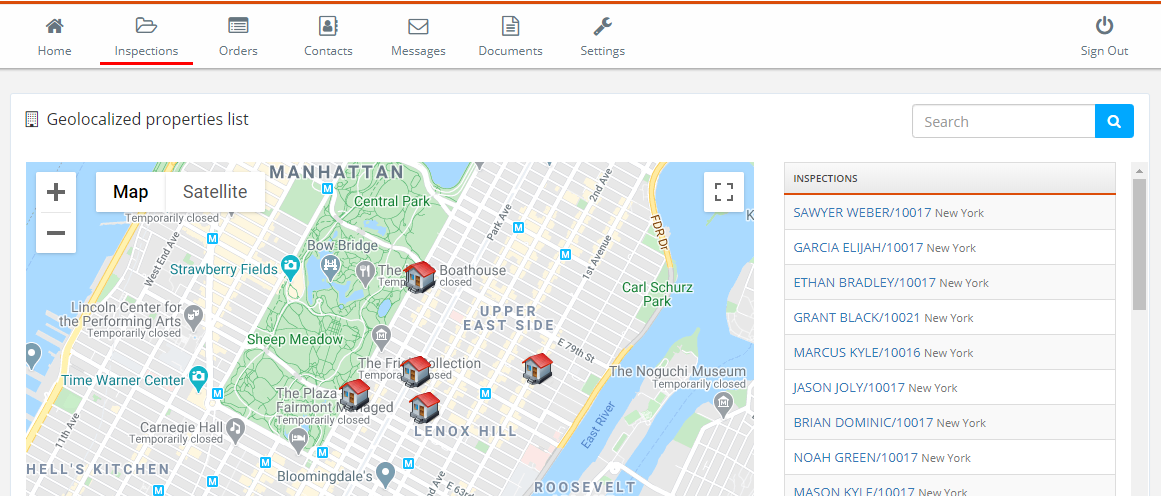
Select an asset and access the folder
II.3. New Inspection File
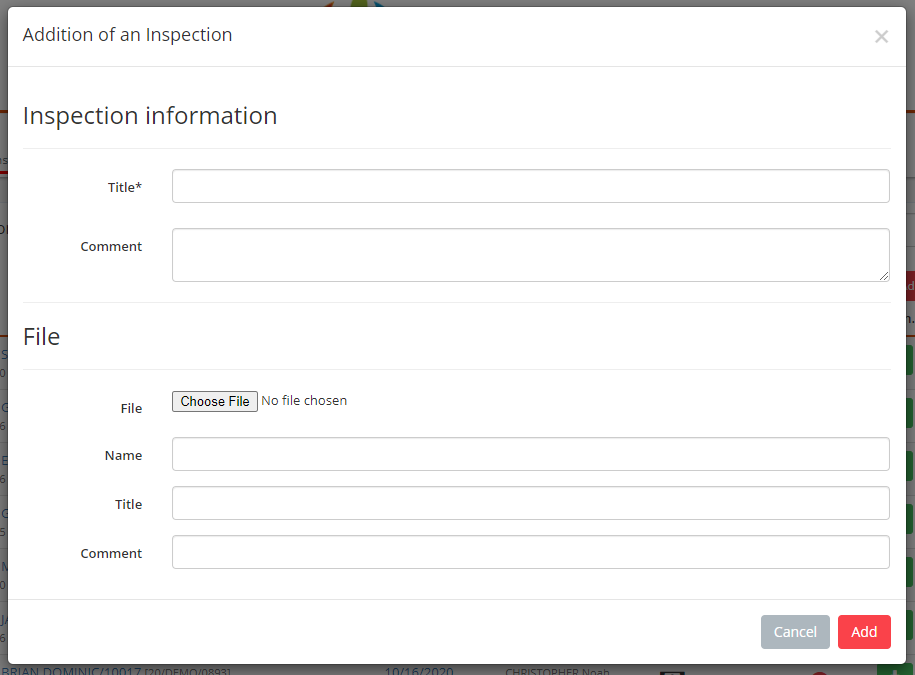
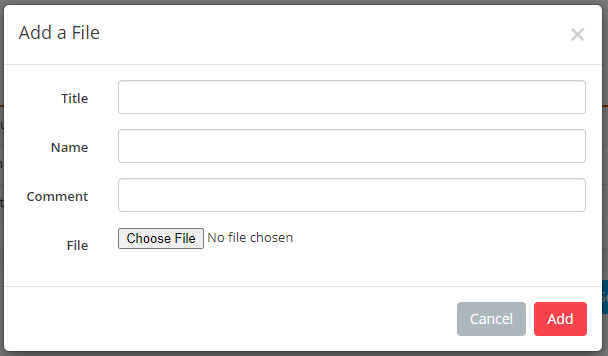
Fill in the following fields to create a new file
-
- Title
- Comments
- Attach a file to the folder
- Give a name to the attached file
- Give a title to the attached file
- Leave a comment
II.3. Contents of the inspection file
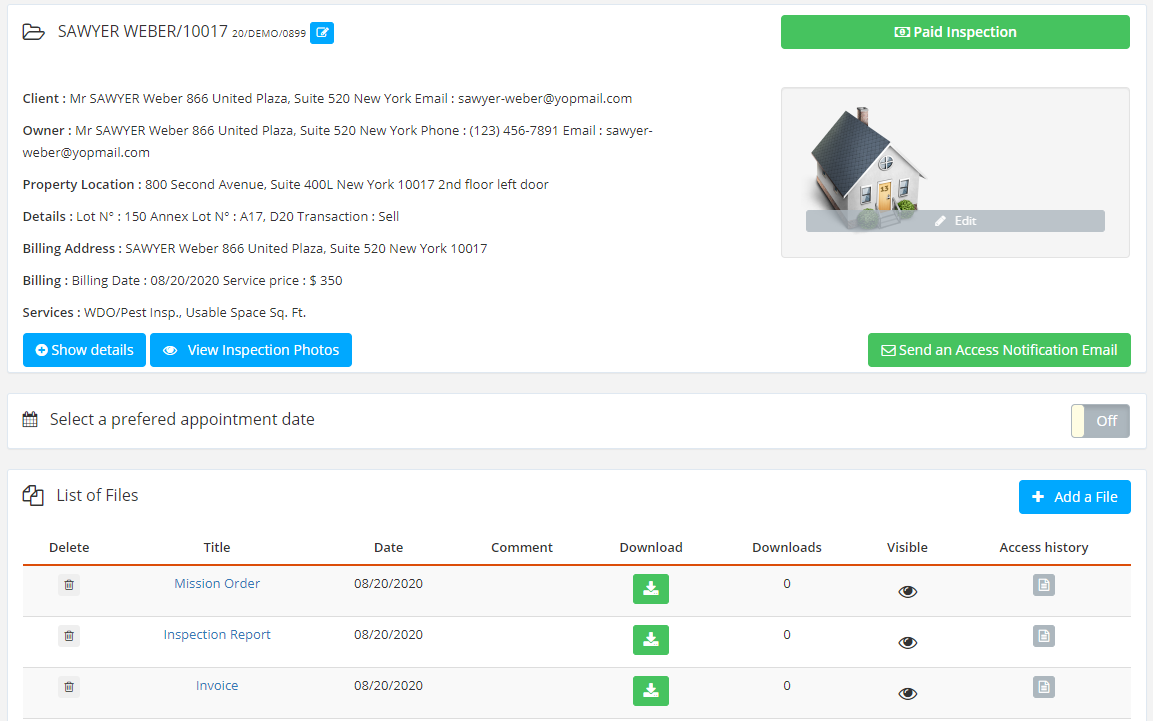
This insert contains all the information concerning the file sent by Liciel Diagnostics.
II.3.1 Show details / Hide details:
Click Show Details to show or hide folder information including:
- Payment status
- The list of people with access to the file
- The list of stages
- The list of files
- Messages sent
II.3.2 Send an Email
Click on Send a message about this file

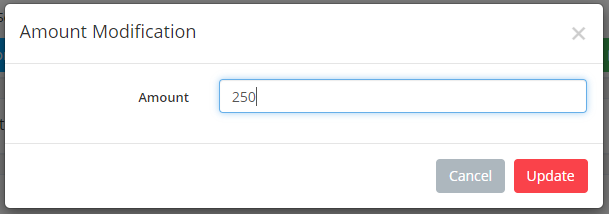
II.3.3 Modify the amount in Payment status
Click on Modify the amount
II.3.4 Add occasional access

Click on Add and select a Name from the list as below:
II.3.5 The list of files
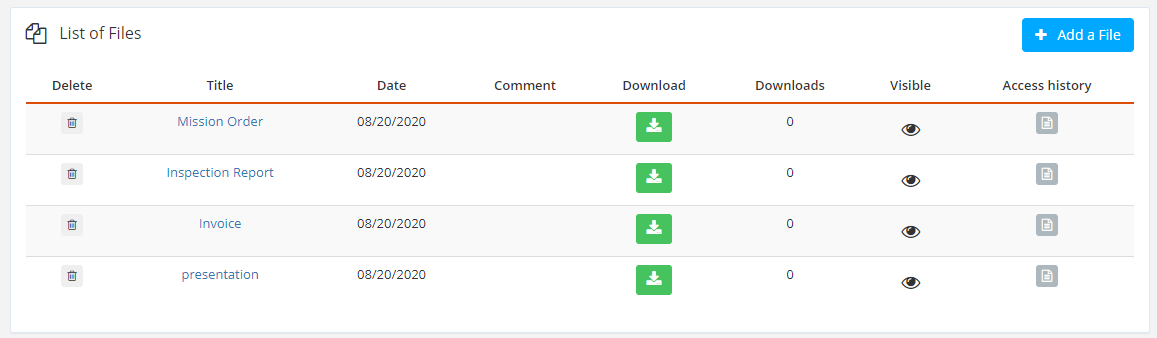
You can delete or add a file, download it either by clicking on the title or the “Download” icon, see the number of times the file was downloaded, view the status and access history.
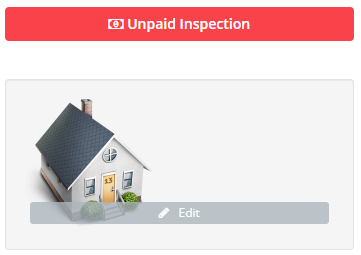
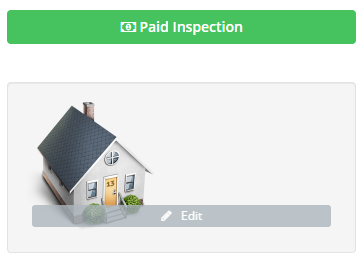
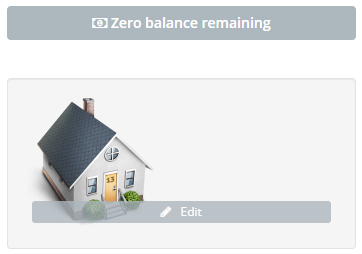
II.3.7 Filing a paid / unpaid case
Click on the paid file button in green to change it to unpaid.
|
|
|
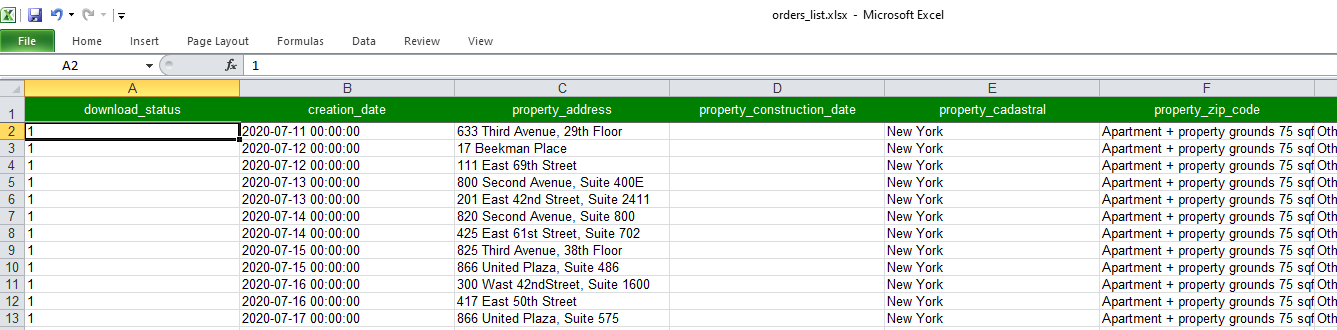
III. The Orders
“Orders” menu: It is used to manage the list of diagnostic commands passed by the site.
"Add an inspection order" button: It displays the new order form.
"Export" button: It allows the list of commands to be exported in Excel format.
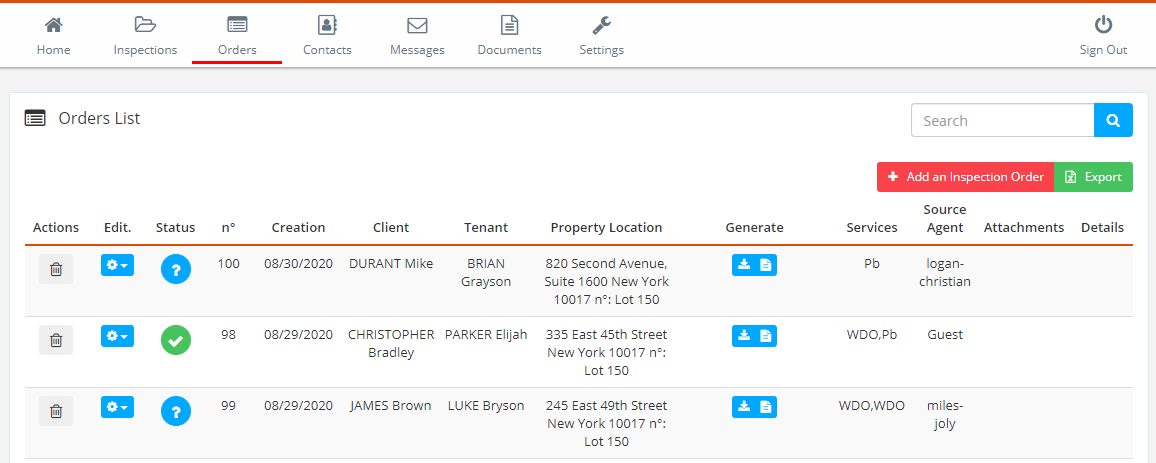
We have three order states
 To Process To Process |
 Validated (with the date and time of validation by passing the mouse over it) Validated (with the date and time of validation by passing the mouse over it) |
 Cancelled Cancelled |
Download links are provided.
 .Liciweb (to import it directly into V4) .Liciweb (to import it directly into V4) |
 .docx .docx |
III.1 Search for an order
Use the search bar to display the desired command.
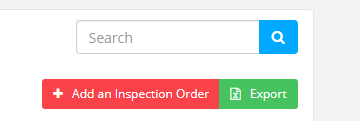
III.2 Export the list of orders to Excel
III.3 Add an order
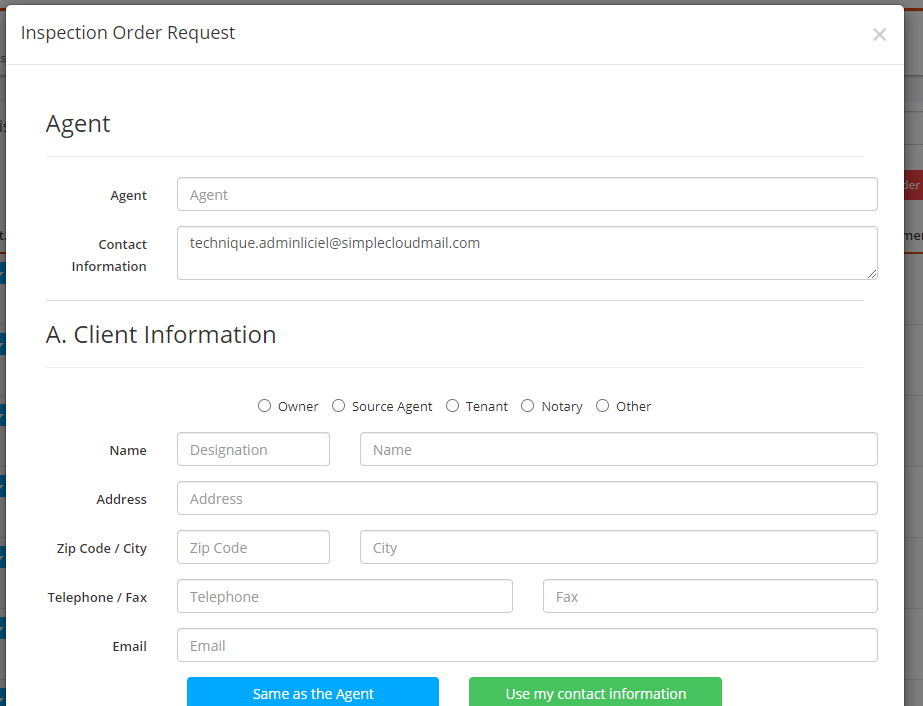
Click on Add to create an order and fill in all the fields. This remains identical to the V4 software. The order, once validated, will go into "to process".
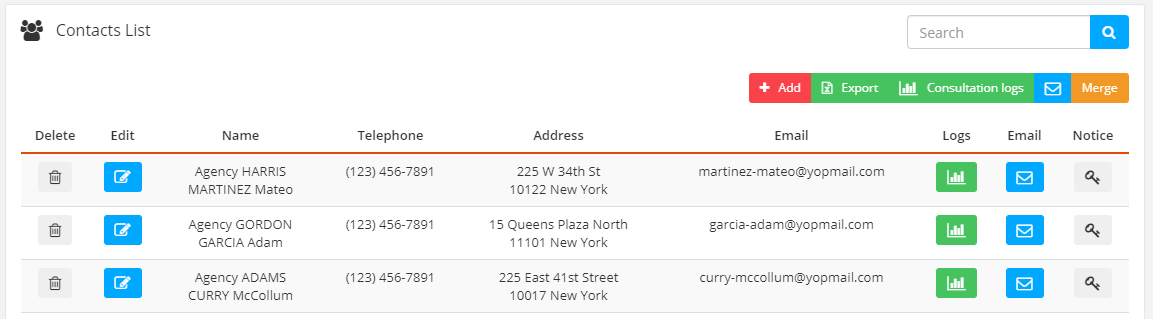
IV. Contacts
“Contacts” menu: It allows you to manage the list of your contacts who have access to the site.
"Add" button: This allows you to add a new customer.
"Export" button: It allows you to export the list of contacts in Excel format.
IV.1 Create a Contact
Click on  to create a contact.
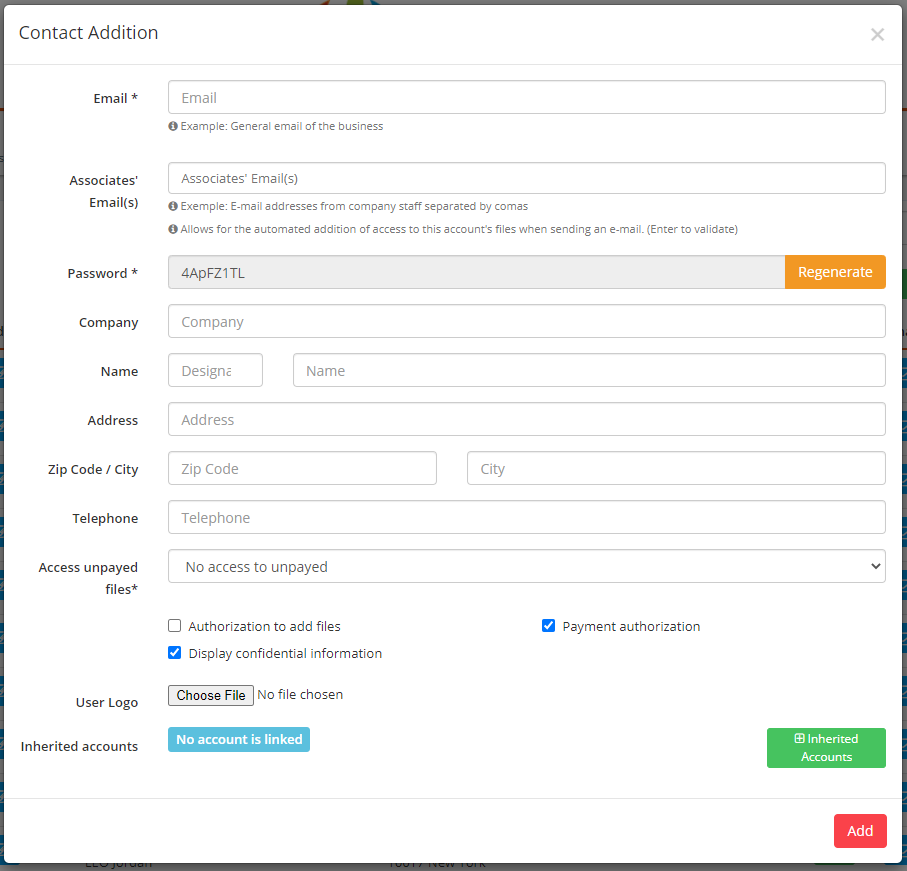
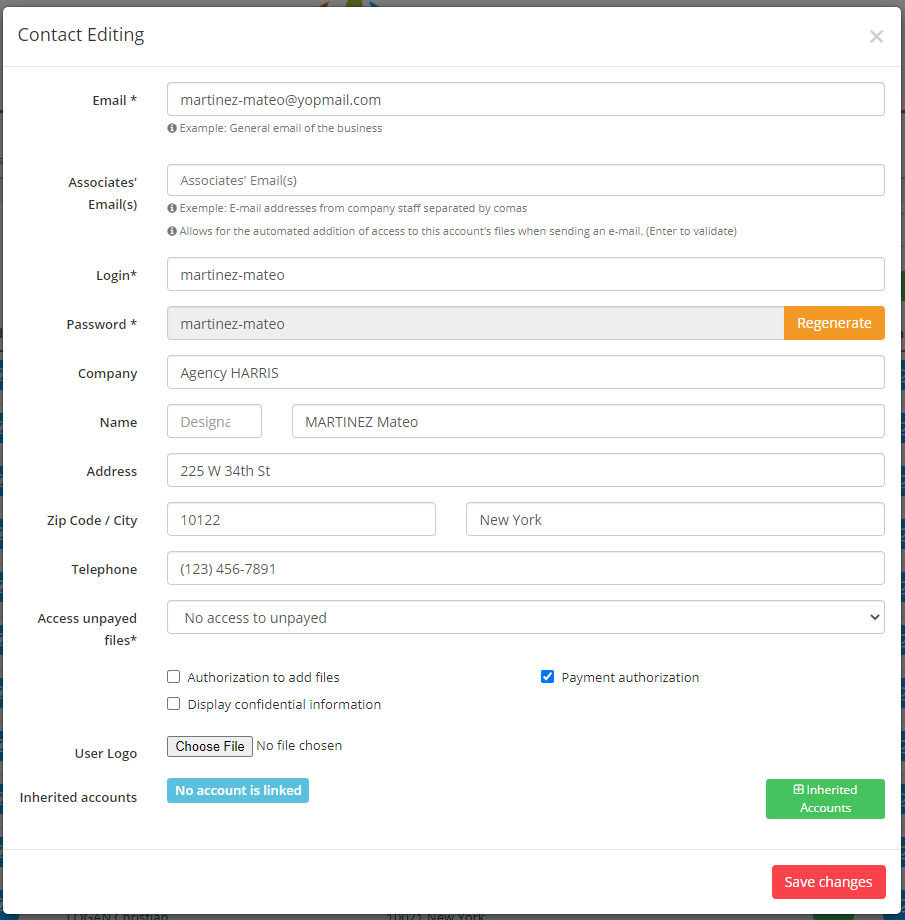
"Email" : Indicate the email address of the real estate agency. The various messages will be sent to him at this address if he is in the order of assignment and is chosen as contact for sending EXTRANET.
"Associates Email (s)" : Put the email addresses of employees / salespeople working in the real estate agency.
Used to automatically add access to the folder to the main account when sending an email to one of the addresses listed above.
"Password" : Used to connect to the My account area . For security reasons, the password is generated automatically.
"Inherited Accounts" : Allows, when creating a new account, to copy the rights and access to the folders of another account.
IV.2 Send access codes
To send the access codes by email to the customer click on 
IV.3 Delete a contact
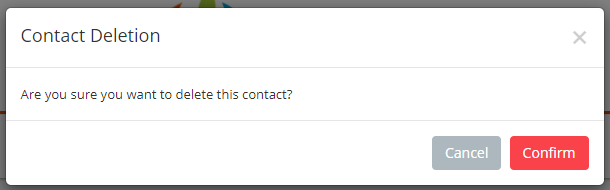
To delete a contact, click on the recycle bin.
IV.4 Send an email
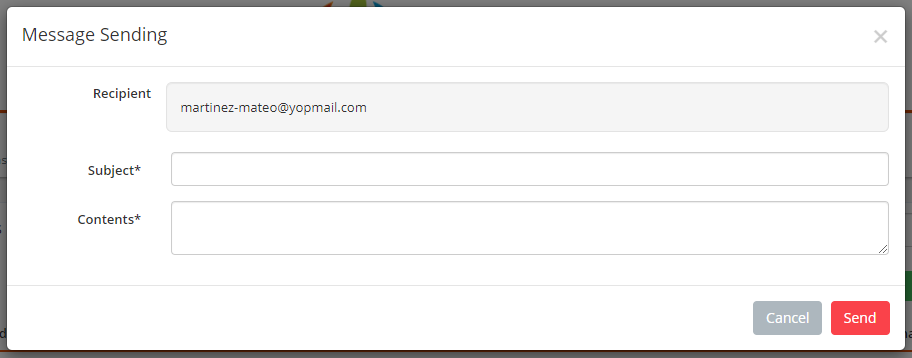
Click on  to send an email
IV.5 Export a list of file consultations

Click on  to export a list of file consultations
IV.6 Modify a contact
Click on  to display the modification page
IV.7 Search for a contact
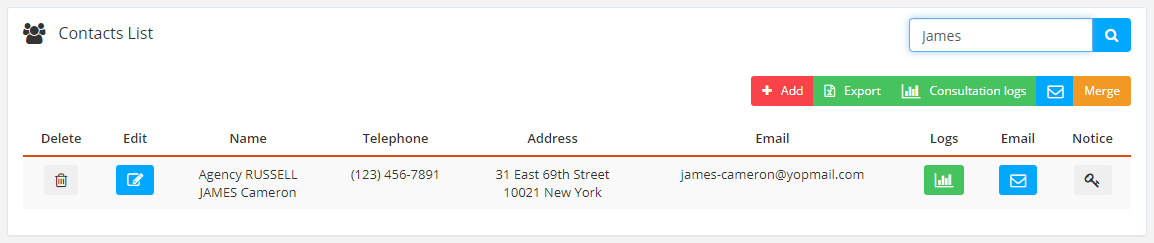
The search tool allows you to display the desired contact.
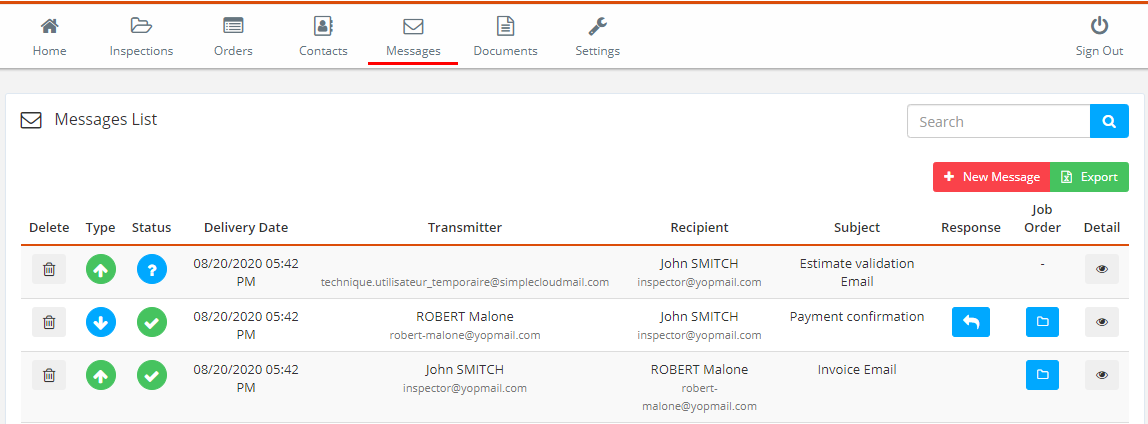
V. Messages
“Messages” menu : It allows you to manage the list of messages you have sent to your customers.
“New Message” button: This allows you to write and send a new message.
"Export" button: It allows you to export the list of messages in Excel format.
V.1 Display page
 Email sent
 Email received
We have three email states.
 To consult
 Consulted
 Canceled
To view messages
V.2 Reply to a message
To reply to a received email, click on
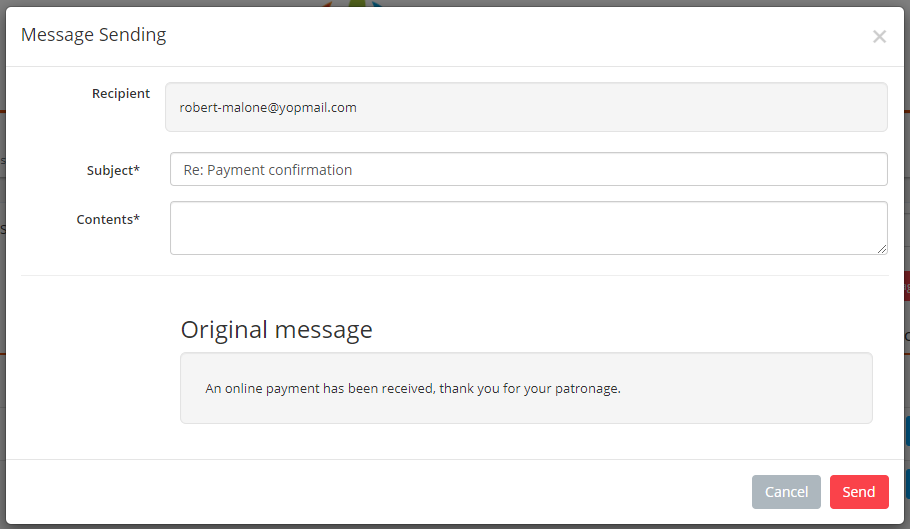
The original message is visible in the lower part of the window
V.3 Create a new message
Click on
By going to select a recipient, you will access the drop-down list.
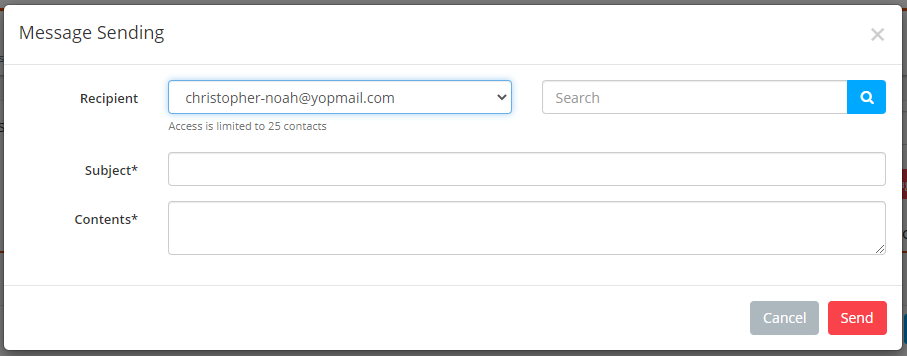
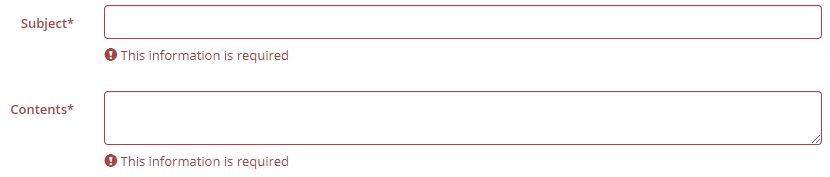
The message cannot be empty and must contain the subject.
VI. Documents
"Documents" menu : Used to manage the list of attestations and certificates made available on the site
VI.1 User manuals

To view different records click on the "View" button
VI.2 Software
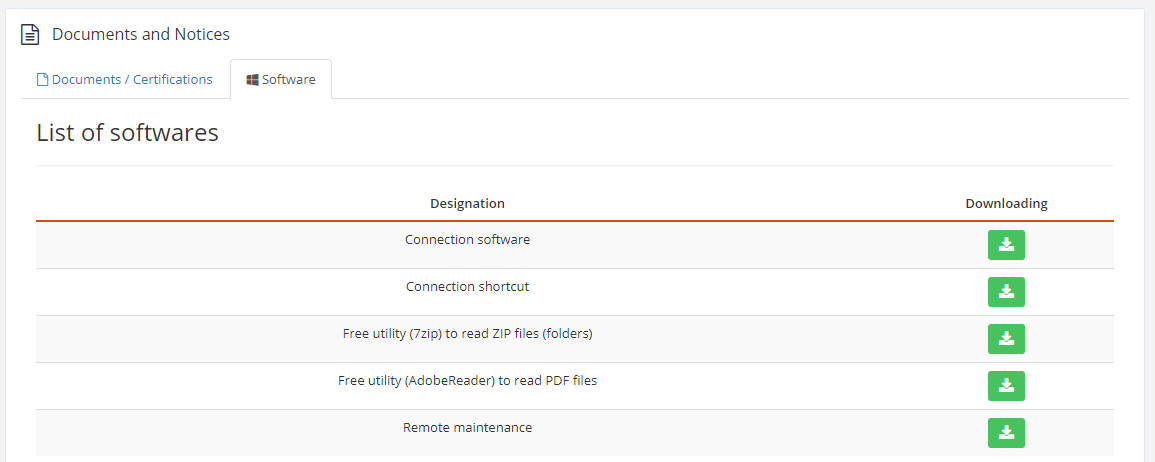
Several downloads are available to you:
- Direct access on your desktop to LiciWeb
- File / document compression / decompression software
- A PDF viewer
- Remote control software (for the software technical service)
VII. Settings
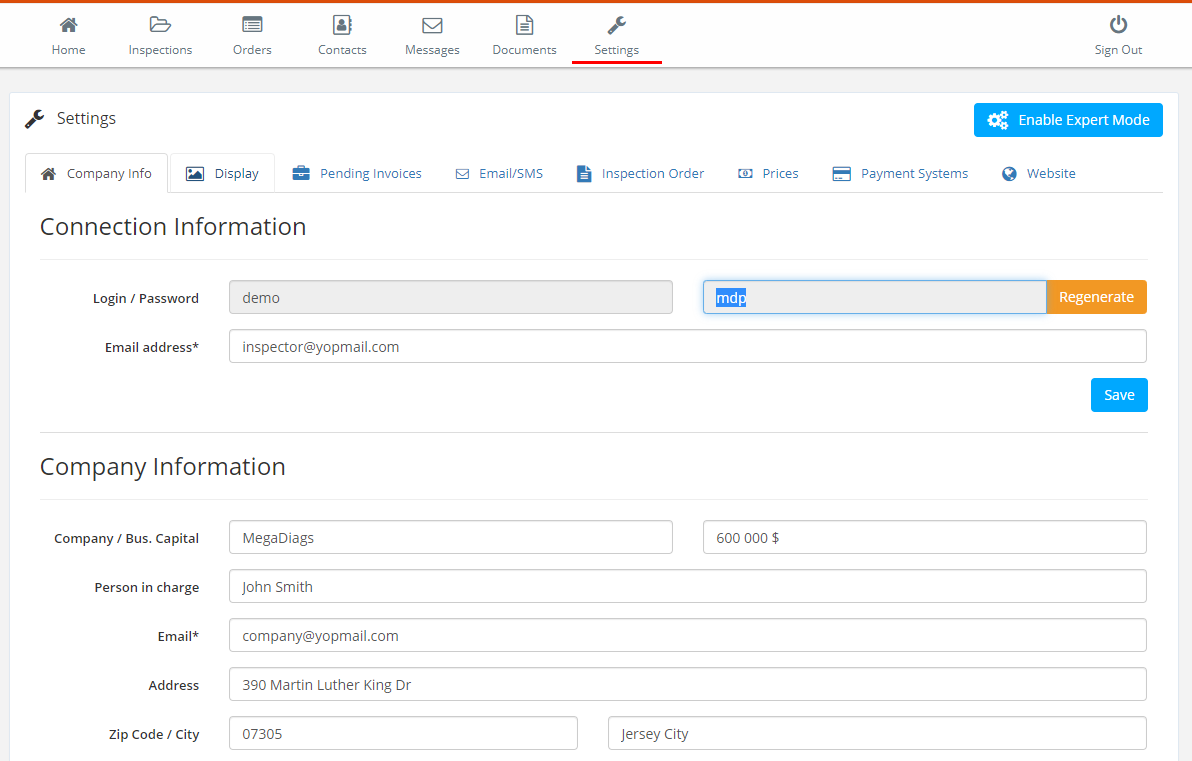
VII.1 Company Info tab
Fill in all of your company parameters.
VII.2 Display tab
|
|
EXTRANET, Online office |
0. Identification
Access to the site is via a secure connection using a username and password.
To identify yourself, fill in the User and Password fields.
(which were sent to you when you registered).
To retrieve your Password, click on Forgot password? and enter his email address
I. Home
The summary banner shows the number of files, orders and contacts as well as the total amount of outstanding payments
They are also buttons for quick access to the folders, commands and contacts menus.
II. The Inspection Files
“Inspections” menu : Used to display the list of folders.
"Add" button: It allows you to add a new folder.
"Export" button: It allows you to export the list of files in Excel format.
When you have several online files, a page navigation system is activated.
To export the list of files click on the button of the same name.
Use the search bar to refine your search.
The states :
Not downloaded
Downloaded
Partially downloaded
Online payment is available via the logo![]()
Notify the customer of the availability of the file by email
II. 1 Search for folders
Using the search box, you can display the folder (s) containing one or more thermal baths.
II.2. Geolocation
Clicking on GOOGLE EARTH allows you to view the properties on a map.
Select an asset and access the folder
II.3. New Inspection File
Fill in the following fields to create a new file
-
- Title
- Comments
- Attach a file to the folder
- Give a name to the attached file
- Give a title to the attached file
- Leave a comment
II.3. Contents of the inspection file
This insert contains all the information concerning the file sent by Liciel Diagnostics.
II.3.1 Show details / Hide details:
Click Show Details to show or hide folder information including:
- Payment status
- The list of people with access to the file
- The list of stages
- The list of files
- Messages sent
II.3.2 Send an Email
Click on Send a message about this file
II.3.3 Modify the amount in Payment status
Click on Modify the amount
II.3.4 Add occasional access
Click on Add and select a Name from the list as below:
II.3.5 The list of files
You can delete or add a file, download it either by clicking on the title or the “Download” icon, see the number of times the file was downloaded, view the status and access history.
II.3.7 Filing a paid / unpaid case
Click on the paid file button in green to change it to unpaid.
|
|
|
III. The Orders
“Orders” menu: It is used to manage the list of diagnostic commands passed by the site.
"Add an inspection order" button: It displays the new order form.
"Export" button: It allows the list of commands to be exported in Excel format.
We have three order states
| To Process |
Validated (with the date and time of validation by passing the mouse over it) |
Cancelled |
Download links are provided.
| .Liciweb (to import it directly into V4) |
.docx |
III.1 Search for an order
Use the search bar to display the desired command.
III.2 Export the list of orders to Excel
III.3 Add an order
Click on Add to create an order and fill in all the fields. This remains identical to the V4 software. The order, once validated, will go into "to process".
IV. Contacts
“Contacts” menu: It allows you to manage the list of your contacts who have access to the site.
"Add" button: This allows you to add a new customer.
"Export" button: It allows you to export the list of contacts in Excel format.
IV.1 Create a Contact
Click on to create a contact.
"Email" : Indicate the email address of the real estate agency. The various messages will be sent to him at this address if he is in the order of assignment and is chosen as contact for sending EXTRANET.
"Associates Email (s)" : Put the email addresses of employees / salespeople working in the real estate agency.
Used to automatically add access to the folder to the main account when sending an email to one of the addresses listed above.
"Password" : Used to connect to the My account area . For security reasons, the password is generated automatically.
"Inherited Accounts" : Allows, when creating a new account, to copy the rights and access to the folders of another account.
IV.2 Send access codes
To send the access codes by email to the customer click on
IV.3 Delete a contact
To delete a contact, click on the recycle bin.
IV.4 Send an email
Click on to send an email
IV.5 Export a list of file consultations
Click on to export a list of file consultations
IV.6 Modify a contact
Click on to display the modification page
IV.7 Search for a contact
The search tool allows you to display the desired contact.
V. Messages
“Messages” menu : It allows you to manage the list of messages you have sent to your customers.
“New Message” button: This allows you to write and send a new message.
"Export" button: It allows you to export the list of messages in Excel format.
V.1 Display page
Email sent
Email received
We have three email states.
- To consult
- Consulted
- Canceled
To view messages
V.2 Reply to a message
To reply to a received email, click on
The original message is visible in the lower part of the window
V.3 Create a new message
Click on
By going to select a recipient, you will access the drop-down list.
The message cannot be empty and must contain the subject.
VI. Documents
"Documents" menu : Used to manage the list of attestations and certificates made available on the site
VI.1 User manuals
To view different records click on the "View" button
VI.2 Software
Several downloads are available to you:
- Direct access on your desktop to LiciWeb
- File / document compression / decompression software
- A PDF viewer
- Remote control software (for the software technical service)
VII. Settings
VII.1 Company Info tab
Fill in all of your company parameters.
VII.2 Display tab

Logo setting: Allows you to configure the logo in the header of the site
Website Application Setting: Allows you to modify the website name
Click to see more options
Background image
This option allows you to configure the background image of your site
To delete the current image click on the delete button
You can change the color of the background and buttons.
Login page settings
allows you to offer your customers a link to create an account and to offer your customers a link to recover a forgotten password
Application languages
Allows you to choose the language

VII.3 "Unpaid management" tab Switch to advanced mode to have more possibilities
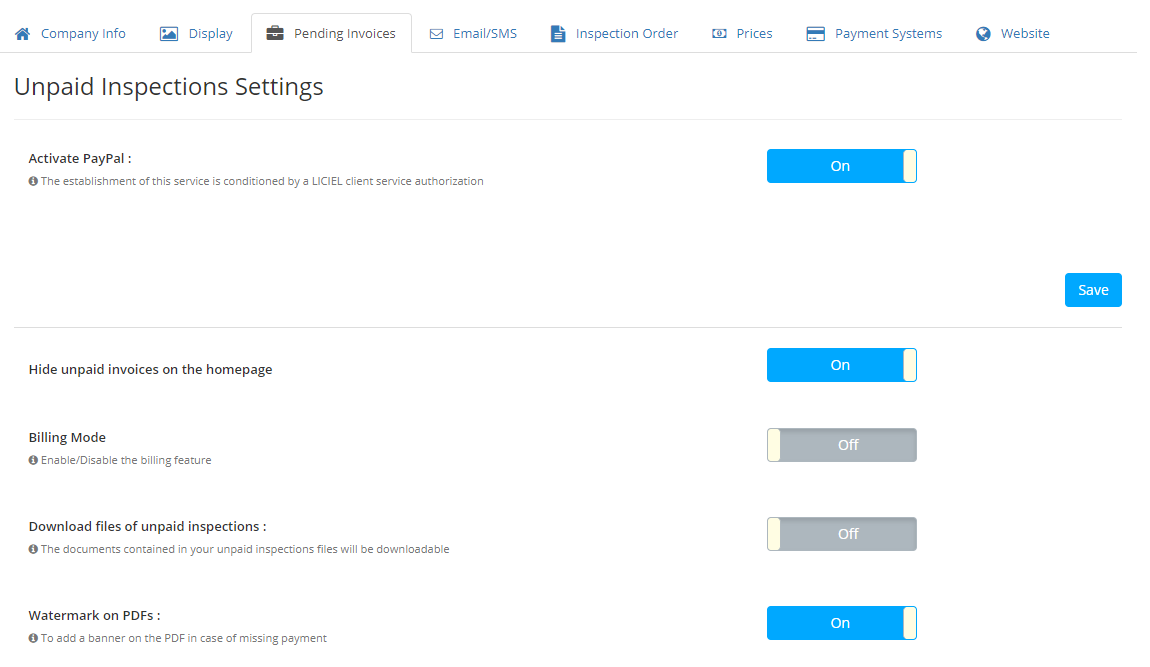
Three types of payment are available: Paypal, Payzen and Systempay
Liciweb integrates an unpaid management tool, two options are at your disposal
Activate functions on PDFs:
The PDFs contained in your unpaid files will be downloaded from the originals with a mention 'FOR CONSULTATION ONLY', on each page of the document.
Prevent downloading of unpaid records:
The documents contained in your unpaid files will no longer be available.
The banner is automatically added to all your PDFs with or without digital signature. These documents must not contain specific encryption blocking its opening.
Customize according to customer:
Among the customer details (in the customer tab) you can authorize certain customers to access documents even in the event of unpaid bills.
VII.4 "Email / SMS" tab
LICIWEB allows you to personalize the emails sent:
You just have to click on the links below and enter your text in the page that appears.
Email warning of the availability of a file
Folder access email for occasional users
Email indicating the access codes to the customer area
Payment confirmation email
CB payment confirmation email
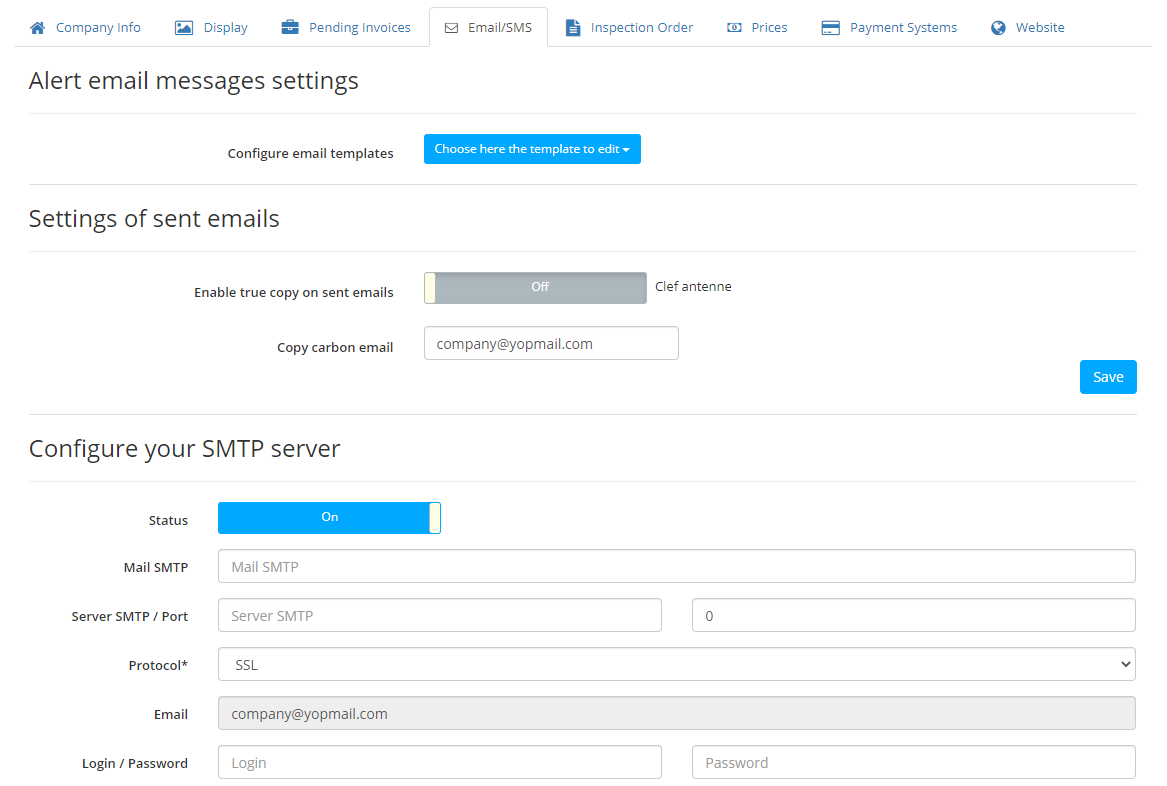
To configure SMTP follow this link
 Click Choose here the template to edit to edit the default email templates.
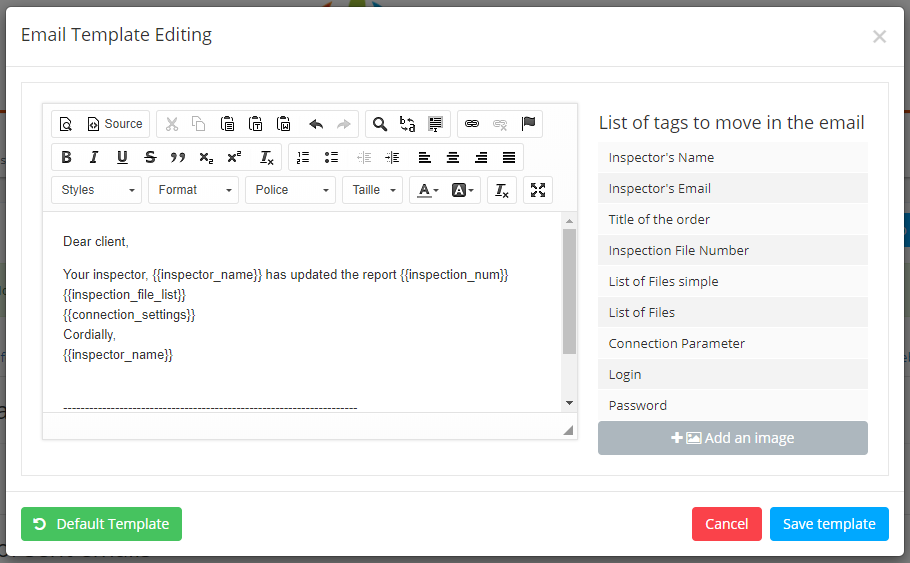
To use the tags, drag them onto the page.
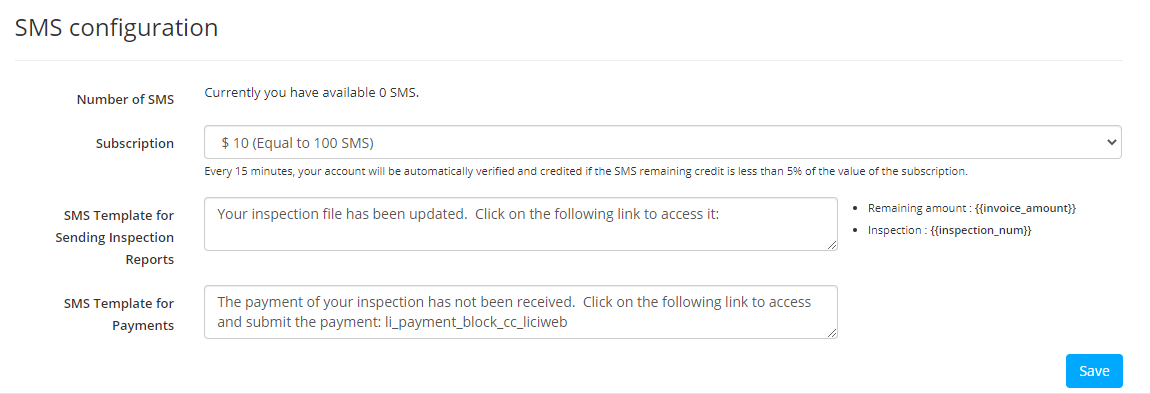
To configure your SMS, define the signature and create an SMS template for Records or payments information.
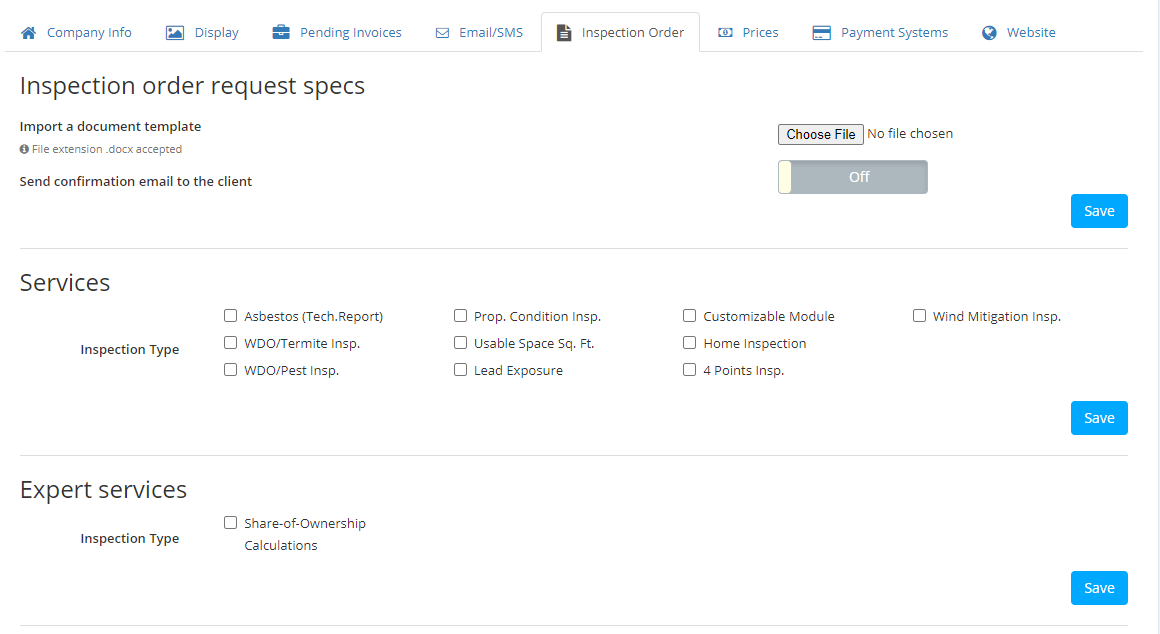
VII.5 "Inspection Order" tab
Reminder: You can send your Report Template directly from the Liciel Software by right-clicking on your ODM in the print tool.
VII.6 "Prices" tab
This tab will allow you to manage your price list so that your customers can place an order online, and be offered an automatic quote, using the " Quote Wizard " tool .
More information on the configuration of the Quote Wizard : Notice
More information on making an appointment online and paying a deposit: Notice
VII.7 "Website" tab
Manage and administer your website with just a few clicks. Link to Wiki page