LICIEL Field Section File Basics
 Field Section Basics
I. Introduction
The Field Section window is the part of your LICIEL Diagnostics software used to record inspection information on every Job Order. This WikiLICIEL article describes the functions accessible using from the Menu, Tabs and Button bars. The more complex functions are documented fully in other WikiLICIEL articles referenced in their description.
- You can customize many areas of this display to suit your business needs and priorities.
--->--> See the WikiLICIEL "Software Settings" article for more information.
- The Field Notes Tool is available throughout the Field Section. Click on
 to open the Notes pane to add a note (text), photo, or spreadsheet to record information either for yourself or for your company. You can use the Notes pane to do first drafts of drawings, enter reminders, etc.
--->--> See the WikiLICIEL "Notes Tool" article for more information.
II. Client/Property Tab
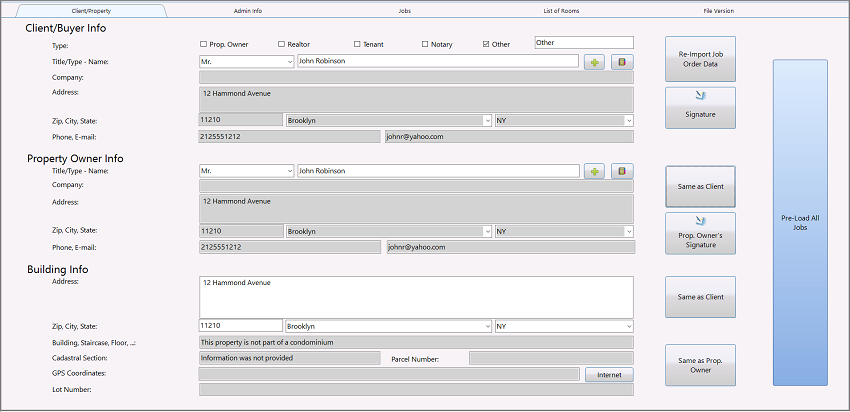
II.A Client/Buyer Info Section
Use this section to enter, access, or modify general information that sums up a case file and readies it for adequate field action.
Type
Check one of the boxes (Prop. Owner, Realtor, Tenant, Notary, Other) to identify the Client. You can also enter text in the box to the right to further describe the Client.
Title/Type - Name
- Select the appropriate Title/Type of client (Mr., Mrs., Ms., Agency, etc.) from the drop-down menu, then enter the first and last name of the Client who has requested the inspection.
-
- displays the Contact Details window, where you can enter additional information that will also be available in your Contacts List.
displays the Contacts List window, to select from all your Contacts.


Company
Enter the business name.
--->--> See the WikiLICIEL "Contact Book" article for more information.
Address
Enter the address of the client.
ZIP, City, State
Enter the ZIP code. LICIEL automatically completes the City and State fields based on the ZIP; however you can change these manually, if necessary.
Phone, E-mail
Enter the client's Phone number and E-mail address.
-

replaces the data for rooms A, B and C in the Job Order. 
displays the Signature Entry window, where you can store client's signature for use in documents. -
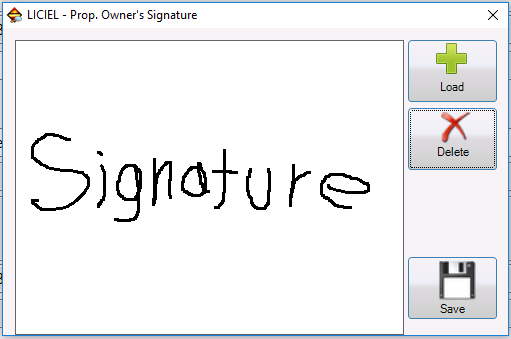
-

allows you to select an image of a saved signature from your computer. 
deletes the content in the white area. 
cancels unsaved changes. 
saves the signature in image format, so that you can insert it in your reports.
II.B Property Owner Info Section
Title/Type - Name
Select the appropriate Title/Type of property owner (Mr., Mrs., Ms., etc.) from the drop-down menu, then enter the property owner's first and last name.
-
- displays the Contact Details window, where you can enter additional information that will also be available in your Contacts List.
displays the Contacts List window, to select from all your Contacts.
--->--> See the WikiLICIEL "Contact Book" article for more information.
Company
Enter the business name.
Address
Enter the address of the property owner.
ZIP, City, State
Enter the ZIP code. LICIEL automatically completes the City and State fields based on the ZIP; however you can change these manually, if necessary.
Phone, E-mail
Enter the property owner's Phone number and e-mail address.
 copies information from the Client Info section.
 displays the Signature Entry window, where you can store property owner's signatures for use in documents. (See instructions above).
II.C Building Info Section
Address
Enter the address of the subject property.
ZIP, City, State
Enter the ZIP code. LICIEL automatically completes the City and State fields based on the ZIP; however you can change these manually, if necessary.
Building, Staircase, Floor
LICIEL inserts this information for you, based on what was entered on the Property Info tab in the Admin section. You can add to or replace this information manually, if necessary.
Cadastral Section
Enter the cadastral information, if any.
Parcel Number
Introduce this data, if any.
GPS Coordinates
Click on  to update this field with the GPS coordinates, based on the Property Address (internet connection required).
Lot Number
Enter the lot number of the property to be inspected.
copies information from the Client Info section.
 copies information from the Property Owner Info section.
III. Administrative Information Tab
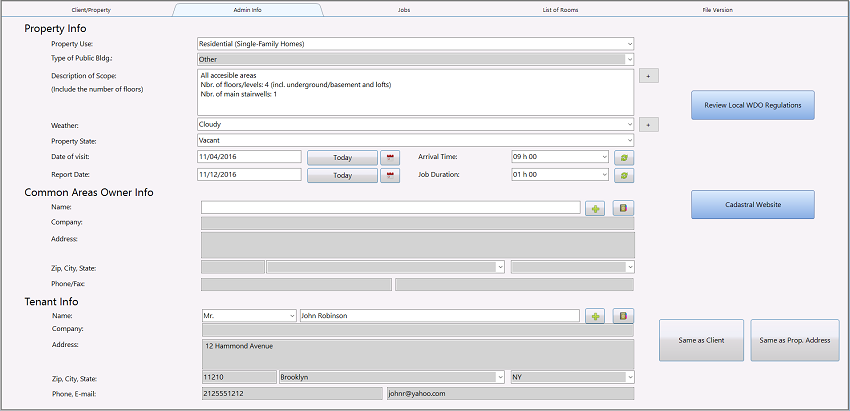
III.A Property Info Section
This section allows you to complete the administrative information.
Property Use
Select the use that best describes the inspected property from the drop-down menu.
Type of Public Bldg.
Select the option that best describes the property from the drop-down menu, if applicable.
Description of Scope
Click on the  button (on the right) to display the Scope of Inspection window.
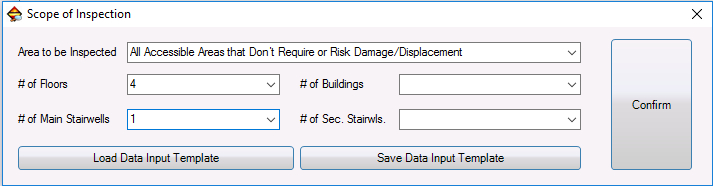
Select an appropriate value for each field, then click on  to save your selections.
Note: In the # of Floors field, include all levels, including cellars and attics.
 allows you to load an existing Scope of Inspection template from your computer.
 allows you to save the Scope of Inspection that you have just entered as a template for later use.
Weather
Click on the button (on the right) to display the Meteo window.
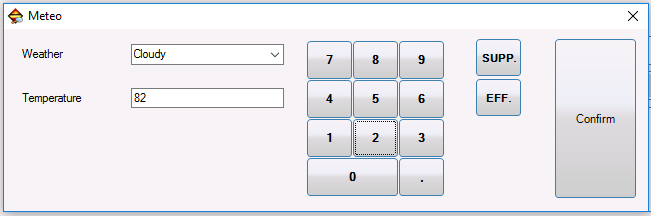
Indicate the weather condition on the day of the inspection.
Introduce the temperature using the keypad. You can also enter it manually in the available text field.
To delete the temperature, click on  .
.
To erase the temperature digit by digit, click on  .
.
To save the information, click on .
The weather information will display in the Weather field.

Date of visit, Arrival Time, Report Date, Job Duration
- Use these fields to plan and track events related to the Job Order. If the Date field is empty when editing a report, LICIEL fills the field using the report's effective date. After that date, the report can no longer be modified.
-

(calendar button) accesses the date-picker to select dates more easily. 
selects the current date from your computer's system clock. 
selects the current time from your computer's system clock. - Review Local WDO Regulations
Click on 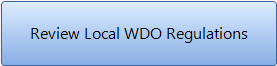 to access the WDO regulations for the area to be inspected.
III.B Common Areas Owner Info Section
Use this section to record contact information for the owner of common areas, such as a condominium association.
Name
Enter the common areas owner's first and last name.
-
- displays the Contact Details window, where you can enter additional information that will also be available in your Contacts List.
displays the Contacts List window, to select from all your Contacts.
--->--> See the WikiLICIEL "Contact Book" article for more information.
Company
Enter the business name.
Address
Enter the address of the common areas owner.
ZIP, City, State
Enter the ZIP code. LICIEL automatically completes the City and State fields based on the ZIP; however you can change these manually, if necessary.
Phone, Fax
Enter the contact's voice and fax Phone numbers in the two fields provided.
Cadastral Website
Click on  to open the cadastral webpage.
III.C Tenant Info Section
Name
Select the appropriate title for correspondence (Mr., Mrs., Ms., etc.) from the drop-down menu, then enter the concerned party's first and last name.
-
- displays the Contact Details window, where you can enter additional information that will also be available in your Contacts List.
displays the Contacts List window, to select from all your Contacts.
--->--> See the WikiLICIEL "Contact Book" article for more information.
Company
Enter the business name.
Address
Enter the address of the tenant.
ZIP, City, State
Enter the ZIP code. LICIEL automatically completes the City and State fields based on the ZIP; however you can change these manually, if necessary.
Phone, E-mail
Enter the tenant's Phone number and E-mail address.
 copies information from the Client/Buyer Info section.
 copies information from the Property Owner Info section.
IV. Jobs Tab
The Jobs tab allows you to add or remove a job from the inspection assignments by checking or unchecking the associated box.

Internal Job Ref. #
Enter a reference number your company may use for internal tracking. This field is optional.
Subcontracting Ref #
Enter a reference number your company may use to identify the subcontractor performing inspections.

Click on this button to display the Licenses menu to manage special "licenses" that you grant to subcontractors, to use your templates when creating reports. This is an optional service from LICIEL to make your templates available to the subcontractors that you authorize via these licenses. LICIEL stores your templates, and keeps them synched as you develop new versions, for your subcontractors to access and use. The Licenses menu consists of the following options:
-
- Notices - Displays the WikiLICIEL "Printing Tool" article for detailed instructions.
- Return to Company Settings Area - restores a subcontractor/user's default settings to discontinue producing reports using the contractor’s template.
- Add new License/Certificate - enable use of a contractor’s template for reports, if you have been granted a license to do so.
--->--> See the WikiLICIEL "Printing Tool" article for more information.
IV.A Assigning Inspectors
Use the area to indicate who is performing the inspections. You can assign more than one inspector per Job, and more than one inspection per inspector.
1. On the Field Section's Jobs tab, click on  to display the Choosing Inspectors window.
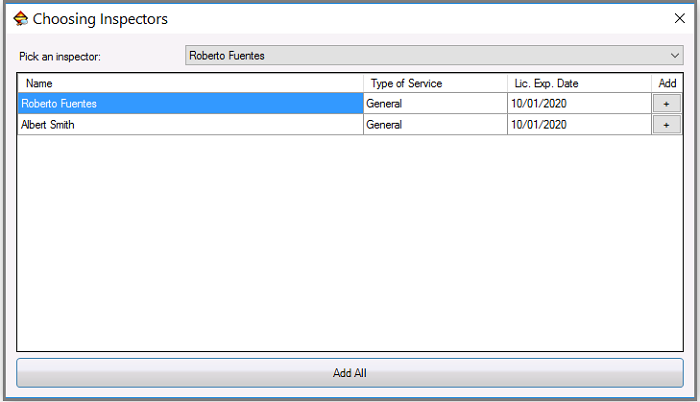
2. Select the Inspector you want to add from the Pick an inspector drop-down menu. Inspectors may be certified in more than one area, or in general services, as shown above.
3. Click on to add the Inspector(s) that apply to the current Job, or click on  .
.
IV.B Deleting an Inspector From the List
1. Click to select the Inspector you want to delete.
2. Double-click on  .
.
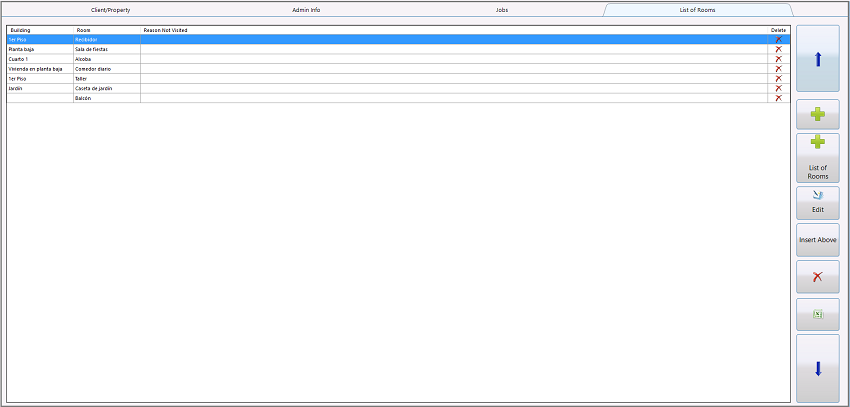
V. List of Rooms Tab
Use this tab to define a list of rooms to be inspected. It is very helpful to list all rooms before you begin, because most modules in the Field Section access this list.
You have two entry options:
V.A Creating the Room List Using Manual Entry
1. On the Field Section's List of Rooms tab, click on  to display the Room window.
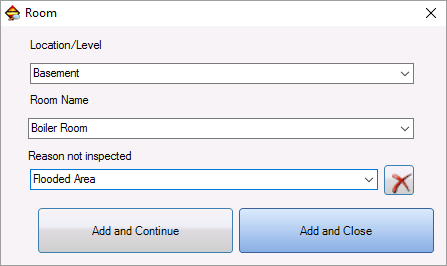
2. Complete the Location/Level and Room Name fields. You can choose from the drop-down menus or enter text.
3. Complete the Reason why it was not surveyed field if applicable. You can choose from the drop-down menus or enter text, or click on  to clear the field.
4. Click on 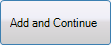 to add the room and keep the window open to add more rooms, or click on
 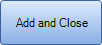 to add the room and close this window.
V.B Creating the Room List Using Assisted Entry
Assisted Entry allows you to add rooms with a data entry interface, saving time by using the pre-set buttons and drop-down menus. Click on  to toggle between button mode and drop-down menus mode for each of the fields where it is available.
1. On the Field Section's List of Rooms tab, click on  to display the Assisted Entry window.
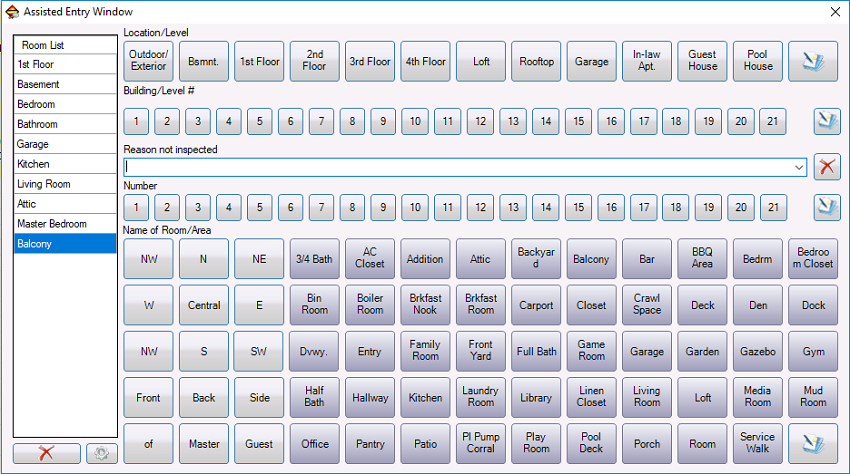
2. Complete the Location/Level field. You can use button mode, choose from the drop-down menu, or enter text.
3. Complete the Building/Level # field, if applicable. You can use button mode, choose from the drop-down menu, or enter text.
4. Complete the Reason not inspected field, if applicable. You can choose from the drop-down menu or enter text, or click on  to clear the field.
5. Complete the Name of Room/Area field. You can use button mode, choose from the drop-down menu, or enter text.
Note: You can configure the options offered on this window by clicking on this button: 
An options menu will appear:
|
|
Access the Notice of Change - takes you to the WikiLICIEL article related with this matter. Edit Building Fields - opens the Edition window for you to modify this area. Edit Room Fields - displays the Edition window for you to customize this area. Use Adjectives Entry Pad - displays a variety of new rooms/areas and their location in the property (NW, NE, central, front, back, etc.). It also adds two more options to the menu: Edit Adjectives 1 Database and Edit Adjectives 2 Database, which allow you to modify these parameters via the Software Settings tool. Edit Buildings Database - takes you to the Software Settings tool> Room List - Building Type and Venue Type, where you can customize this section. Edit Rooms Database - takes you to the Software Settings tool> Room List - Name of Quick Access Controls, where you can customize this section. |
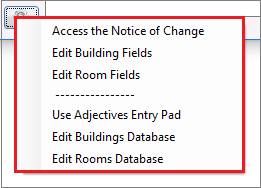
You can also edit the Assisted Entry's functions as follows:
On the Home screen's Menu bar, click on Tools > Software Settings > Databases > Drop-down Menus: Room List: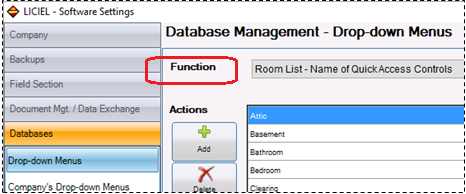
| List of Rooms field | Software Settings > Databases: Drop-down Menu |
|
Name of Building/Level (list) |
Room List - Building Type and Venue Type during input of Room information |
|
Room Name drop-down menus |
Room List - Room type (during input of Room information) |
|
Room Name buttons |
Room List - Name of Quick Access Controls |
|
Reason not inspected |
Room List - Reason for non-inspection |
--->--> See the WikiLICIEL "Software Settings" article for more information.
V.C Deleting a Room
1. On the Field Section's List of Rooms tab, click on to display the Assisted Entry window (above).
2. Click in the Rooms List on the left to select the room that you want to delete.
3. Click on  (below the Rooms List) to delete the room.
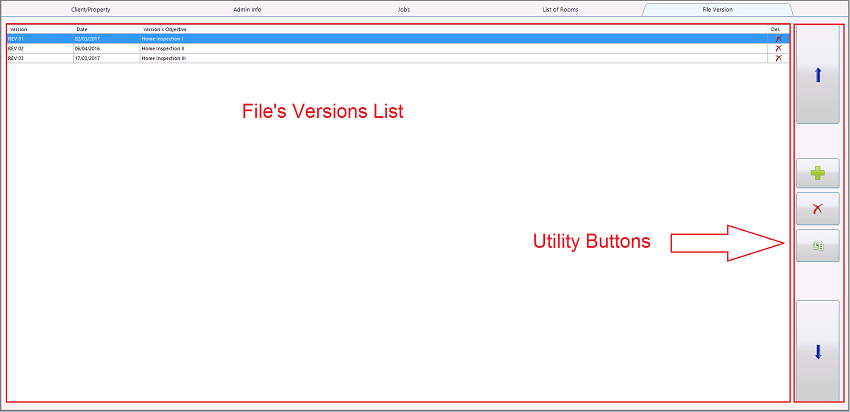
VI. File Version Tab
Use this tab to update the file according the different stages of the inspection(s) in progress. The file's versions will appear in the File's versions list. The Utility buttons will help you to manage them as needed.
VI.A Adding a New File's Version
1. On the Utility buttons, click on to open the File Version window.

2. Enter the file's version number using the available drop-down menu. You can also enter the information manually.
3. Introduce the date manually or click on to access the calendar and select the date more easily.
4. Indicate the file's version objective using the available drop-down menu. You can also enter the information manually.
5. Click on Save button.
The file's version will appear in the File's versions list.
VI.B Moving a File's Version on the List
1. In the File's versions list, select the version that you need to move.
2. On the Utility buttons, click on the arrows 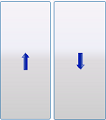 to move it up or down depending on your needs.
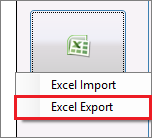
VI.C Importing/Exporting a File's Version Via Excel
Importing via Excel
1. In the File's versions list, select the version that you need to import.
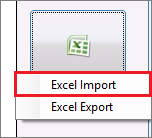
2. On the Utility buttons, click on  to display the following menu (see below):
3. Select the Excel Import option.
4. Upload the file's version from your computer.
The version will be added to the File's versions list.
Exporting via Excel
1. In the File's versions list, select the version that you need to export.
2. On the Utility buttons, click on to display the following menu (see below):
3. Select the Excel Export option.
4. Download the file's version to your computer.
VI.D Deleting a File's Version From the List
1. In the File's versions list, select the version that you need to remove.
2. On the Utility buttons, click on  .
.
A confirmation/countdown pop-up window will appear.
3. Click on the Yes button to confirm the operation or on the No button to cancel it.