 Home Inspection Module
I. Introduction
The Home Inspection Module is preloaded with the most popular areas of inspection, and allows you to document both general and technical descriptions and findings.
|
|
|
|
|
|
|
|
|
|
|
On most windows in this module, you can click on  to access the range of module setting options and customize databases, displays, and other Home Inspection Module features.
Note: The Home Inspection Module works in conjunction with both the 4-Point Inspection and Wind Mitigation Inspection, allowing you to visualize their values and update these modules using data present in the current one.
II. Areas of Inspection tab
Use first tab functions to add, edit, and delete Areas of Inspection as needed. You can also use them to create customized Subsections.
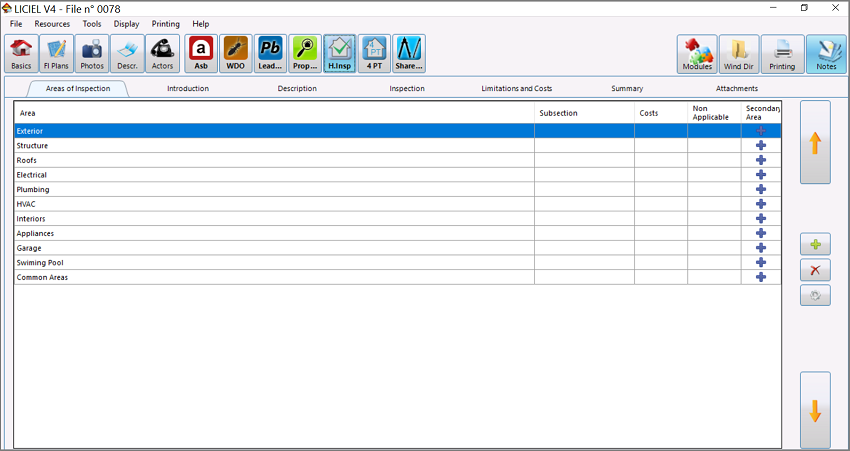
II.A Adding a New Area of Inspection
1. On the Areas of Inspection tab, click on  (on the far right) to display the Add/Edit Areas of Inspection window.
2. Complete the following fields:
Area
Enter the Area's name.
Subsection
Enter a Subsection name, if applicable.
Comment Code and Print Code (3 characters)
Enter the applicable Comment and Printing codes.
3. Click on  to create the new area at the bottom of the list.
II.B Modifying an Area of Inspection
1. On the Areas of Inspection tab, double-click on the Area that you want to modify to display the Add/Edit Areas of Inspection window (see above).
2. Change the information as needed, then click on .
II.C Deleting an Area of Inspection
1. On the Areas of Inspection tab, click to highlight the Area that you want to delete.
2. Click on  to execute the deletion.
II.D Marking an Area of Inspection as Non-Applicable
1. On the Areas of Inspection tab, click to highlight the area that you wish to mark as non-applicable.
2. Click on the Non-Applicable column at the line in question to indicate that the selected area does not apply to the job or property at hand.
Note: If you want to hide a certain area from your inspection report (for example, a garage on a property that does not have one), you have to mark that area as non-applicable in this section.
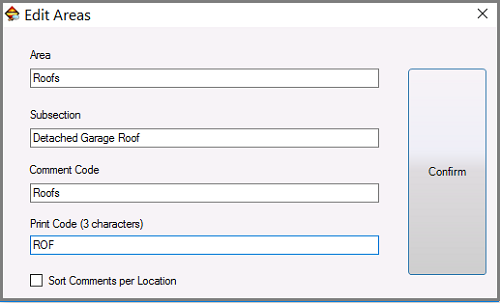
II.E Adding a Secondary Area of Inspection
Use this function to create a secondary area of inspection, such as when a second system exists (e.g., a Guest House Roof).
1. On the Areas of Inspection tab, click on the  button in the Secondary Area column of the row for which you wish to create a secondary area.
The software will then create a second row beneath the one that you selected for duplication, and the original line will now display a subsection name: "Main."
A second line will then display the same area name as the one you selected, and the subsection label: "Complementary."

2. Double-click the word "Complementary" to customize the secondary area using the Add/Edit Areas of Inspection window.
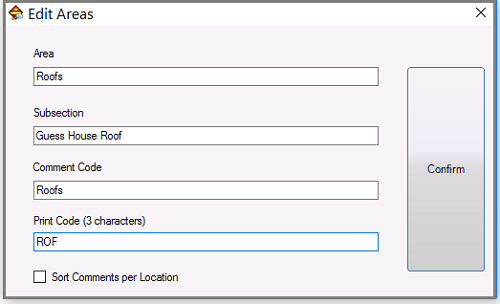
3. Edit the following fields as needed:
Subsection
Enter the name of the subsection (you may create a new name or keep the default name: "Complementary").
Comment Code and Print Code (3 characters)
Enter the applicable Comment and Printing codes.
4. Click on .
III. Managing Inspection Areas
Use the following buttons to manage Areas and Subsections:
-

to sort the list as needed.
to add a new Area at the bottom of the list.
to delete a selected Area or Subsection.
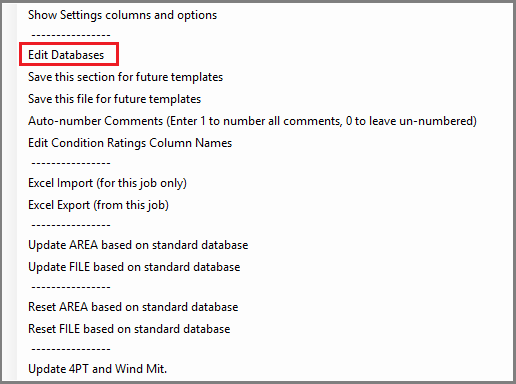
to display the standard options menu:
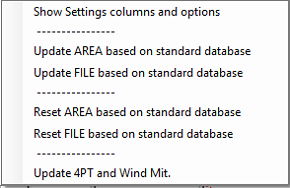
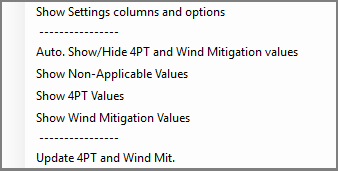
Show Settings columns and options - makes visible the Comment Code and Printing Code columns, and the expanded module settings menu (see below).
Update AREA based on standard database - updates the selected Area based on the Home Inspection databases saved in the Database Management section of your Software Settings tool.
Update FILE based on standard template - updates the entire file based on the Home Inspection databases saved in the Database Management section of your Software Settings tool.Note that all complementary areas and estimated costs previously added will be deleted after updating the file.
Reset AREA based on standard database - resets the selected AREA based on the Home Inspection databases saved in the Database Management section of your Software Settings tool.
Reset FILE based on standard database - resets the selected FILE based on the Home Inspection databases saved in the Database Management section of your Software Settings tool.
Update 4PT and Wind Mitigation - updates these modules using data present in the current one.
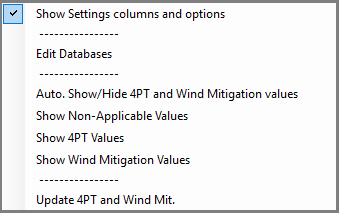
The expanded module settings menu is visible and available when clicking
again after having clicked on Show Settings columns and options on the standard options menu.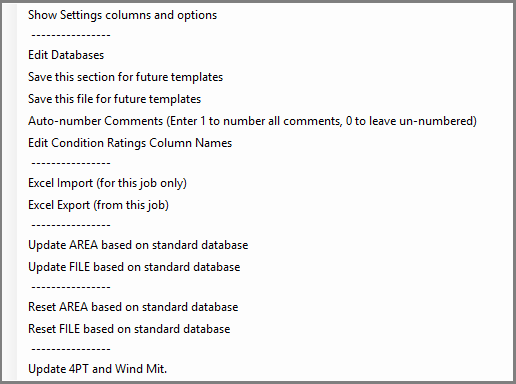
The expanded module settings menu adds the following seven options, not present in the standard menu:
Edit Databases: opens the Software Settings window to the drop-down menu section that displays Home Inspection module databases (specifically, by default, in the Home Inspection - Inspection Items database - see explanations below).
Save this section for future templates: copies the selected section for reuse.
Auto-number Comments: allows you to choose whether or not to enumerate the comments about the inspected areas and their components (see explanation below).
Edit Condition Ratings Column Names: allows you to customize the columns pertaining to condition ratings (see explanation below).
Excel Import (for this job only) - allows you to replace the current file with data from a saved spreadsheet.
Excel Export (from this job) - allows you to save the current file as a spreadsheet.
III.A Editing a Database
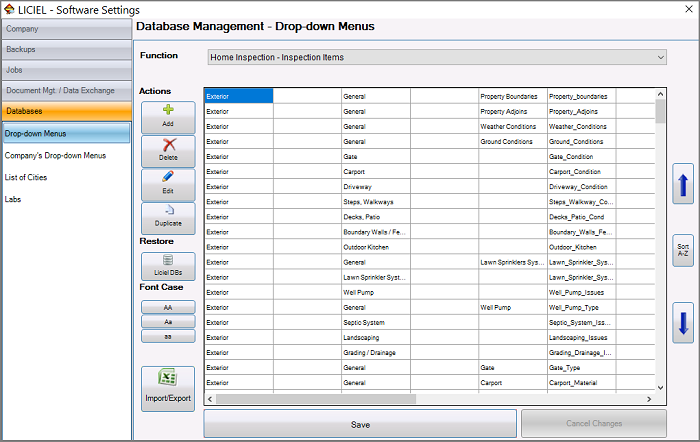
1. From the expanded module settings menu, select the Edit Databases option to display the Software Settings window, Database Management - Drop-down Menus section.
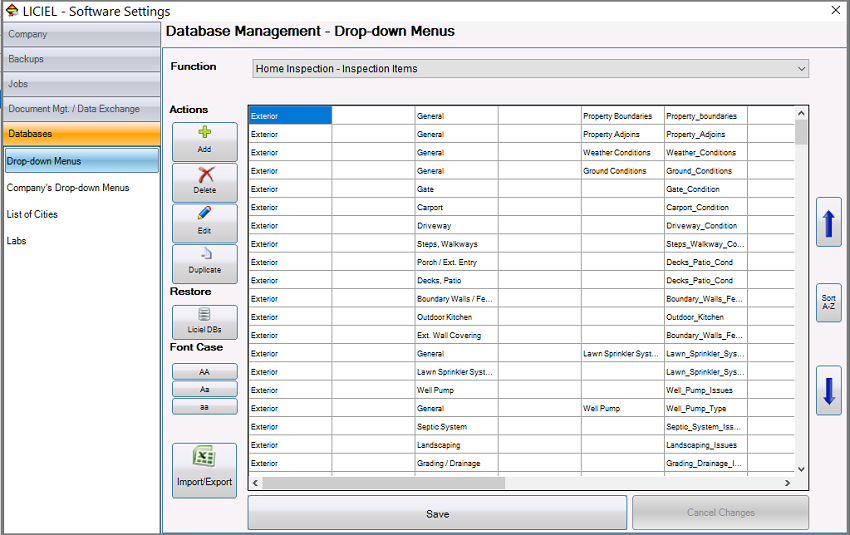
2. From the Function's drop-down menu, select the section that you need to modify.
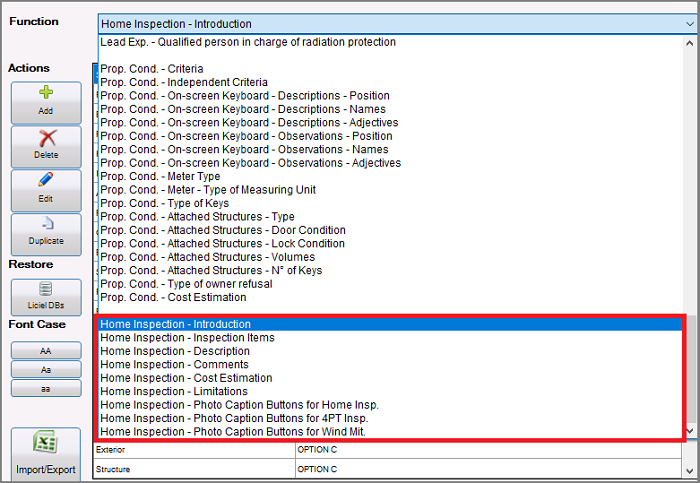
Note that there are nine Home Inspection databases that you can customize to suit your business needs.
| Introduction | allows you to personalize the introductory information of the different Areas of Inspection. |
| Inspection Items |
allows you to add components and/or edit the default ones. |
| Description |
allows you to modify the component's descriptions. |
| Comments |
allows you to customize your notes about the inspected items. |
| Cost Estimation |
allows you to edit the estimated costs of services recommended after inspecting the property. |
| Limitations |
allows you to customize the Home Inspection limitations. |
| Photo Caption Buttons for Home Inspection |
allows you to customize these buttons for the current Home Inspection. |
| Photo Caption Buttons for 4 Point Inspection |
allows you to customize these buttons if you are also performing a 4 Point Inspection. |
| Photo Caption Buttons for Wind Mitigation |
allows you to customize these buttons if you are also performing a Wind Mitigation Inspection. |
3. Double-click on the line to be edited.
For example, if you are going to edit the estimated cost of a certain service:
- Select Home Inspection - Cost Estimation database
- Find both the Area of Inspection and the Service you are working with in the displayed list
- Double-click on the Cost column at the line in question, as shown below:

You can either double-click on that column or click on  to display the Edition window.

4. Make the desired change and click on  . To cancel the operation, click on
  .
.
5. Back on the Software Settings window, click on  .
.
6. Close the Software Settings window, then click on the Yes button in the confirmation window.
--->--> See the WikiLICIEL "Software Settings" article for more information.
III.B Auto-Number Comments
This tool allows you to choose whether or not to enumerate your comments about the inspected areas and their components.
1. From the expanded module settings menu, select the Add Indicators to Comments option to display the Edition window:

2. Enter number 1 if you want to identify your comments with a number in your reports in order to find/refer them more easily. If you don't, then enter number 0.
3. Click on . To cancel the operation, click on .
--->--> See section "V.A.4 Adding Comments to the Component Description", below.
III.C Editing Condition Ratings Column Names
1. From the expanded module settings menu, select the Edit Condition Ratings Column Names option to display the following window:
2. Customize the ratings initials as needed to match the condition ratings that your company uses.
3. Click on  to save your edit. To set the default names again, click on
  .
.
IV. Introduction Tab
This tab allows you to add an Introduction and/or General Photo to each Area of Inspection.
It also gives you access to the Log of Visited Rooms section (on the lower left of the window), which allows you to make a follow up of the rooms that you already have inspected.
This section also allows you to add new visited rooms using Assisted Entry.
--->--> See section "IV.C Adding a Room Using Assisted Entry", below.
IV.A Introduction Section (upper area of the window)
IV.A.1 Entering an Introduction
1. Click in the Area pane to select the Area or Subsection that you want to introduce.
2. Type the Introduction in the large text field, below the Select from Database/Save to Database button.
IV.A.2 Using a Saved Introduction or Saving an Introduction
1. On the Introduction tab, click in the Area pane to select the Area that you want to describe.
2. Click on  to open the Intros Database window.
3. Select from the saved Introductions displayed in the upper large field by double-clicking on the one you want to use from the list.
Note: You can also introduce a related keyword in the Filter field, and click on  to quickly find the introduction(s).
After making your selection, the selected introduction will display in the lower Entry field.
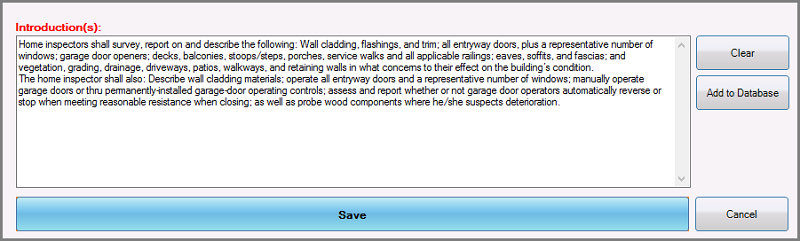
4. Modify the selected text in the lower field, as needed.
5. If you want to add the new or modified text to the database, click on  . To remove it, click on Clear button.
6. Click on  to copy the contents of the Entry box into the Introduction text box on the Introduction tab. To cancel the operation, click on Cancel button.
Note: If you want to edit default introductions in the database, click on  to open the Software Settings window to the Home Inspection - Introduction function. To modify this database, kindly refer to the explanation above (section "III.A Editing a Database").
IV.B General Photo Section (lower area of the window)
IV.B.1 Adding a Photo
1. Click on the Area pane to select the Area you will want to associate the photo to.
2. Click on  to open the Image Selection window if you want either to associate an existing photo from your hard drive or data storage devices, or take a new photo, if your hardware is capable.
3. Upload the image.
The image will display in the General Photo section.
You can use the green arrows to visualize all photos related to the selected Area.
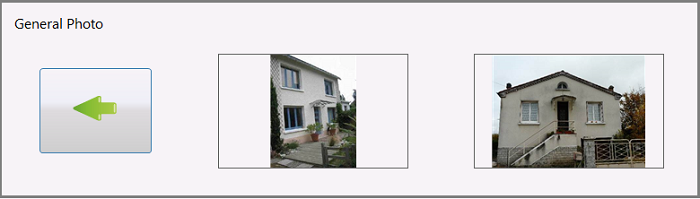
--->--> See the WikiLICIEL "Photos Tool" article for more information.
Note: You can decide if you want to add images from this section or from the Photo tab. Kindly refer to section "X. Adding an Image Using Drag and drop Option", later in this article.
IV.C Adding a Room Using Assisted Entry
The Assisted Entry Window allows you to add rooms with a data entry interface, saving time by using the preset buttons and drop-down menus.
The  buttons allow you to toggle the input mode between button mode and drop-down menu mode for each of the fields where it is available.
1. Double-click in any area of the Log of Visited Rooms section, on the lower left of the Introduction tab, to display the Assisted Entry Window.
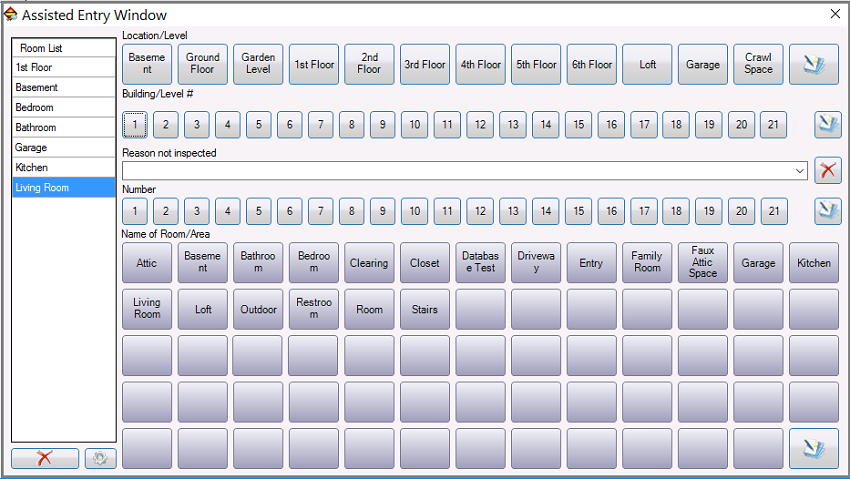
2. Complete the Location/Level and Building/Level # fields, if applicable.
You can either choose from the drop-down menus, enter text, or use button mode.
3. Complete the Reason not inspected field, if applicable.
You can either choose from the drop-down menu or enter text, or click on  to clear the field.
4. Select the Name of Room/Area using the preset buttons.
Automatically, the room just added will display at the bottom of the Room List section (on the left of the Assisted Entry Window).
It also will display at the bottom of the Log of Visited Rooms section on the Description tab.
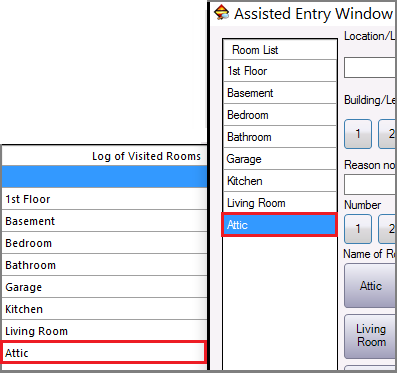
IV.C.1 Deleting a Room Using Assisted Entry
1. Double-click in any area of the Log of Visited Rooms section to display the Assisted Entry Window (above).
2. Click in the Rooms List section to select the room that you want to delete.
3. Click on  (below the Rooms List section) to delete it.
Note: The Log of Visited Rooms section is also available on the Description, Inspection, and Limitations and Costs tabs.
V. Description Tab
Use this tab to enter component descriptions for each of the Areas of Inspection related to your job.
Commonly inspected components load automatically for most Areas; however, you may edit or delete them as needed, or create your own lists of components.
The list of default components comes from the standard database, accessible via the Software Settings tool.
- V.A Global Description Section
V.A.1 Adding a Global Description
1. Click in the Area pane to select the Area that you want to document.
2. In the Global Description grid, double-click on either the Component or Description columns on the row corresponding the component that you want to describe to access the Description window.
3. For each Component, enter a Description, or select one from the quick buttons or drop-down menu. You may also add to it, or edit it as needed.
4. Click on .
You may also choose to add related Photos  and/or Comments
  , as described below.
V.A.2 Marking a Component as Non-Applicable
1. Click to highlight the component in question.
2. Click on the NA column in its row to indicate that the selected component does not apply.
Note: Keep in mind that unless you click on "Show Non-Applicable Values," on the module settings button--> , LICIEL hides the components that you designate as Non Applicable. This is different from deleting the component, however, since you may later choose to redisplay such items.
Also, if you want to hide a certain component from your inspection report (for example, a basement on a property that does not have one), you have to mark that component as non-applicable in this section.
V.A.3 Marking a Component as Not in Report
1. Click to highlight the component in question.
2. Click on the NR column in its row to indicate that the selected component will not appear in the report.
Note: if you want to hide a certain component from your inspection report, you have to mark that component as not in report in this section.
V.A.4 Adding Photos to the Component Description (Optional)
1. Click to highlight the component in question.
2. Click on the Photo column at the component row you want to add an image to.
This will display the Image Selection window, which allows you to select an existing photo from your hard drive or data storage device, or take a new photo, if your hardware is capable.
Note: You can decide if you want to add images via this tool or from the Comments section. The images added from this last section will appear in the Inspection tab, Comments and Recommendations section.
V.A.5 Adding Comments to the Component Description
1. Click to highlight the component you are working with.
2. In the Comments column for the selected component, click on  to display the Add/Edit Comments window, which opens in the Comments tab by default.
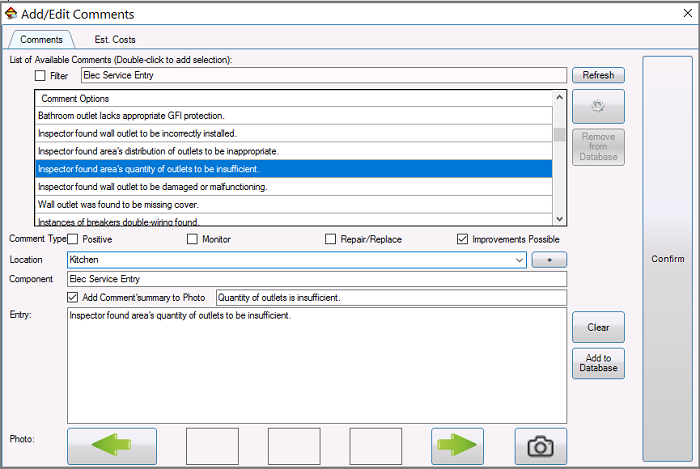
2. In the List of Available Comments section, double-click the comment that best describes the component.
The selected comment will display in the Entry section, and a short version of it will appear in the Add Comment Summary to Photo field.
If you want this photo caption appears in your report, check the box next to Add Comment Summary to Photo field.
If you don't, uncheck it. In this case, the photo will only show the name of the Component to be inspected.
3. Indicate the Comment Type by checking the box that best describes it.
4. Enter the component Location by using the drop-down menu.
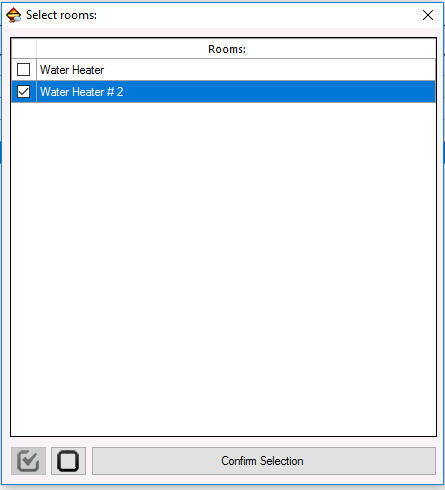
You can also click on  to display the Select Rooms window and select the location.
5. If needed, you can add a new comment on the Entry section, or edit the previously added. You can also save it to the database, by clicking on  . Otherwise, if you need to remove a comment, select it, then click on
  .
.
6. Click on  to upload a photo (optional).
7. Click on .
Note: The comment(s) selected on the List of Available Comments section will also display in the Inspection tab, Comments Recap and Recommendations section.
V.A.6 Adding Estimated Costs
1. From the Add/Edit Comments window, click on the Estimated Costs tab to display the following window:
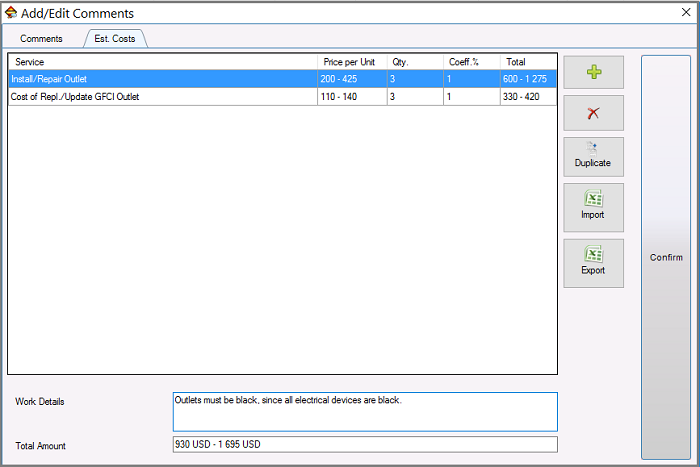
2. Click on to open the Cost Estimator window.
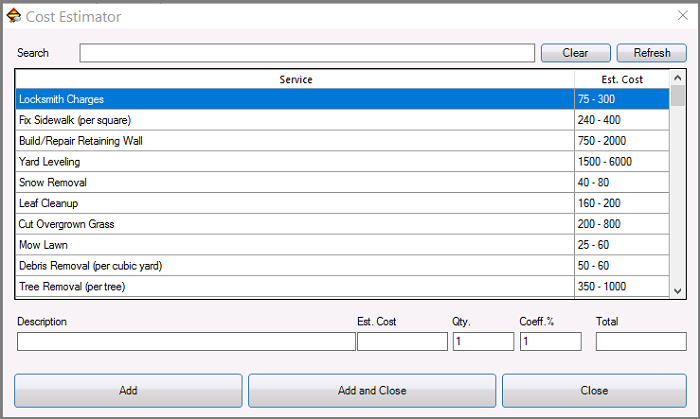
3. Select the service that best describes the comment previously added on the List of Available Comments section.
Note: You can also introduce a related keyword in the Search field, and click on to quickly find the service(s).
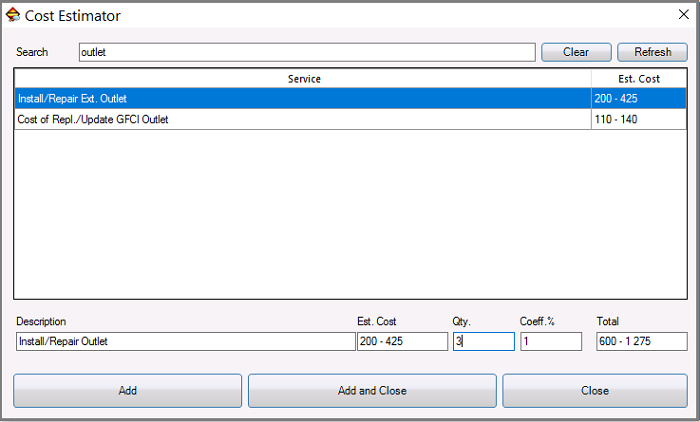
4. Edit the Description, Estimated Cost, Quantity, Coefficient %, and Total fields, if necessary.
5. Click on  to add the Estimated Cost and keep working on this tab, or click on
  to add it and close this window.
To just close the window, click on Close button.
6. Back on the Estimated Costs tab, add a comment in the Work Details text field (optional).

7. Click on .
V.A.7 Deleting a Service
On the Estimated Costs tab, select the service that you need to delete, then click on  .
.
V.A.8 Duplicating a Service
On the Estimate Costs tab, select the reference service, then click on  .
.
V.A.9 Importing/Exporting a Service Via Excel
To import a service, on the Estimate Costs tab, click on  to upload it from your computer.
To export a service, select the one that you need to download, then click on  .
.
V.B Managing the Global Description Section
Use these buttons to manage the Global Description area.
-
to sort the list as needed.

to add a new component.

to delete a selected component.

to display the standard options menu:
Show Settings columns and options - makes visible the Code Liaison Mod., Code Description, and Delete columns. It also displays the expanded module settings menu (see below).
Auto-Show/Hide 4PT and Wind Mitigation values- auto-displays/hides these values.
Show Non-Applicable values - makes visible the NA values.
Show 4PT values - displays these values.
Show Wind Mitigation Values - makes visible these values.
Update 4PT and Wind Mitigation - updates these modules using data present in the current one.
The expanded module settings menu is visible and available when clicking on
again after having clicked on Show Settings columns and options on the standard options menu.The expanded module settings menu adds the following option, not present in the standard menu:
Edit Databases - opens the Software Settings window to the drop-down menu section that displays Home Inspection module databases (specifically, by default, in the Home Inspection - Inspection Items database - see explanation above).
V.C Technical Description Section
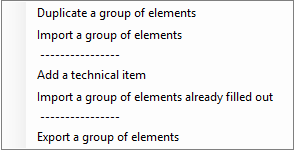
The functions of the Technical Description section are the same than the Global Description section, with the exception of the button, which gives you access to the following Options menu:
|
|
Duplicate a group of elements - allows you to duplicate technical items (see explanation below). Import a group of elements - allows to add a list of technical elements previously saved on your database (see explanation below). Add a technical item - allows you to add a new item. Import a group of elements already filled out - allows you to add a list of technical elements already described. Export a group of elements - allows you to download a selected list of elements to your computer (see explanation below). |
V.C.1 Duplicating a Group of Elements
Note: This tool is extremely useful if you are inspecting a property with repeated technical components (e. g., air-conditioning units, electric panels, water heaters, etc.). Be aware that using this tool not only will duplicate the technical elements, but also their respective descriptions. If you just need to add a technical component's template, kindly refer to next section for detailed instructions.
1. Click in the Area pane to select the Area that you want to document.
2. On the Technical Description grid, click to highlight the reference component.
3. Click on to display the Options menu (shown above).
4. Select the Duplicate a group of elements options from the menu to open the following window:

5. Enter the name of the group of elements (you can create a new name or keep the name displayed by default).
6. Click on to save it. To cancel the operation, click on .
The duplicated technical elements will display in the Technical Description grid, below the reference component.
V.C.2 Importing a Group of Elements
Note: This tool allows you to add technical elements as needed. It is different from the previous option since it gives you access to technical component's templates previously saved on your computer, therefore, you can import the desired template and then describe the components according to their specific characteristics.
1. Click in the Area pane to select the Area you want to work with.
2. On the Technical Description grid, click on to display the Options menu (shown above).
3. Select the Import a group of elements options from the menu to open the following window:
4. Select the group of elements that you want to import.
To select all available groups, click on  .
.
To deselect all groups, click on  .
.
5. Click on  to open the following window:

6. Enter the name of the group of elements (you can create a new name or keep the name displayed by default).
7. Click on to save it. To cancel the operation, click on .
The list of imported elements will display in the Technical Description grid.
Note: To import a group of elements already filled out from the Options menu, take the aforementioned steps since the procedure is the same.
V.C.3 Exporting a Group of Elements
1. Click in the Area pane to select the Area you want to work with.
2. On the Technical Description grid, click to highlight the group of elements that you want to export.
3. Click on to display the Options menu (shown above).
4. Select the Export a group of elements options from the menu to open the following window:

5. Enter the name of the group of elements (you can create a new name or keep the name displayed by default).
6. Click on to save it. To cancel the operation, click on .
The list of the selected technical elements will be saved in the client's folder on your computer.
VI. Inspection Tab
Use this tab to add new components, describe the existing ones (if you haven't already done so), and indicate or modify the component's condition.
You can also use it to visualize/edit the comments related to the existing components, among other functions.
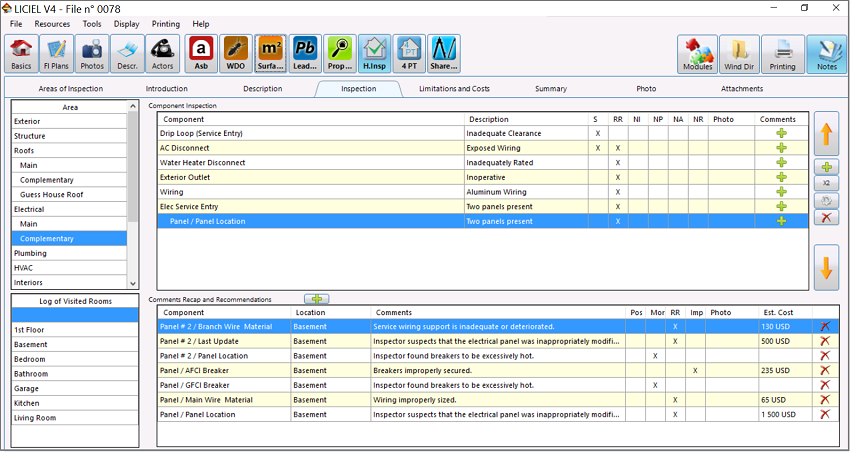
VI.A Component Inspection Section
VI.A.1 Adding a Component
1. Click in the Area pane to select the Area that you want to document.
2. Click on (on the far right) to display the Add/Modify Criteria window (see above).
3. Complete all fields as explained above; then, click on .
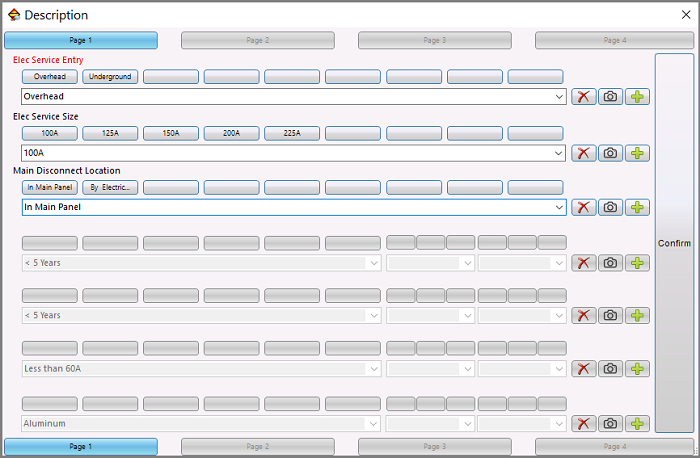
VI.A.2 Describing a Component
1. Click in the Area pane to select the Area that you want to document.
2. Double-click on the Description column for the component that you want to describe to display the Description window (see above).
3. For each Component, enter a Description, or select one from the buttons or drop-down menu, as explained above.
4. Add Photos and Comments as needed.
5. Click on .
VI.A.3 Indicating/Modifying the Component's Condition
1. On the Component Inspection grid, click to highlight the component.
2. Click on the cell that better fits the component's condition.
Condition Boxes
S: Satisfactory
RR: Repair or Replace
NI: Not Inspected
NP: Not Present
To mark Non-Applicable/Not in Report components, and add a photo and/or a comment, kindly refer to the explanation above (section "V. Description Tab").
VI.B Managing the Component Inspection Buttons
The buttons of the Component Inspection section are the same than the Description tab, with the exception of the  button, which allows you to add a new component within an existing area to be inspected.
VI.B.1 Adding a Component
1. Click in the Area pane to select the Area that you want to document.
2. On the Component Inspection grid, click to highlight the reference component.
3. Click on to display the Add/Modify Criteria window (see above).
4. Complete the fields as needed.
5. Click on .
The new component will display below the reference one, as shown below.
- VI.C Comments Recap and Recommendations Section
Comments, Comment Type, and Estimated Cost previously added on the Description tab, will display in this section.

VI.C.1 Adding a Comment
1. Click in the Area pane to select the Area that you want to document.
2. Click on  to open the Add/Edit Comments window (see above).
3. Select the comment that best describes the Area.
4. Click on .
VI.C.2 Editing a Comment
1. In the Comments Recap and Recommendations section, click to highlight the component.
2. Double-click on the Comments column to display the Add/Edit Comments window (see above).
3. Change the information as needed.
4. Click on .
VI.C.3 Editing/Adding a Comment Type
1. In the Comments Recap and Recommendations section, click to highlight the component.
2. Click on the cell that best describes the Comment Type.
Comment Type Boxes
Pos: Positive
Mon: Monitoring
RR: Repair or Replace
Imp: Improvement
VI.C.4 Adding a Photo
1. Click to highlight the component in question.
2. Click on the Photo column for the component you want to add an image to open the Image Selection window, which allows you to select an existing photo(s) from your hard drive, or take a new photo(s), if your hardware is capable.
Note: You can decide if you want to add images from this section or from the Photo tab. Kindly refer to section "X. Adding an Image Using Drag and drop Option", later in this article.
VI.C.5 Editing the Estimated Costs
1. In the Comments Recap and Recommendations section, click to highlight the component.
2. Double-click on the Estimated Cost column to display the Add/Edit Comments window, Estimated Costs tab (see above).
3. Double-click on the service you are working with to open the Cost Estimator window (see above).
4. Change the information as needed.
5. Click on  .
.
6. Back on the Add/Edit Comments window, click on .
VI.C.6 Deleting a Component
1. In the Comments Recap and Recommendations section, click to highlight the component that you need to delete.
2. Double-click on  to make the deletion.
VII. Limitations and Costs Tab
Use this tab to indicate the limitations and estimated costs of the components listed.
VII.A Limitations Section
VII.A.1 Entering a Limitation
1. Click in the Area pane to select the Area or Subsection that you want to document.
2. Type the Limitation in the large text field, below the Select from Database/Save to Database button.
VII.A.2 Using a Saved Limitation or Saving a Limitation
1. Click in the Area pane to select the Area that you want to describe.
2. Click on to open the Limitations Database window.
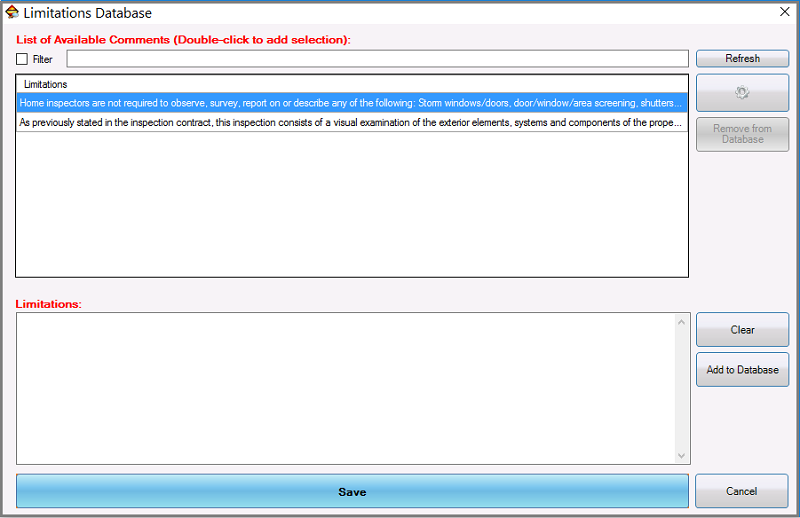
3. Select from the saved Limitations in the upper Limitations box by double-clicking the one you want.
Note: You can also introduce a related keyword in the Filter field, and click on to quickly find the limitation(s).
After making your selection, the selected limitation will display in the lower Entry field.
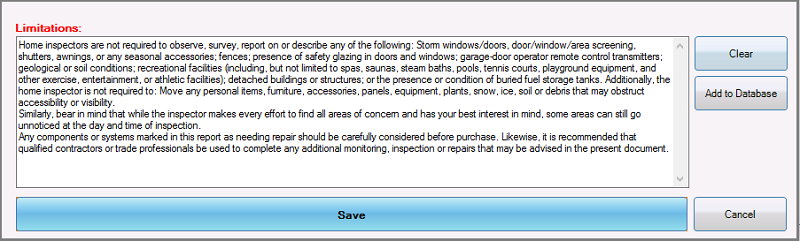
4. Modify the selected text in the lower box, if necessary.
5. If you want to add the new or modified text to the database, click on . If you need to remove it, click on Clear button.
6. Click on to copy the contents of the Entry box into the Limitations text box on the Limitations and Costs tab.
Note: If you want to edit default limitations in the database, click on to open the Software Settings window to the Home Inspection - Limitations function.
To modify this database, kindly refer to the explanation above (section "III.A Editing a Database").
VII.B Costs Estimator Section
Estimated costs previously added on the Description tab will display in this section.
VII.B.1 Calculating the Cost Manually
1. Check the Calculate Manually box.
2. Enter the new cost in the available text field.
VIII. Summary Tab
Use this tab to visualize/edit the comments recap and estimated costs of all the areas and components listed.
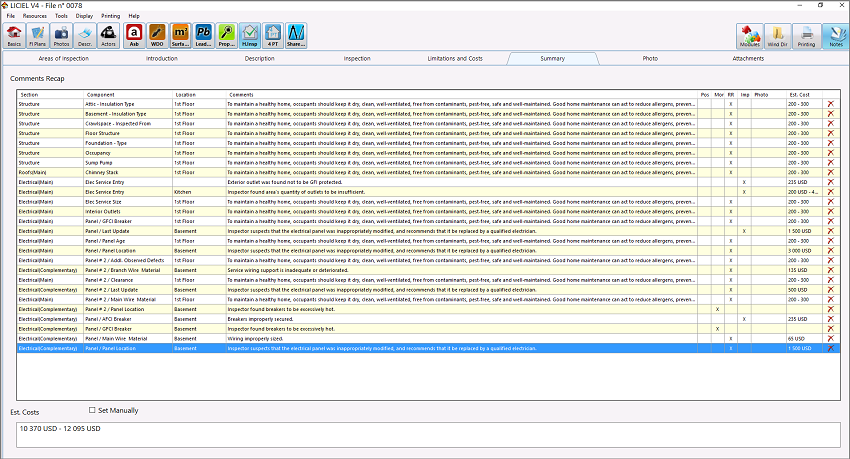
VIII.A Comments Recap Section
If you need to modify Comments, Comment Type, and Estimated Costs values, kindly refer to the respective explanations above (section "V. Inspection Tab).
VIII.A.1 Deleting a Section
1. Click to highlight the section that you need to delete.
2. Double-click on to make the deletion.
VIII.B Estimated Costs Section
The total of the estimated costs previously added on the Description tab, will display in this section.
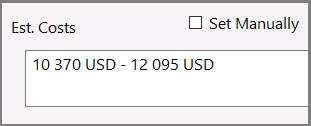
VIII.B.1 Setting the Cost Manually
1. Check the Set Manually box.
2. Enter the new cost in the available text field.
IX. Photo Tab
This tab allows you to manage all the images you previously added for the components listed.
It also allows you to add new photos, edit the image's names, rotate the pictures, and customize photo caption quick buttons, among other functions.

IX.A List of Images Section
Use these options and buttons to manage the List of Images section.
 |
to hide/show the captioned photos. |  |
to share the selected image with the Wind Mitigation Inspection. |
 |
to only show the Home Inspection photos. |  |
to edit the image's location name. |
 |
to hide/show the photo's previews. |  |
to display the following menu to unlink/delete the selected image and remove all photos: 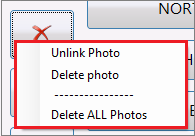 |
 |
to move the selected image up in the list.* |  |
to rotate the selected image. |
 |
to duplicate the selected image's location. |  |
to add a photo. |
 |
to share the selected image with the 4 Point Insurance Inspection. |  |
to move the selected image down in the list.* |
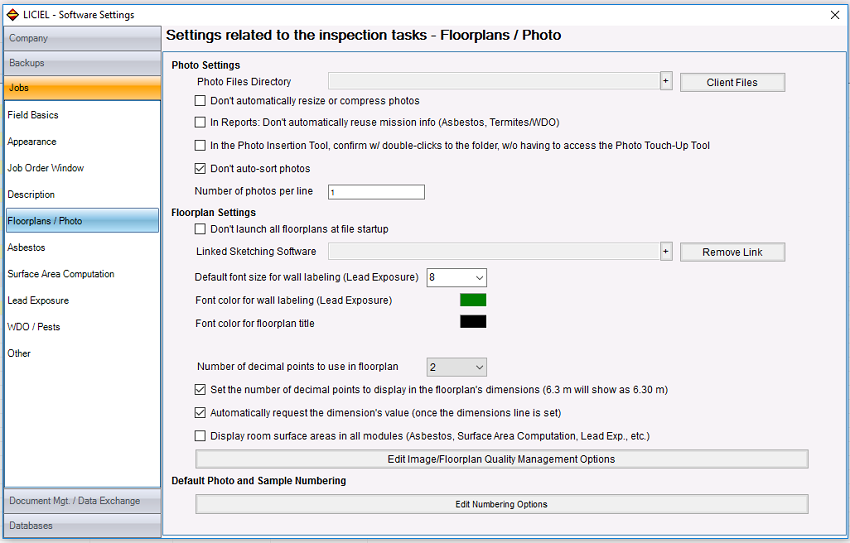
* To activate the  functions: functions: 1. On the Home screen's Menu bar, click on Tools drop-down menu> Software Settings> Jobs> Floorplans/Photo.  box. box.3. Click on the Yes button when closing the window. 4. Back on the Home screen, click on  . . |
|||
IX.B List of Images Section's Columns
When unchecking the  box, you will see the three List of images section's columns:

- Picture: Shows a photo series number associated with the selected image.
- Location: Shows an area printing code and a caption for the selected image.
- Path: Shows the selected image's path on your computer.
X. Adding an Image Using Drag and drop Option
There are two methods for you to add images using the drag and drop option:
- Drag and drop into the List of images section
- Drag and drop into the Photo Caption Quick Buttons
X.A Dragging and Dropping Photos into the List of Images Section
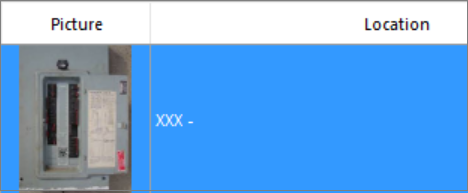
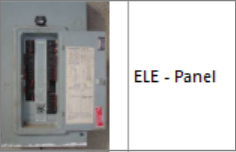
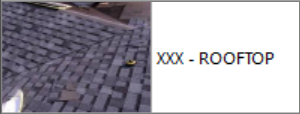
1. Select the image that you want to add from your computer; then, drag and drop it into the List of Images section.
It will show XXX to indicate that its area printing code has not been yet added.
2. Edit the image as needed. To do so, click on to open the Edit Photo window (see below).
3. Select the area where you want the image to appear from the Area of Inspection's drop-down menu.
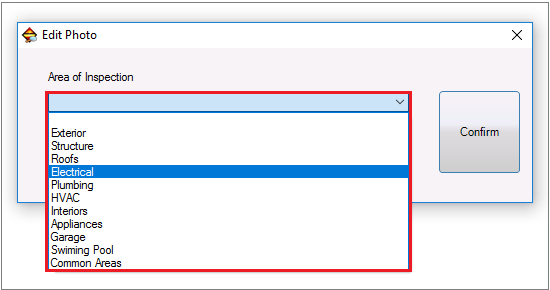
4. Check the  box to enable the following drop-down menu (see below).
5. Select the Area to be inspected.
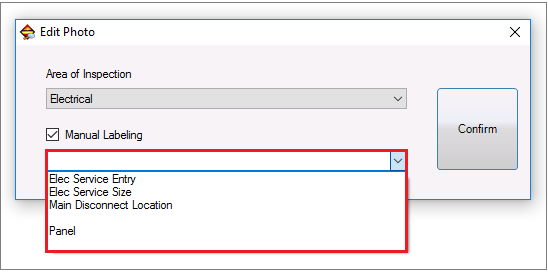
6. Click on  .
.
The image will show its area printing code and the Area to be inspected.
X.B Dragging and Dropping Images into the Photo Caption Quick Buttons
1. Select the image that you want to add from your computer; then, drag and drop it into a Photo Caption Quick Button.
The image will appear in the List of images section. It will show XXX to indicate that its area printing code has not been yet added and the quick button's name.
2. Edit the Photo Caption Quick Button as needed. To do so, right-click on the button in question to display the following menu (see below).
3. Select the Edit this text option.
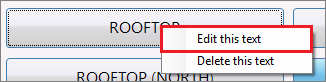
The Edition window will appear (see below).
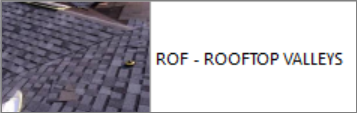
4. Introduce the quick button's new name (optional), the Home Inspection module abbreviation (HI) to associate the image with this module, and the printing code for the area where you want the image to appear (for example, ELE for Electrical, PLU for plumbing, ROF for Roof, etc.).
Note. You can find the area's printing codes in the Areas of Inspection tab>  button> Show Settings Columns and Options> Printing Code column.

5. Click on to save it. To cancel the operation, click on .
The photo caption quick button will show the changes immediately.
6. Check the box to display the image's preview.
7. Click on the quick button again to link it with the image.
The image will show its area printing code and the quick button's new name, as shown below.
If you want to remove the quick button's name, kindly refer to section "XVIII. Photo Caption Quick Buttons", later in this article.
X.B.1 Working on the Edition Window
While working on the Edition window (see above) to edit the quick button's name, you can also do the following:
a) Share a selected image with other modules.
b) Add a caption on a selected image and sharing it with other modules.
a) Sharing a Selected Image with Other Modules
1. In the Photo Caption Quick Buttons section, right-click on the button you are working with.
2. Select the Edit this text option from the menu to display the Edition window (see below).
3. Right after the Home Inspection abbreviation, enter the # symbol plus the abbreviation for the module that you are sharing the image with (e. g. 4PT).

4. Click on to save the operation. To cancel it, click on .
The photo caption quick button will show the module's abbreviations immediately.


Click on to save the operation. To cancel it, click on .
5. On the Menu bar, click on File> Save to save the operation.
The image that you just shared will appear in the List of images section from both the 4 Point Insurance Inspection and Wind Mitigation Inspection.
Note: If you are working with the 4 Point Insurance Inspection and/or Wind Mitigation Inspection modules, and would like to share photos with the Home Inspection Module, you just have to enter the # symbol plus the Home Inspection abbreviation (HI) right after the quick button's name.
b) Adding a Caption on a Selected Image/Sharing it with Other Modules
1. In the Photo Caption Quick Buttons section, right-click on the button you are working with.
2. Select the Edit this text option from the menu to display the Edition window (see below).
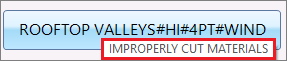
3. Right after the quick button's name, enter the braces ( {} ), the caption that you want to add, the Home Inspection abbreviation, and the area's printing code.

4. Click on to save it. To cancel the operation, click on .
The quick button will show its name, the Home Inspection abbreviation, and the area's printing code.

 to save it. To cancel the operation, click on .

It will also register the caption.
Move your mouse over the button to visualize it.
5. Uncheck the box.
6. Click on the quick button again to link it with the image.
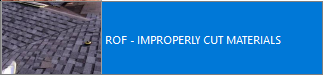
The image will show its area printing code and the caption that you just added.
- 7. On the Menu bar, click on File> Save to save the operation.

- The image will also appear in the List of images section from both the 4 Point Insurance Inspection and Wind Mitigation Inspection, and it will show the caption that you just shared.

Note: For the rest of the quick button's functions, kindly refer to section "XVIII. Photo Caption Quick Buttons", later in this article.
XI. Adding an Image Using the Camera Button
Besides adding photos using the drag and drop option, you can also add them using the camera button, but make sure that there is at least one photo in the List of images section.
1. In the List of Images section, click to highlight the Location where you want the new photo to appear.
2. Click on to display the Image Selection window if you want either to associate an existing photo from your hard drive or data storage devices, or take a new photo, if your hardware is capable.
- 3. Upload the image.
The picture will be added to the List of Images section. It will show the same Picture series number and the same Location's name than the reference location.

To change its location's name, kindly refer to section "XIII. Editing a Picture's Location Name".
XII. Duplicating an Image's Location
Note: To duplicate an image's location, it must belong to the module you are working with.
1. In the List of Images section, click to highlight the picture's location that you want to duplicate.
2. Click on .
A new line will display in green in the List of Images section. It will show the same Picture series number and the same Location's name than the reference location, but it will not show its path since the photo was not duplicated.

3. Add it a photo by following the above mentioned steps (section "XI. Adding an Image Using the Camera Button").
XIII. Editing a Picture's Location Name
1. In the List of Images section, click to highlight the picture's location that you want to edit.
2. Click on to display the Edition window (see above - section "X.A Dragging and Dropping Photos into the List of Images Section" ).
3. Make the desired changes.
4. Click on  .
.
XIV. Unlinking/Deleting an Image and Removing all Photos
XIV.A Unlinking an Image
1. In the List of Images section, click to highlight the picture that you want to unlink.
2. Click on to display the following menu (see below):
3. Select the Unlink photo option.
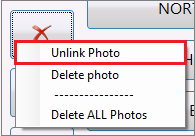
The image will disappear from the list, but its location will stay just in case that you want to link another photo on it.
XIV.B Deleting an Image
1. In the List of Images section, click to highlight the picture that you want to remove.
2. Click on to display the following menu (see below):
3. Select the Delete photo option.
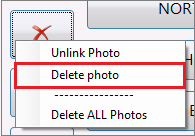
A confirmation/countdown pop-up window will appear.
3. Click on the Yes button to confirm the deletion, or on the No button to cancel it.
XIV.C Deleting all Images
1. Click on to display the following menu (see below):
2. Select the Delete all photos option.
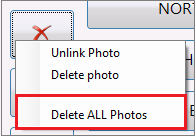
A confirmation/countdown pop-up window will appear.
3. Click on the Yes button to confirm the deletion, or on the No button to cancel it.
XV. Rotating an Image
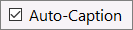
1. Uncheck the Auto-Caption box.
2. In the List of Images section, click to highlight the picture that you want to rotate.
To see the image's previews, move the mouse up and down on the Picture column.

3. Click on as much as necessary until the image is to your liking.
XVI. Sharing an Image with the 4 Point Insurance Inspection
1. In the List of Images section, click to highlight the picture that you want to share.
2. Click on .
The selected image will appear in the 4 Point Insurance Inspection module.
XVII. Sharing an Image with the Wind Mitigation Inspection
1. In the List of Images section, click to highlight the picture that you want to share.
2. Click on .
The selected image will appear in the Wind Mitigation Inspection module.
XVIII. Photo Caption Quick Buttons Section
This section allows you to associate your photos with default photo caption quick buttons, and edit the quick button's names as explained in section "X.B Dragging and Dropping Images into the Photo Caption Quick Buttons".
It also allows you to add names to a blank buttons and delete button's names, as explained below. Since the buttons are editable, you can also create a personalized database via the Software Settings tool (see explanation later in this article).
XVIII.A Adding a Name to a Blank Button
1. In the Photo Caption Quick Buttons section, click on  to display the Edition window.

2. Introduce the button's name.
3. Click on . To cancel the operation, click on .
The photo caption quick button will show the name immediately.
XVIII.B Deleting a Button's Name
1. In the Photo Caption Quick Buttons section, right-click on the button that you want to remove the name to display this menu.
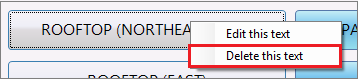
2. Select the Delete this text option.
The photo caption quick button will be blank again.
XVIII.C Customizing the Buttons Via the Software Settings
XVIII.C.1 Adding a Name to the Photo Caption Quick Buttons
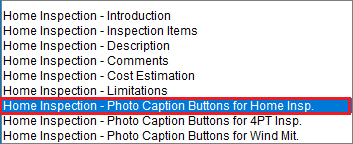
1. From the Home Inspection Module's expanded module settings menu, select the Edit Databases option.
The Edit Databases option opens the Software Settings window to the Home Inspection - Inspection Items function.
2. From the Function's drop-down menu, select the Home Inspection - Photo Caption Buttons for Home Inspection option.
3. On the following window, click on  to create a new line at the bottom of the photo caption quick buttons list.
4. Double-click on the line to display the Edition window:

5. Enter the button's name.
6. Click on . To cancel the operation, click on .
7. Back on the Software Settings window, click on  .
.
The photo caption quick button's name will appear in the selected line.
XVIII.C.2 Editing a Button's Name
1. On the Software Settings window, select the line to be edited.
2. Click on  to display the Edition window.

3. Modify the text as needed.
4. Click on . To cancel the operation, click on .
5. Back on the Software Settings window, click on .
The photo caption quick button's name will change immediately.
Note: You can also edit the button's name by double-clicking on the line to be edited to display the Edition window; then, follow the above mentioned steps (steps 3 to 5).
XVIII.C.3 Duplicating a Button's Name
1. On the Software Settings window, click on the reference line you want to work with.
2. Click on  .
.
The duplicated button's name will appear below the reference line.
XVIII.C.4 Deleting a Button
1. On the Software Settings window, click on the line that you want to remove.
2. Click on  .
.
A confirmation/countdown pop-up window will appear.
3. Click on the Yes button to confirm the deletion, or on the No button to cancel it.
XVIII.C.5 Saving all Changes
1. After finishing all additions/changes/deletions on the Photo Caption Buttons for Home Inspection function, click on .
2. Close the Software Settings window, then click on the Yes button in the confirmation window.
Back on the Home Inspection's Photo tab, all edited photo caption quick buttons will show the customization that you just done.
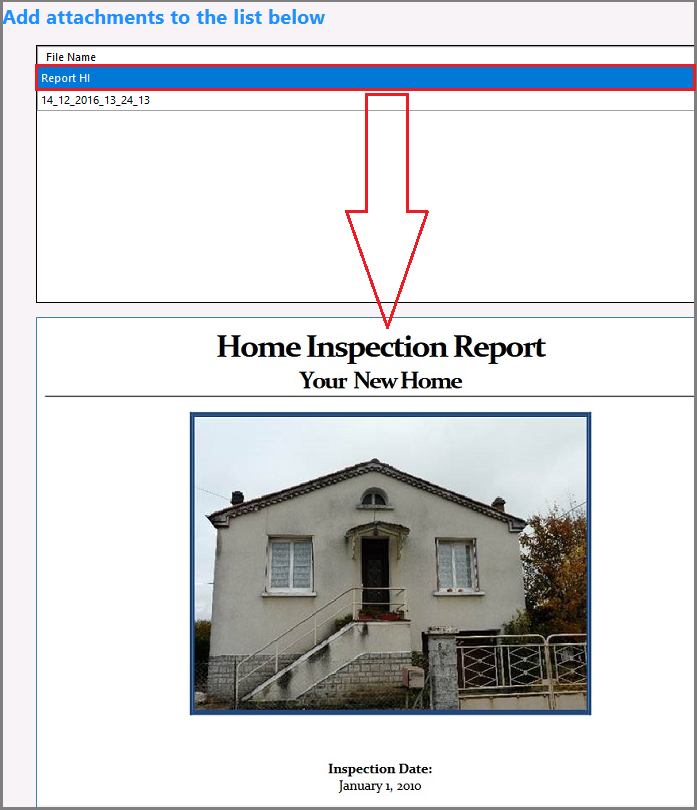
XIX. Attachments Tab
Use this tab to add attachments related to the inspected property, such as PDF documents and images (bmp, jpg, jpeg, and gif formats).
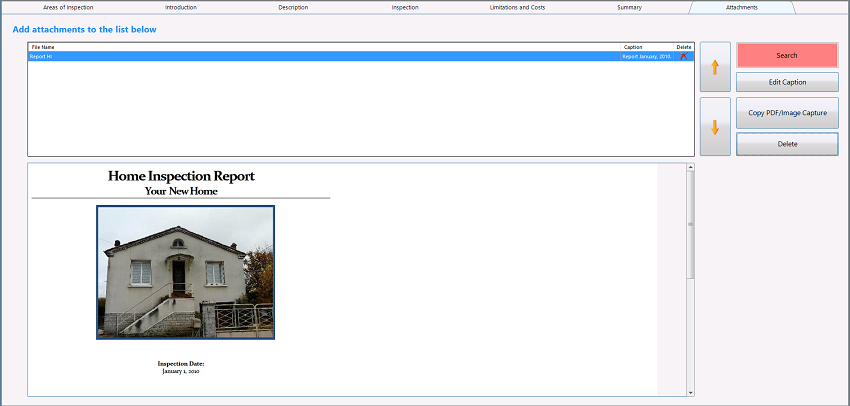
XIX.A Add Attachments to the List Below Section
This section gives you access to the Attachments List, the file's names, and their respective captions.
XIX.A.1 Adding an Attachment
1. Click on  (on the far right).
2. Select the attachment that you need to add from your computer.
3. Upload it.
The file's name will appear in the Attachments List, and a preview of the file just loaded will display in the lower section.
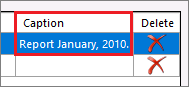
XIX.A.2 Adding/Editing a Caption
1. In the Attachments List, click to highlight the attachment you want to work with.
2. Click on  to display the Edition window.

3. Add/Edit the caption.
4. Click on . To cancel the operation, click on .
The added/edited caption will appear in the Caption column.
XIX.A.3 Adding an Screenshot From your Clipboard
1. Capture the image.
2. Click on 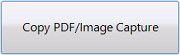 (on the far right).
The file's name will appear in the Attachments List, and a preview of the screenshot will display in the lower section.
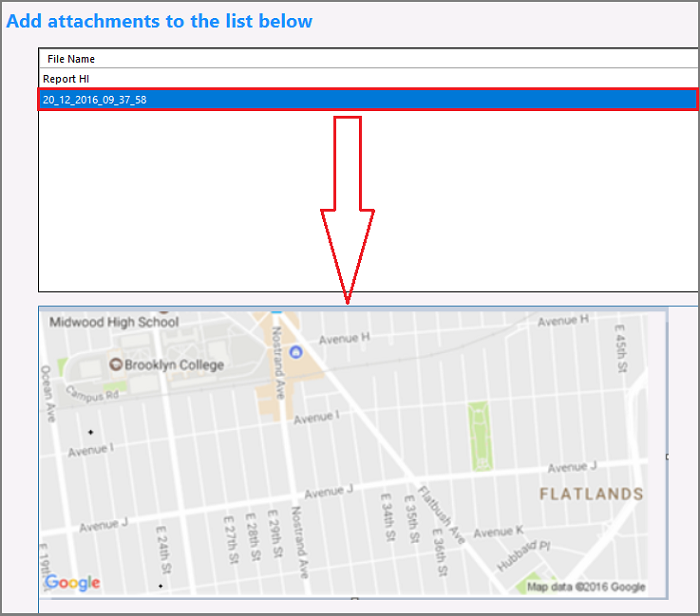
Note: The file's name will be the current date and time the screenshot was taken.
If you want to add a caption to the screenshot, just follow the above mentioned steps.
XIX.A.4 Deleting an Attachment
1. In the Attachments List, click to highlight the attachment that you need to remove.
2. Click on  (on the far right).
A confirmation/countdown pop-up window will appear.
3. Click on the Yes button to confirm the deletion, or on the No button to cancel it.
You can also delete it by clicking on on the Delete column.
XIX.A.5 Sorting the Attachments
1. In the Attachments List, click to highlight the attachment that you need to sort.
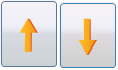
2. Use these arrows to sort it according to your needs.