| Job Order Tool |
I. Job Order Window
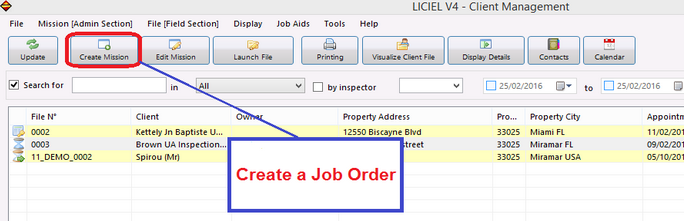
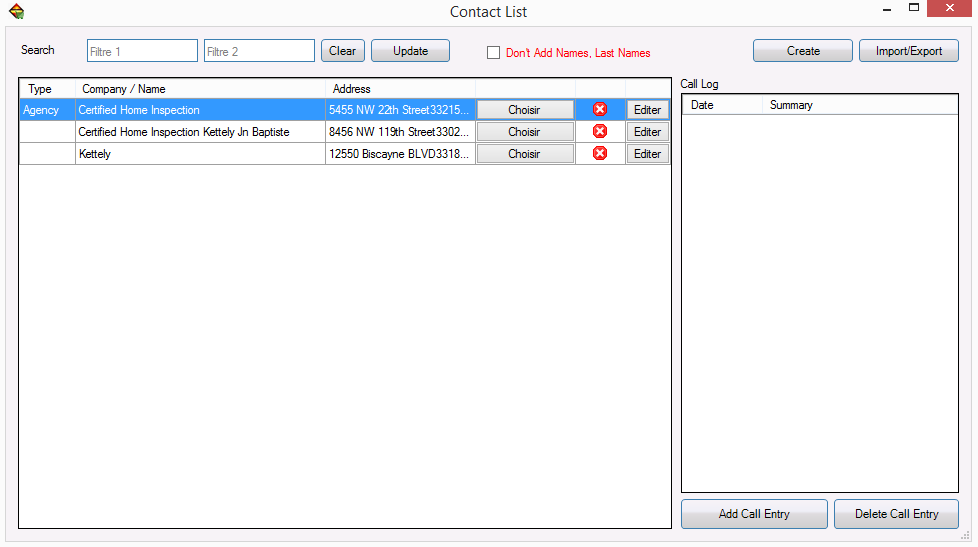
To create a Job Order, you must click on the "Create Mission" button located in the top menu of the Client Management tool (see the window shown below).
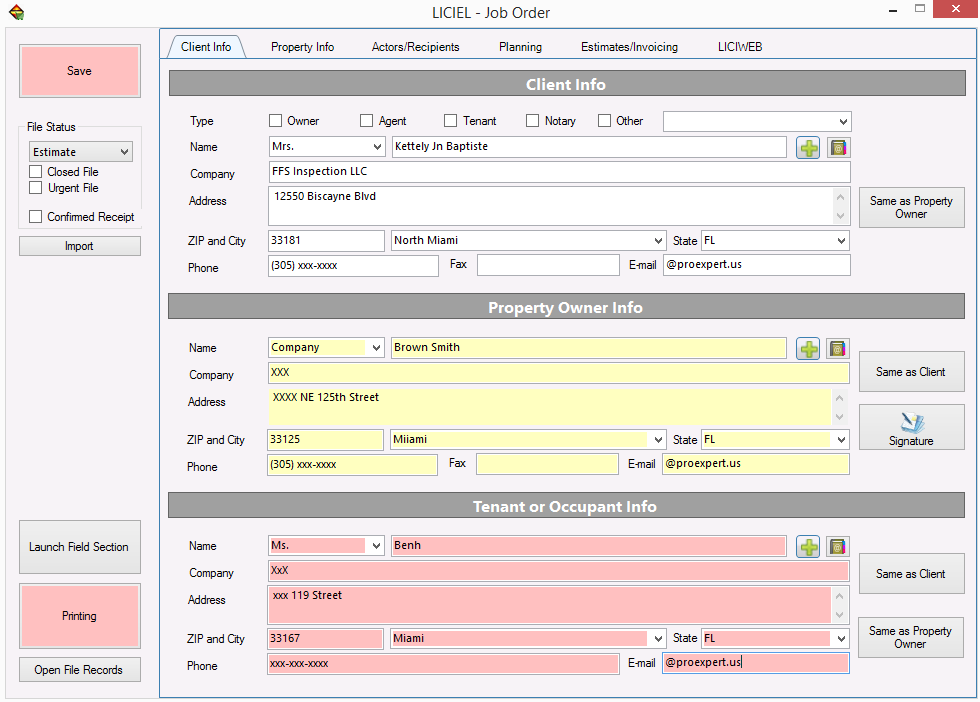
I.A Client Info Tab
Client information tab allows you to provide information regarding the client for whom the mission will be presented.
I.A.1 Client Info Section
"Owner, Agent, Tenant, Notary, Other" checkboxes allow you to specify who is the primary client.
The drop-down menu to the right of the checkboxes allows you to specify the intermediary (Agency Yellow Pages, Owner, Contributor, Tenant, Notary, Other) which will be recorded in the statistics.
In the "Name" section, the drop-down menu lets you specify the status of the client (Mr., Mrs., Ms., SCI, Master Agency, Mr. & Miss, Mr. & Mrs. Gentlemen, Ladies and Company).
In the "Name" field, you can specify the name, first name or business name of the client.
"Address" field allows you to specify the address of the client.
"ZIP and City" fields are used to indicate the Client's address. You will notice entering the ZIP code, the software will automatically suggest the common associated with it from the drop-down menu to the right of the ZIP Code field.
"Phone" field allows you to specify the client phone number.
"Fax" field allows you to indicate the fax number of the client.
"E-mail" field allows you to specify the e-mail address of the client.
"Same as Property Owner" button allows you to directly import the information entered in the bottom which is the the Property Owner Info.
|
|
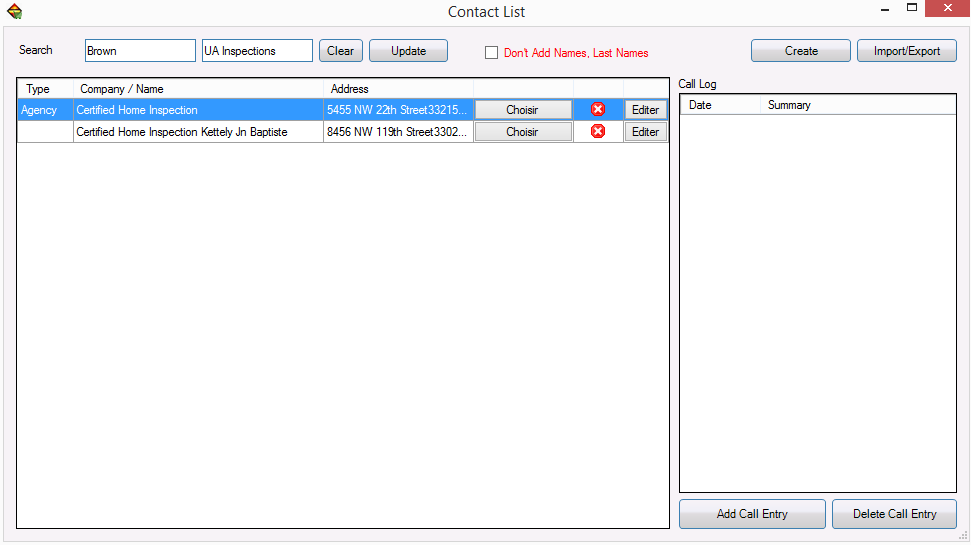
button allows you to add the contact details in the window shown below. |
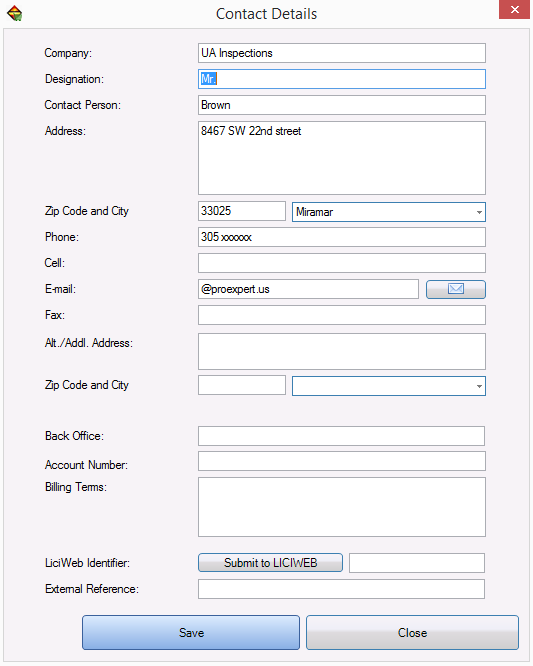
-->--> Refer to the "Directory" Wiki article for a description of the window shown above.
|
|
button allows you to access the calendar. |
-->--> Refer to the "Calendar" Wiki article for a description of the window shown above.
I.A.2 Owner Identification Section
"Owner, Agent, Tenant, Notary, Other" checkboxes allow you to specify who is the property owner.
The associated drop-down menu of the checkboxes allows you to specify the intermediary (Agency Yellow Pages, Owner, Contributor, Tenant, Notary, Other) which will be recorded in the statistics.
In the "Name" section, the drop-down lets you specify the status of the property owner which are (Mr., Mrs., Ms., SCI, Master Agency, Mr. & Miss, Mr. & Mrs. Gentlemen, Ladies and Company).
In the "Name" field, you can specify the name, first name or business name of the property owner.
"Address" field allows you to specify the address of the property owner.
"ZIP and City" fields are used to indicate the Client's address. You will notice entering the ZIP code, the software will automatically suggest the common associated with it from the drop-down menu to the right of the ZIP Code field.
"Phone" field allows you to specify the property owner phone number.
"Fax" field allows you to indicate the fax number of the property owner.
"E-mail" field allows you to specify the E-mail address of property owner.
"Same as Property Owner" button allows you to directly import the information entered in the bottom which is the client Info.
I.A.3 Tenant or Occupant Info Section
"Owner, Agent, Tenant, Notary, Other" checkboxes allow you to specify who is the property owner.
The drop-down menu to the right of the checkboxes allows you to specify the intermediary (Agency Yellow Pages, Owner, Contributor, Tenant, Notary, Other) which will be recorded in the statistics.
In the "Name" section, the drop-down lets you specify the status of the tenant which are (Mr., Mrs., Ms., SCI, Master Agency, Mr. & Miss, Mr. & Mrs. Gentlemen, Ladies and Company).
In the "Name" field, you can specify the name, first name or business name of the tenant.
"Address" field allows you to specify the address of the tenant.
"ZIP and City" fields are used to indicate the tenant's address. You will notice entering the ZIP code, the software will automatically suggest the common associated with it from the drop-down menu to the right of the ZIP Code field.
"Phone" field allows you to specify the tenant phone number.
"Fax" field allows you to indicate the fax number of the tenant.
"E-mail" field allows you to specify the E-mail address of the tenant.
"Same as Client" button allows you to directly import the information entered in the bottom which is the client information.
"Same as Property Owner" button allows you to directly import the information entered in the bottom which is the property owner Info.
I.B Property Info Tab
The property info tab allows you to provide information about the property owner. His adress and the property description are neened in order to complete the job order.
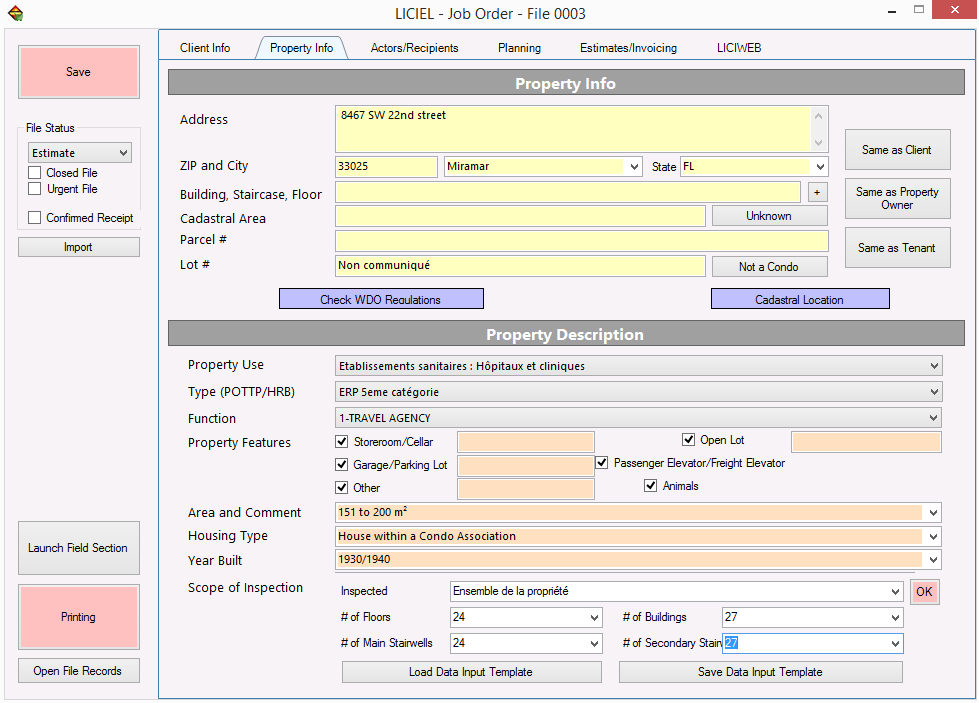
I.B.1 Property Info Section
Shortcuts:
You can import the address of the client by clicking on the "Same as Client" button .
You can import address of the property owner by clicking on the "Same as Property Owner" button.
You can import the tenant's address by clicking on the "Same as tenant" button.
Note: The "Not a Condo" button allows you to specify that the consignment is not part of the condominium by the mention "This property is not part of a condominium".
"Check WDO Regulations" button allows you to search the Internet database to check if the city identified by the ZIP code has regulations on the termite's inspection.
"Cadastral Locations" button allows you to question the basic Internet service and also allows you to search, view and order these map sheets from the following internet address : http://www.cadastre.gouv.fr/ scpc/accueil.do (nouveau site à créer)
"Address" field allows you to specify the address of the inspected property.
"ZIP and City" field is used to indicate the ZIP Code and city to be inspected. It should be noted that, as in the "Client Info" tab if you enter a ZIP Code, the software will propose the list of associated cities.
In the "Building, Stairs, Floor" fields you can specify the building number, the staircase and the floor of the property to be inspected.
|
|
button allows you to dicplay another way to complete the information regarding the "Building, Stairs, Floor" field. |
![]()
This area allows you to enter faster the information about the perimeter tracking.
"Cadastral Area" field allows you to specify the reference of the cadastral section to be isnpected. If the land registry information was not provided, please click on the "Unknown" button.
"Parcel #" field allows you to specify the piece of land number to be inspected.
"Lot #" field allows you to specify the lot number of the property to be inspected.
I.B.2 Property Description Section
In the setion shown below, you will provide the property description which are the : type, function, features, the construction year and the scope of inspection in order to complete the job order.
"Property Use" drop-down menu allows you to describe the inspected property.
You will have the choice between the elements shown below.
This list is non-exhaustive.
|
Agricultural |
Health Hospitals Institution/Clinic |
|
Crafts |
Social Institutions |
|
Other building of culture and leisures |
Housing (Individual Houses) |
|
Others |
Housing (Private Building) |
|
Offices |
Housing (Common Areas) |
|
Trade |
Industry |
|
Primary/Secondary Education |
Sports Premises |
|
Higher Education/Research |
"Type (POTTP/HRB" field allows to describe the category of the property to be inspected if it fits into the premises open to the public.
You will have the choice between these different elements.
This list is non-exhaustive
- Others
- Premises open to the public 3RD and 4th Category
- Premises open to the public 5th Category
- Premises open to the public 1St and 2nd Category
"Function" drop-down menu allows you to select the type of the property to be inspected.
You will have the choice between these different elements.
This list is non-exhaustive
- Others
- Dweeling Sale
- Rental Management
- Common Property
"Property Features" checkboxes allow you to select the characteristic room to be inspected.
"Storeroom/Cellar" checkbox allows you to specify if the property comes with a basement or a cellar (you can enter additional information in the text field).
"Garage/Parking Lot" checkbox allows to specify if the property comes with a garage or a parking lot (you can enter additional information in the text field).
"Other" checkbox allows you to inquire if the property has another attached lot (you can enter additional information in the text field).
"Open Lot" field allows you to specify the total area of the property on which you will perform the inspection.
"Passenger Elevator/Freight Elevator" allows you to specify the presence of these elements in the nspected property.
"Animals" allows you to specify in the report the presence of animals in the inspection.
"Area and Comment" field allows you to specify the surface and any comments about the property to be inspected.
In the "Housing Type" drop-down menu, you can select the size of the property to be inspected.
This list is not exhaustive and can be modified by the "Tools / Settings" menu modified databases. The database section that you have to change is called:
"General type of housing".
In the "Year Built" dropw-down menu, you can select the construction year of the property to be inspected
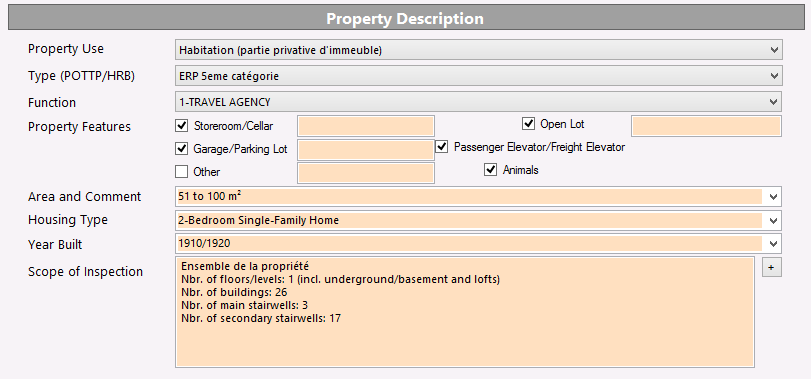
"Scope of inspection" allows you to specify the locations (such as levels for example) to be inspected and by clicking on the "+" button you will access the section shown below which will allow you to provide information about the scope of locating faster. Once you done, click on the "OK" button to save the information.

"Inspected" drop-down menu allows you to insert comments about the inspected parts of the housing or property.
"# of Floors" drop-down menu allows you to specify the number of levels of the property. Note that you must include all levels. Cellars and attics included.
"# of Buildings" drop-down menu allows you to insert the number of buildings to be inspected.
"# of Main Stairwells" drop down menu allows you to enter the number of main stairwells to be inspected.
"# of Main Secondary Stairwells" drop-down menu allows you to enter the number of secondary stairwells to be inspected.
"Load Data Input Template" button allows you to load an existing model from your computer.
"Save Data Input Template" button allows you to save a template of the job order that you have just written.
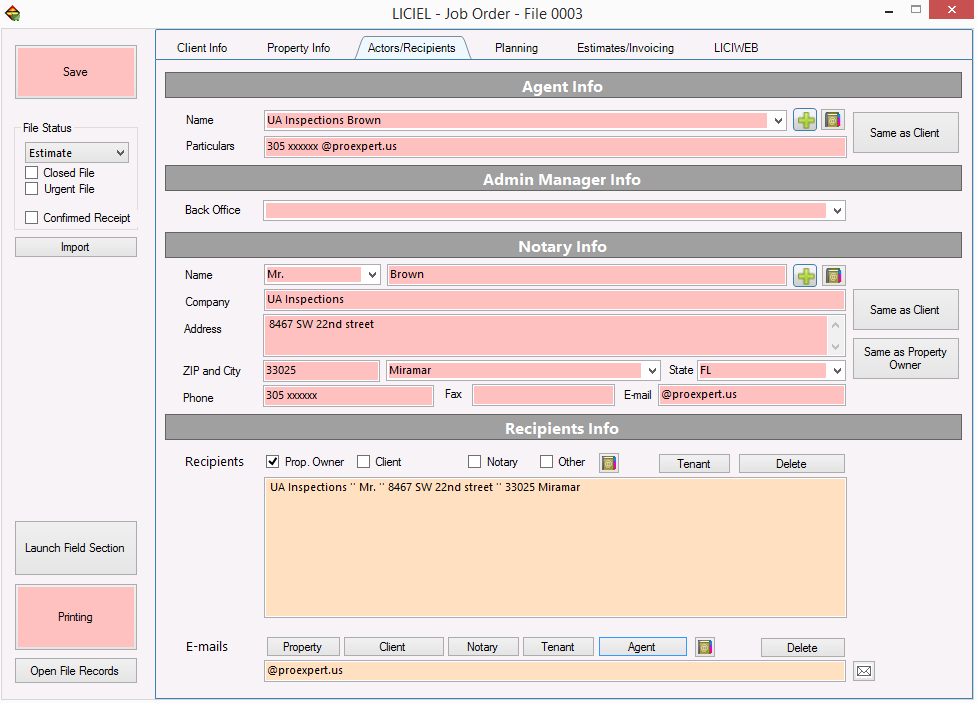
I.C Actors/Recipients Tab
The Actors/Recipients tab allows you to provide information about the intermediary, the administrative manager, the notary and the recipients in order to complete the job order.
I.B.2 Property Description Section
Please enter the name of the agent or select it from the drop-down menu.
You can manually fill in the "Details" field.
The "Same as Client" button allows you to automatically fill in the information on the payer.
|
|
button allows you to add the contact details in the window shown below. |
-->--> Refer to the "Directory" Wiki article for a description of the window shown above.
|
|
button allows you to access the contact's list by in the window shown below. |
-->> Consult the "Calendar" tool Wiki article for more information of the window shown above.
I.C.2 Admin Manager Info Section
"Back Office" drop-down menu allows you to inform the head of the administrative management of the file in question.
I.C.3 Notary Info Section
"Name" drop-down menu allows you to specify the status of the notary (Mr., Mrs., Ms., SCI, Master Agency, Mr. & Miss, Mr. & Mrs. Gentlemen, Ladies and Company).
"Name" field allows you to specify the first or last name of the notary.
"Company Name" field allows you to add the notary's company name.
"Address" field to specify the address of the notary.
"ZIP Code" and "City" are used to indicate the ZIP Code, the city of the notary. You will notice by entering the ZIP Code, the software automatically offers the cities associated with it from the drop-down menu to the right of the postal code field.
"Phone" field allows you to specify the notary's phone number.
"Fax" field allows you to specify the notary fax number.
"E-Mail" field to specify the e-mail address of the notary.
"Same as Client" button allows to directly import the information about the client.
"Same as Property Owner" button allows you to directly import the information about the property owner.
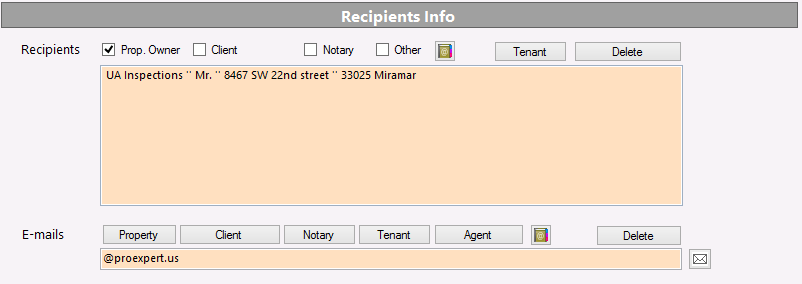
I.C.4 Recipients Info Section
The recipient checkboxes allow you to select one or more recipients of the inspection report.
It is the same for "E-mail" bottom section, but you will have to click on the E-mail button.
I.D "Planning'' Tab
This tab allows you to better organize your mission.
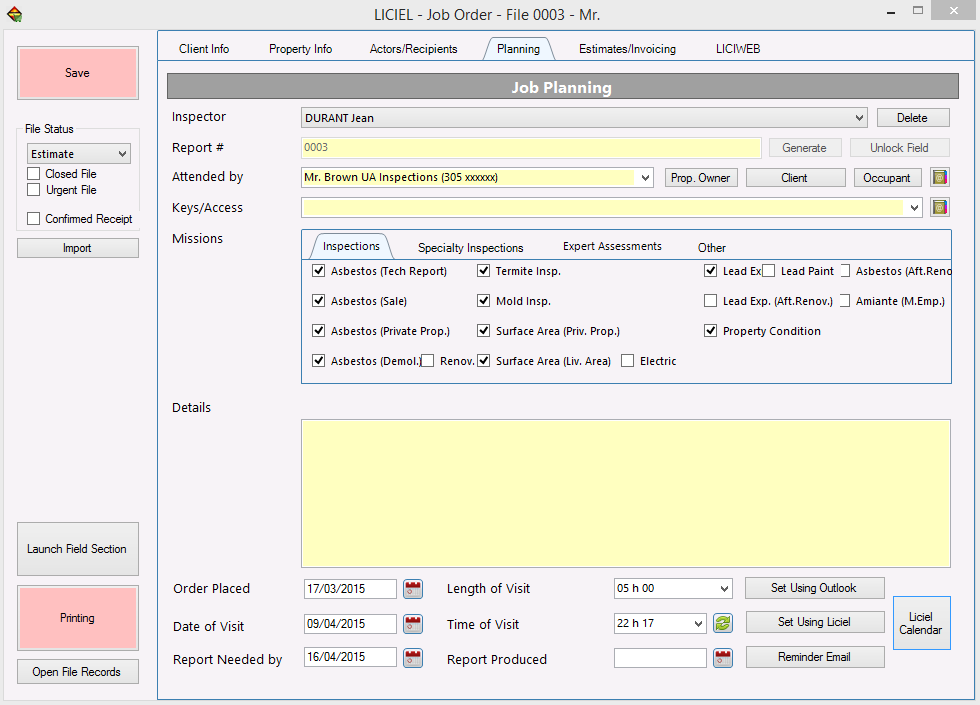
"Inspector" drop-down menu allows you to select the inspector who will perfom the mission. Refer to the software options chapter for the terms of implementation of this list.
"Reports #" field is locked by default. He shows us the mission number. It can be set in ->> Tools - Software Settings - Numbering.
By default, when you start a mission, the field is empty then you only need to click on the "Generate" button to create a new report number.
To manually edit the report number field, click on the "Unlock Field" button.
"Attented by" field allows you to specify the name of the person who will be present with the inspector during the inspection. You can import the property owner name by clicking on the
"Same as Proprty Owner" button or the name of the client by clicking on the "Same as Client" button. The drop-down menu is freely editable as a text field.
"Keys/Access" drop-down menu gives you the choice between these values:
(This list is not exhaustive)
- On site data by the Agency.
- On site, given by the Property Owner.
- Recover to the agency.
- Recover to the address.
The checkboxes corresponding to the "Missions" menu shown below allow you to select which missions will be performed during the inspection.
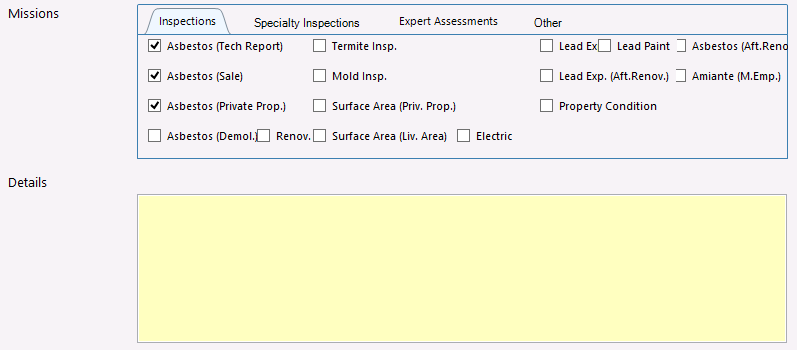
"Details" field allows you to specify any details of the inspection to be made.
Complementary missions set in "Other":
You can change the name of the checkboxes in the "Other" tab --> The Tools menu / Software Settings / Databases / Company's Drop-down Menus/ Statistics - Additional boxes in the Job Order section.
These boxes will be inserted in the report due to variables Diag + _01, _02 Diag +, Diag + _03 ...
Intervention dates :

| Whenever you see the |
|
button appear, you can click it to access the calendar and enter a date more easily. |
"Set using Outlook" button opens your Outlook calendar in order to add the event to your calendar.
"Set Using LICIEL" button opens the LICIEL calendar in order to add to the event calendar.
You can personnalize the model used by editing the file indicated when you let the mouse and hold the button, a list of available fields on the page http://wikiliciel.liciel.com/?index=2499&recherche=champs
You can create a new confirmation Email ready to be sent to your client via Outlook or Thunderbird) by clicking on the "Reminder Email" button.
You can personnalier the model used by editing the file indicated when you let the mouse and hold the button, a list of available fields on the page http://wikiliciel.liciel.com/?index=2499&recherche=champs
"LICIEL Calendar" button allows you to access the window below in order to add an appointment.
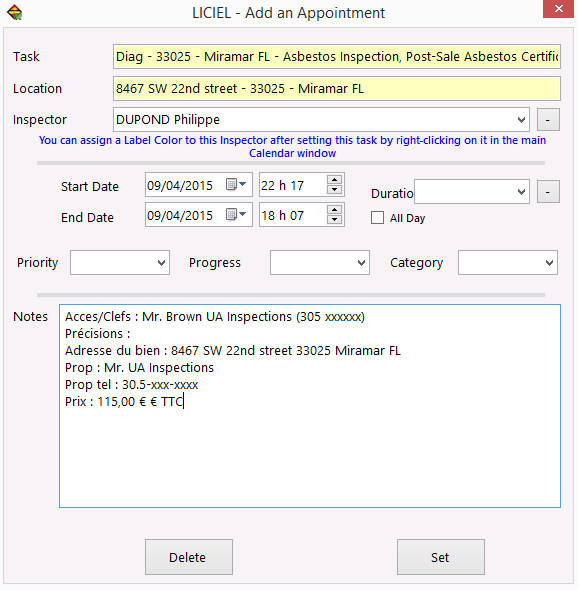
Please manually fill in the "Location" field. You can select your inspector from the associated drop-down menu. The "-" button to the right of the drop-down menu allows you to remove the inspector of the field.
Calendars are available in the "Start Date" and "End Date" fields to select the corresponding dates of the mission.
"Duration" drop-down menu allows you to inform the estimated time of the mission. The "-" button to the right of the drop-down menu allows you to remove the duration of the field.
You can select the level of "Priority, Progress and Category" of the mission from the drop-down menus.
"Delete" button allows you to cancel the appointment.
"OK" button allows you to save the appointment.
I.E "Estimates/Invoicing'' Tab
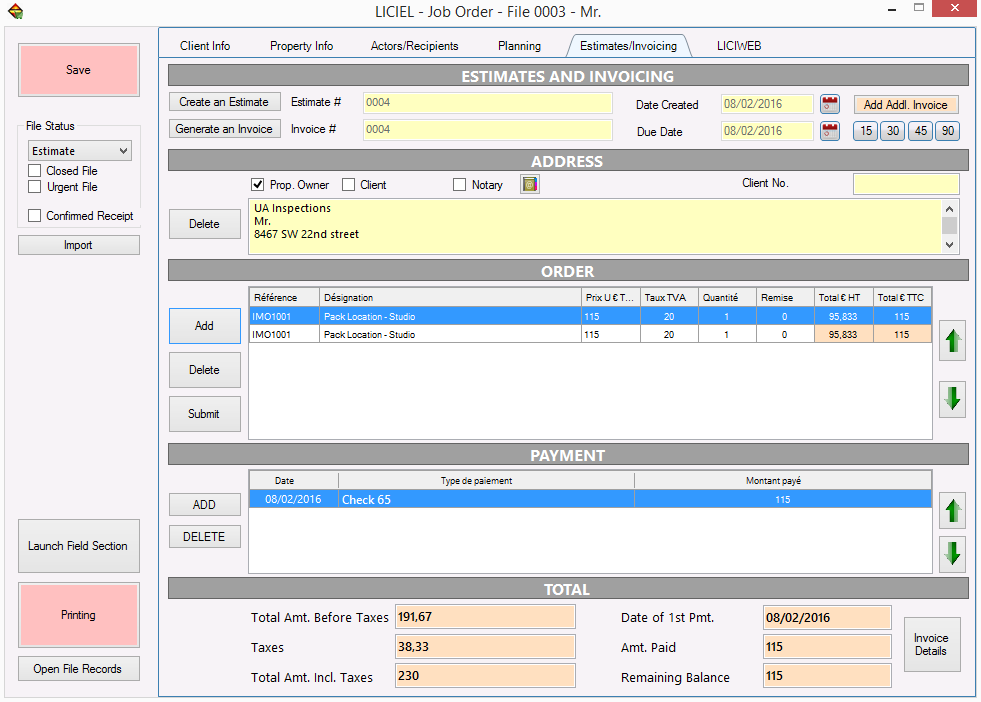
I.E.1 "ESTIMATES AND INVOICING" Section

"Create an Estimate" button generates as part of a new mission a new quote number. It automatically generates when adding product, service .
"Create Invoice" button allows you to generate a new invoice. It automatically generates when adding payment.
If you want to change the invoice number or just delete it after an error, simply double-click on the invoice word of the "Invoice Number" text (placed to the right of the yellow box).
"Created Date" allows to specify the release date of the invoice.
"Due Date" allows you to specify the validity date of the invoice.
| You can quickly insert a date by clicking on the |
|
button. |
"Add Addl. Invoice" button allows you to create another invoice for the same mission.
I.E.2 "ADDRESS" Section
This box allows you to select all billing addresses according to the actor. To do this, you need to check the corresponding box. If you have a customer account number for this person, you can note this in the "Client No. " field.

I.E.2 "ORDER" Section
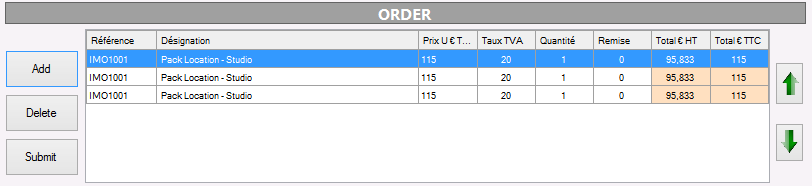
Once you have selected your product you can simply press the "Add" button to add it in the table below the selection bar of sales.
Similarly you can remove a product from the table by selecting the row and clicking on the button
Note that you can change the name of your product directly in the table by double clicking on the line.
A dialog box with a text field opens, all you have to do, is change the text and click on "OK". If you have opened in error the dialog box, just click on "Cancel".
I.E.2 "PAYMENT" Section

To add a new row to the table of payment click on the "Add" button.
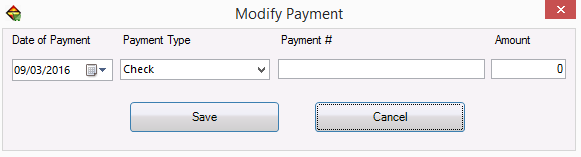
You will be prompted to enter the date, type, number of payments and the amount paid to your client.
For the type of payment following non-exhaustive list that you can choose:
- Cash - Postal Cheque
- Bank check - Against reimbursement
- Bank card - Paypal
- Advance payment - Internet Payment
- Transfer
The software can manage the payments in several times. To do this, type one line per payment, the amount due will be calculated automatically.
You can delete a payline by clicking on the "Delete" button.
I.E.3 "TOTAL" Section

- Total Amount Before Taxes: the invoice total amount before taxes.
- Taxes: the total amount of the tax on the added value of your invoice.
- Total Amt. Incl. Taxes: the total amount including the taxes.
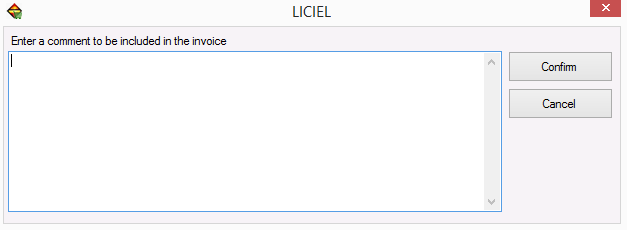
The "Invoice Details" button allows to enter a comment to be included in the invoice in the window shown below.
I.F " LICIWEB" Tab
In this tab you can set the connection interface notice between LICIEL Software and LICIWEB.

"Total Mileage" drop-down menu allows you to specify the mileage you've done to make your inspection. Note that this field is freely editable.
"File's Web Address" field allows you to enter the information regarding the Web Address. By clicking on the "Visual.." button, you will access the Web Address files in your documents folder.
"Notes and Comments" field allows you to freely record information about the mission.
ANNEX - Description of side buttons:
|
|
- "Save" button allows you to save at any time the data that you just modified. (This list is exhaustive) - Quote confirmed. - Diag underway. - Diag pending. - Go to reschedule. - By publishing reports. - Printed reports. - Current Invoice. - Payment pending. - File closed. - Mission canceled. - Diag canceled. "Closed File" checkbox allows you to close the file. "Urgent File" checkbox allows you to mark the file as priority. "Launch Field Section" button allows you to view your files in your Windows directory."Printing" button launches the Printing module. "Open File Records" button starts or open the file directly.
|
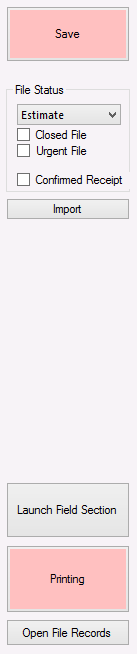
"Import" button allows you to import the selected folder in the "Client Information" tab by clicking the "Select" button in the window shown below.
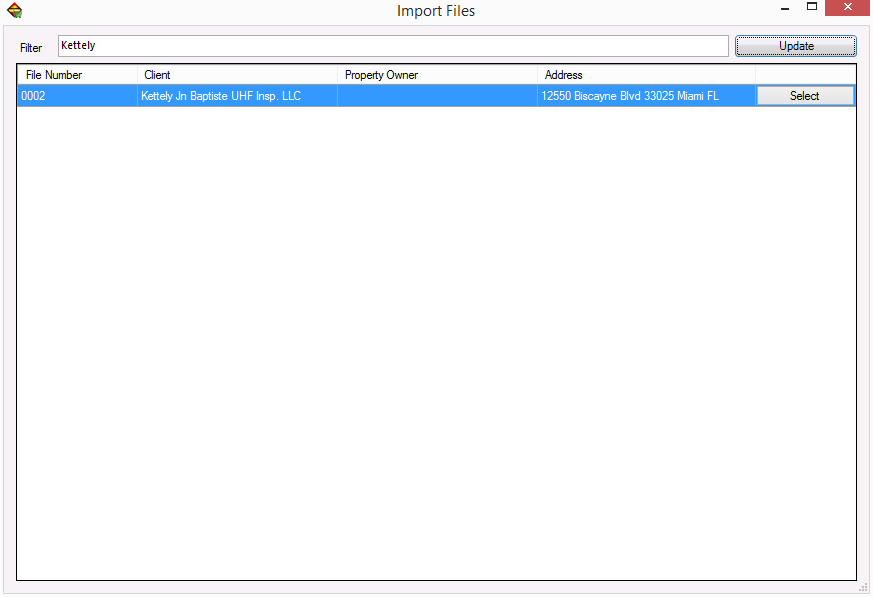
"Update" button allows you to refresh the list of files.
"CREATION OF THE LICIWEB FILE" Section
With LICIWEB, follow, organize and download your files from any computer connected to the Internet! Take your customer management everywhere with you in peace!
For more information, you can read the LICIWEB article.
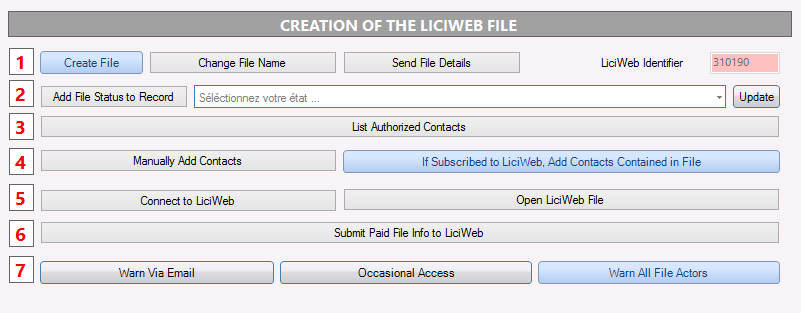
1) "LICIWEB Identifier" button allows to link your client files on your computer and the file numbers (unique) on the Internet.
"Create File" button sends your Internet file by creating a Web file number which will be recorded in the "LICIWEB Name". You will be asked the name under which your customer will see your file. This will allow notaries and agencies to conduct better research into your Web files.
"Change File Name" button change the name of the file attached to LICIWEB.
"Send File Details": sends all LICIEL fields for your customer to see the LICIWEB interface. This will enable it to verify the accuracy of the order online.
2) "Add File Status to Record" button allows you to add new comment which will be read by your client. Usually, we indicate various successive being of record in order to establish a clear follow-up.
3) "List Authorized Contacts" button allows you to share your file with your client, you have to display the available contact's list on LICIWEB. (Use the filter to search for the desired contact). Note that only the first 10/15 contacts will be displayed.
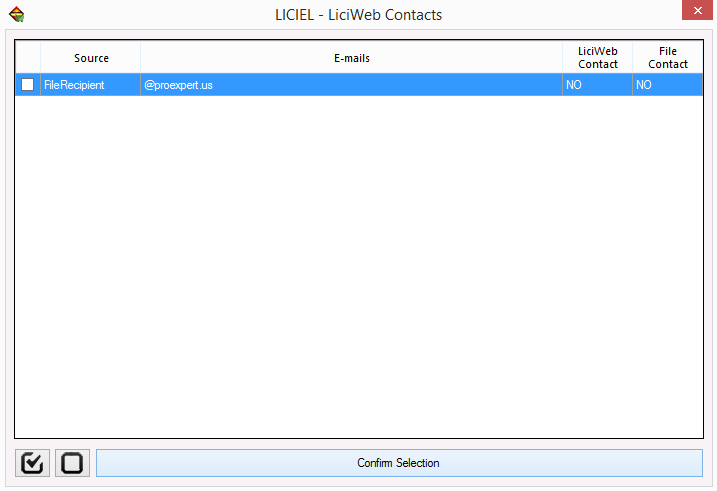
"If Subscribed to LiciWeb, Add Contacts Contained in File" button makes the folder visible to the selected client. You must add as many contacts as necessary for the file to be consulted by the desired client by accessing the following window:
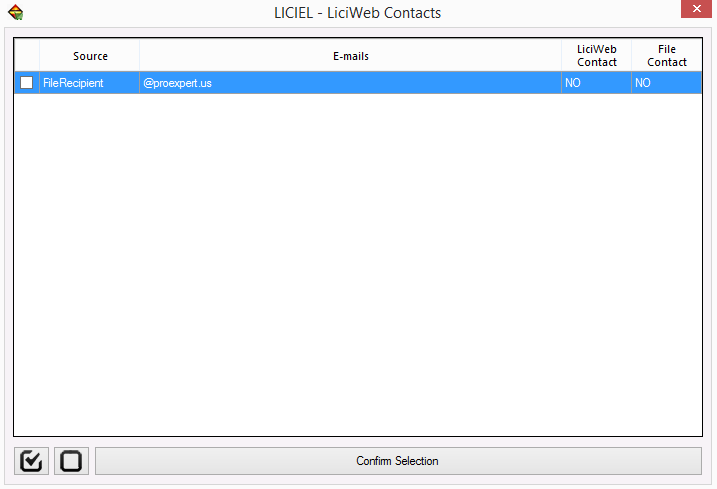
Please select the desired contact by checking the box.
|
|
button allows you to select all files of the list in one click. |
|
|
button allows you to deselect one or several files. |
After checking the (the) affected file, please click on the "Confirm Selection" button to save your selection.
4) Manually Add Contacts: Allows inserting new contacts into LICIWEB interface from LICIEL.
5) Connect to LICIWEB: Opens a LICIWEB interface on your Web Browser.
Open LICIWEB File: Open your LICIWEB file (a LICIWEB session should be open in your Web browser in order to work properly).
6) Submit Paid File Info to LICIWEB button allows you to update the LICIWEB payments.
7) "Warn Via Email" button allows you to inform your client of the disponibility of the file.
"Occasional Access" button allows you to enter the email of the occasional user by accessing the window shown below.

"Warn All File Actors" button allows you to inform all the actors for the avaibility of the file by accessing the window shown below.