Using the BackOffice
I. BackOffice Notifications
Clients may submit an order through your website.
For a step by step instructional video on setting up your estimate wizard, go to Liciel.us and watch our “Setting Up the Extranet” video.
In this example, the estimate wizard was configured to allow the client to set an appointment date.
Once an order is submitted through your website, it will be visible in the LICIEL BackOffice.
Log into your LICIEL BackOffice.
Notice that the LICIEL BackOffice displays a few notifications in the top bar.
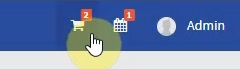
Depending on your order configurations, different icons will be visible.
The shopping cart icon notifies you that a new order has been placed.
The calendar icon informs you that you have a new appointment to confirm.
If you have enabled one of the payment systems that allow your client to pay for their orders online, you will also see a credit card icon.
Each icon will lead you through the steps necessary to complete the inspection.
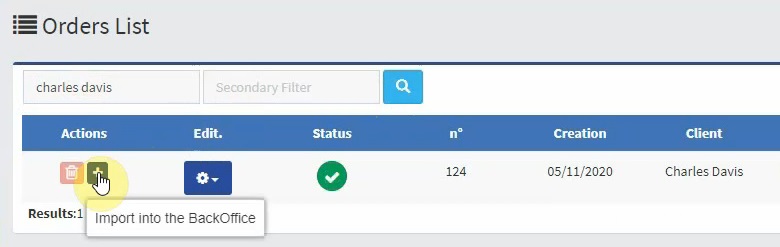
First, click the “Shopping Cart” icon.
The order that was just placed is visible in this list.
Notice that clicking the shopping cart icon opens the Orders List.
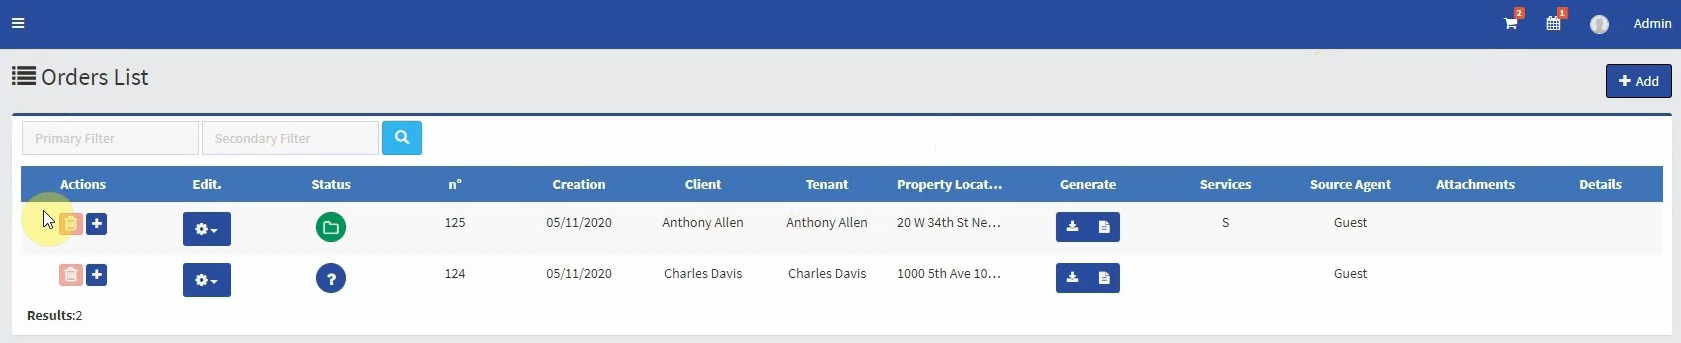
New orders can be managed easily here.
Under the actions column you will see the garbage bin icon, which can be used to delete the order if necessary.
Next to that, the plus sign imports the order into the BackOffice.
Clicking this will remove the order from the notifications list.
The following column, “Edit” let’s you edit or duplicate an order.
Click the gear icon and select “Edit”. This will open a popup with the order details.
If needed, make any changes and click “Submit” to save the modification.
If you are not ready to import the order into the BackOffice but would like to indicate that you are aware of the order, use the status column.
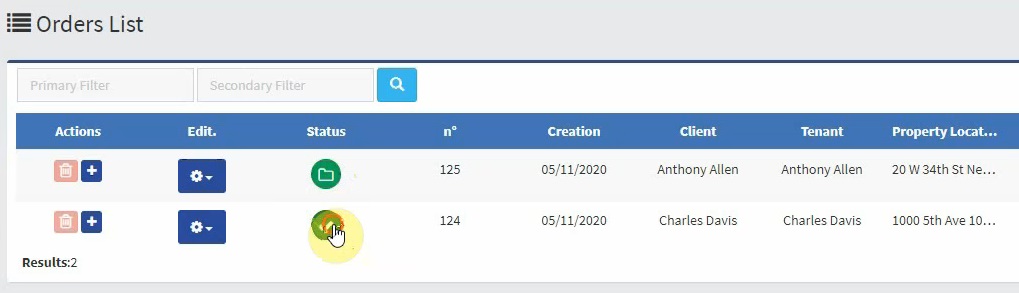
Click the icon in the status column to remove the order from the notification list.
The question mark status shows the order has not been processed yet.
The x status shows that the order is cancelled.
The check mark status shows the order is validated.
When your order configurations are set to display an estimate, the order’s status will display a folder icon in the status.
This indicates that there is an Extranet file created for this order.
Clicking this will redirect you to the Extranet to view the estimate and it will also remove the order from the order notification list.
Orders without estimates will also appear in this list.
Their status icon will show a question mark.
If you are not ready to import the order into the BackOffice yet, but would like to remove the order from the notification list, click the “Question Mark”.
The icon will change to a check mark indicating that the order is validated.
If clicked again, the check mark will turn into an “X” icon, to indicate that the order was cancelled.
Once the status is no longer a question mark, it will be removed from the order notification list.
Continuing through the columns, there is information regarding the order that was placed.
After that the “Generate” column lets you generate a few files.
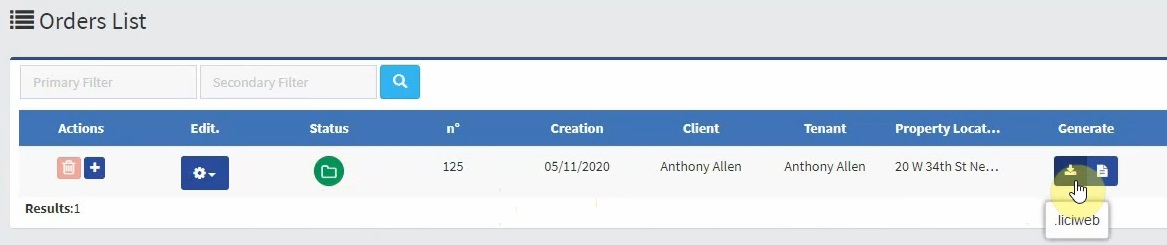
For example, the first icon in the column is the download icon, which downloads a liciweb file that can later be imported into your LICIEL Inspection Software.
Next to that is the document icon.
Click the document icon to download the Inspection Agreement for this order.
Once an order has been removed from the notification list, it can still be viewed by clicking “Extranet” from the sidebar and selecting “Order Entry”.
This will show you all of the orders.
Notice that the columns here are practically identical to the columns in the order notification list.
To create a new order, click the “Add” button.

Use the search box to search for an order.
Click the plus sign to import an order into the BackOffice.
This will generate an inspection file for the order so that it will be visible in the inspections area of the BackOffice.
Since the inspection file is new, it does not have a report number yet.
From the top bar, click “Planning”.
In the area for report number, click the “Generate Folder Number” button.

If the inspection file has never been saved before, a popup will open asking you to please save your inspection file, click “Save and Create a Report Number” to save the file and generate a report number.
This will assign the inspection file its own number.
For more a video tutorial on the LICIEL BackOffice inspection file, go to our website, Liciel.us and watch our “Using the LICIEL BackOffice Inspection File” video.
Close this tab and refresh the orders list page.
Notice that the check mark icon has been replaced with the folder icon.

Clicking the check mark icon will redirect you to the Extranet file that was created for this inspection order.
Continuing through the notifications in the top bar, select the calendar notification icon.
Orders that were placed with a specified appointment date will notify you that an appointment has been created.

The first column states the appointment date and time.
The next column specifies the inspector currently assigned to that appointment.
Next there is the order information, including the client name and address.
Also, if the order has been successfully imported and a report number has been generated, you will see that information reflected here.
Clicking this will take you to the LICIEL BackOffice file for this appointment.
Notice how this temporary file name changes after we import the order into the BackOffice.
Click the shopping cart icon.
Import the order by clicking the plus sign.
When the inspection file opens, click “Planning” from the top bar and click the “Generate Folder Number".
Notice that the appointment information is displayed here.
We see the appointment date and the appointment time.
Use the “Home” icon to return to the BackOffice homepage.
Notice that the shopping cart notification has disappeared.
Click the Calendar notification from the top bar.
Notice that the temporary inspection number has been replaced with the folder number we just generated.
Appointments that are displayed in this list are already on the calendar, they just need to be confirmed.
Before clicking “Edit”, lets open the calendar.
The appointment we will be looking for is on 5/15/2020 at 9:00AM.
From the sidebar, click “Calendar”.
Using the arrows, let’s find the appointment date and time on the calendar.
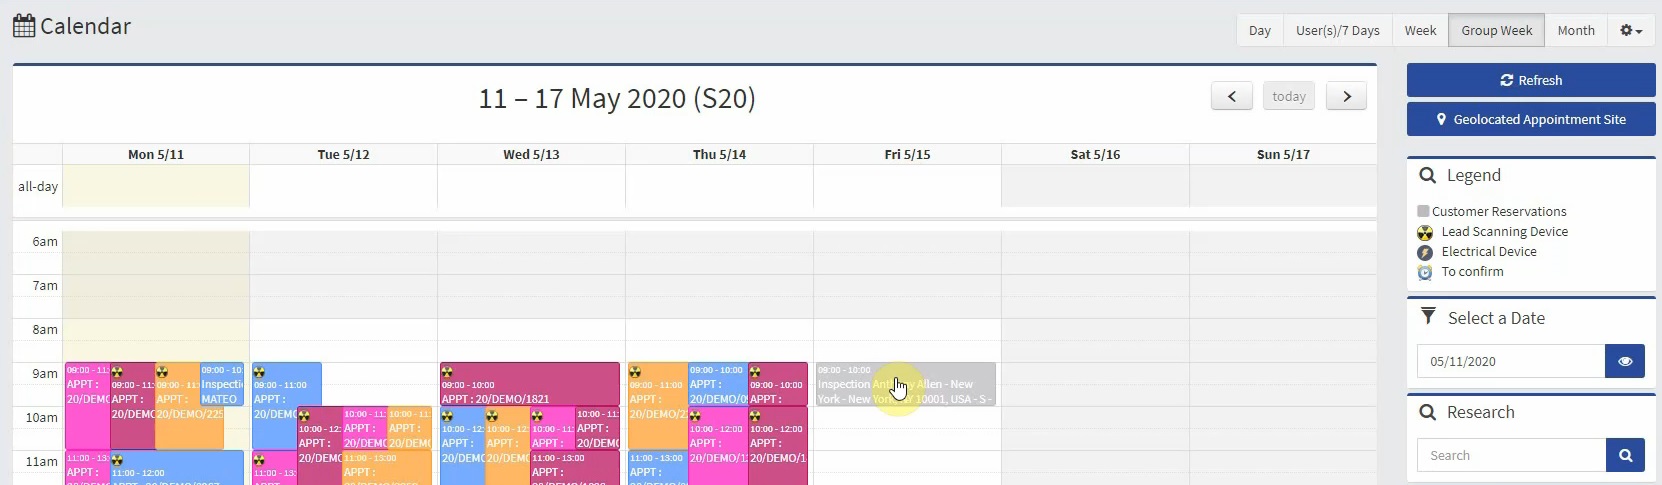
Notice that the appointment is displayed in a gray color.
Looking at the legend we can see that gray means it is a customer reservation.
Once we confirm and assign an inspector to the appointment, the appointment will be colored the same color as the inspector that is assigned to it.
Return to the appointment notification list by clicking the calendar icon in the top bar.
Confirm the appointment.
Click the “Edit” icon.

This will open a tab with the calendar along with a popup displaying the appointment information.
In order to remove the appointment from the appointment notification list, we must change the status of the appointment to “Confirmed”.
If the appointment has been confirmed, you may select “Confirmed” from the drop down.
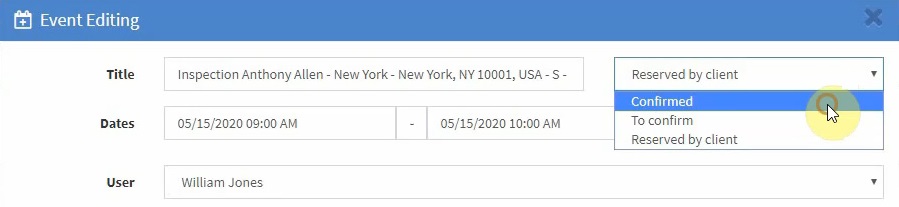
If the appointment has not been confirmed yet, you may select “To Confirm” from the drop down.
However, this will not remove the appointment from the appointment notification list.
Before clicking “Save”, review the rest of the information.
Assign an inspector to the appointment from the USER drop-down list.
Notice that the report number is visible in the JOB ORDER field.
Confirm this appointment and click “Save”.
The calendar now shows the appointment but it is no longer gray, instead it is the same color as the inspector that was assigned to it.
Once confirmed, the appointment will be removed from the assignment notification list.
If no other appointments are in need of confirmation, the calendar icon will be removed from the top bar.
For a video tutorial on the LICIEL BackOffice Calendar, go to Liciel.us and watch our “Using the LICIEL BackOffice Calendar” video.
II. BackOffice Inspections
Once we clicked “Import Into the BackOffice”, the order was added to our BackOffice inspections list.
From the side bar click “Inspections”.
Notice that the two files that we just imported are in this list.
Right click on an inspection from the list.
This will open a list of actions that can be executed with this inspection file.
Inspection files can be deleted by clicking delete.
If needed, generate a new file number for this inspection by selecting “Rename Job Order”.
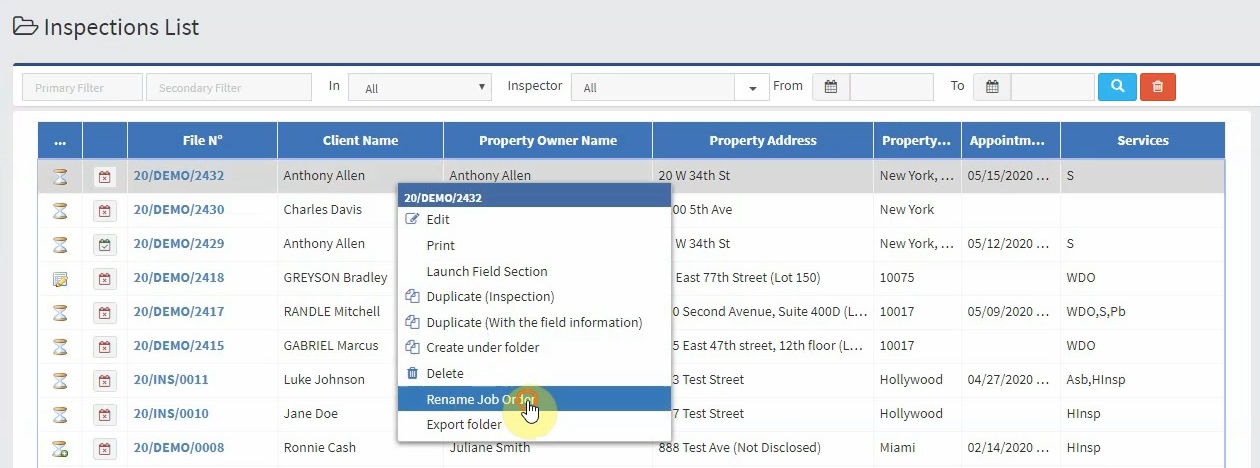
When the popup opens, enter a file name of your choosing or click “Generate” to generate one automatically using the report naming configuration.
To save the new name, click “Confirm”.

Edit the inspection by double clicking the inspection or by right clicking the inspection and selecting “Edit”.
Toggle the preview pane by clicking the file icon.
Notice that the preview pane is empty.
To preview information regarding an inspection file, select any of the files from the list.
Open your LICIEL Inspection Software.
The preview panes are almost identical.
The BackOffice preview pane displays important information like the status of the inspection file, owner name and phone number and client name and phone number.
Use the drop-down to change the file status if necessary.
This helps you keep track of which orders need your attention.
Hover over the icon in the first column.
Notice that a tooltip opens displaying the file state.
If this inspection was conducted successfully and you are awaiting the completion of the inspection report, change the status to “Report in Progress”.
Notice that the icon has changed to reflect the current state of the inspection file.
The preview image will come from the software once the inspection is performed and photos are added.
Click the “Order Details” tab.
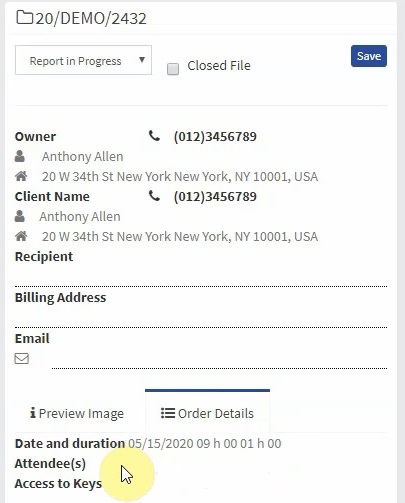
Notice that the appointment information is also displayed here.
If needed, you may add details and notes and then click “Save”.
From the inspections list, you may also create a new inspection file from scratch.
Click “New”.

A blank inspection file lets you enter all the information.
After filling out the info you may proceed with this inspection as if it was imported.
To customize the columns display, click the “Gear” icon.
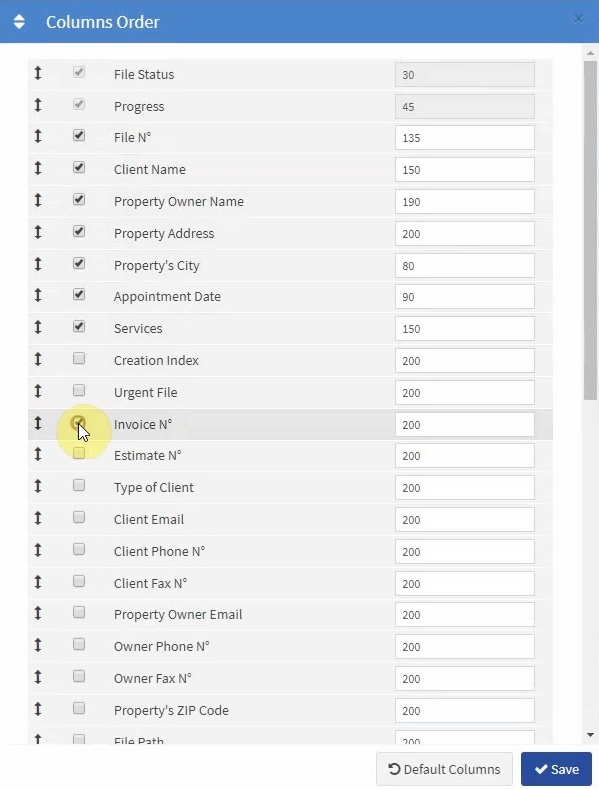
To display a column, ensure that the checkbox for that column is checked.
Then specify the size of the column and click “Save”.
If you would like to restore the columns to their original settings, click “Default Columns”.
Search through your inspections list quickly by using the search boxes.
Enter any information pertaining to the inspection file.
This could be a name, address, email, or any other identifying information regarding the inspection file.
Click the search icon to search through the list.
Clear all of the search fields and then use the Inspector dropdown menu to see which inspection files belong to which inspector..
Select an inspector and click the “Search” icon to view the inspection files assigned to that particular inspector.
Use the options from the side bar to view specific inspection type.
Below “Inspections” there are several options.
Each option will display the inspections with those characteristics.
For example, “Unplanned Inspection” displays all of the inspections without an appointment date on the calendar.
III. BackOffice Contacts
From the side bar click “Contacts”.
This list is the same contact list available on the LICIEL Inspection Software.
Open your LICIEL Inspection Software, click “Contacts” from the ribbon.
Click “Create”.
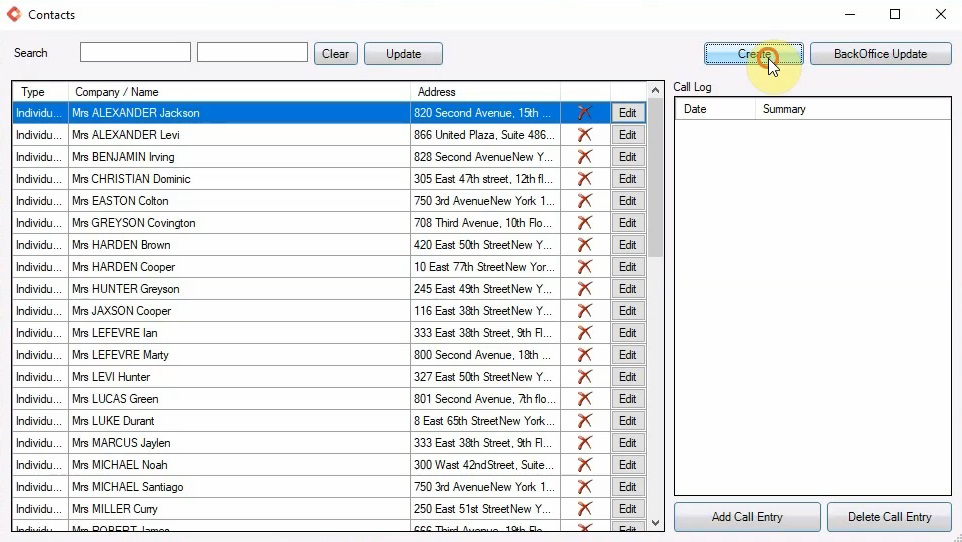
This will open the BackOffice where you can enter the contact information.
Enter the contact information and then click “Save”.
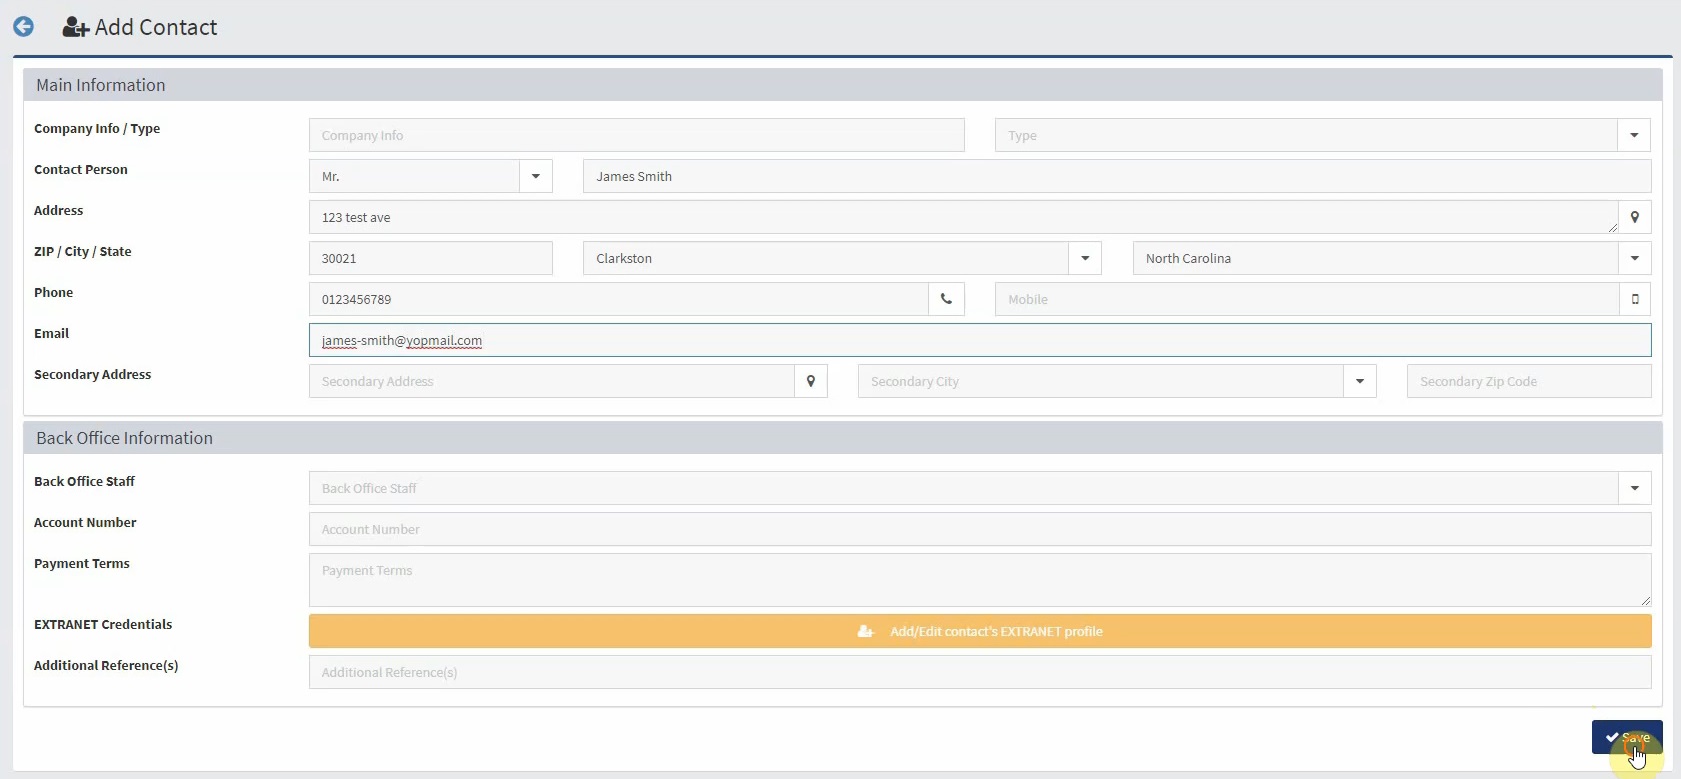
This will create the contact in the BackOffice.
In the LICIEL Inspection Software, click “BackOffice Update” to import the contact that was just created.
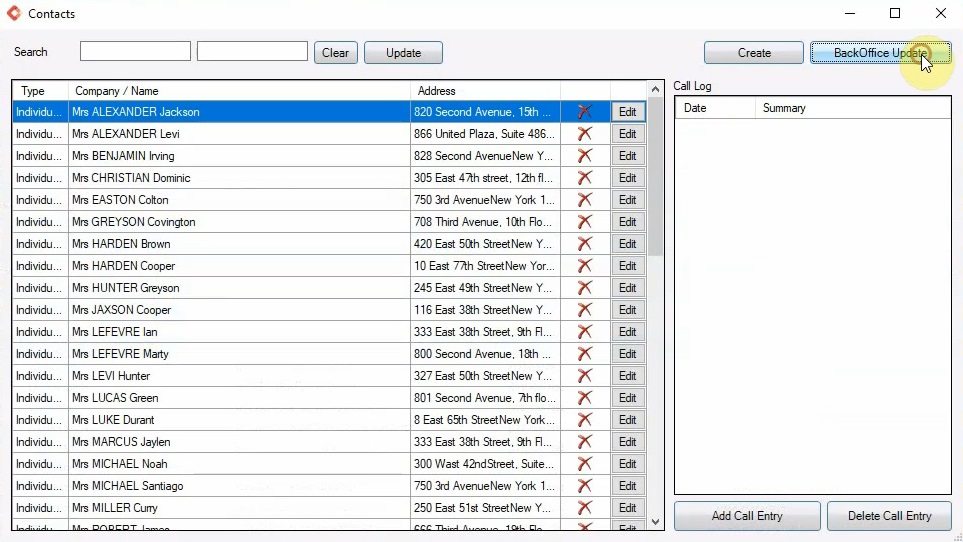
Of course, you can create a contact without opening your LICIEL Inspection Software.
Click “New”.

Enter the contact information and click “Save”.
Use the search boxes to search for the contact that was just created.
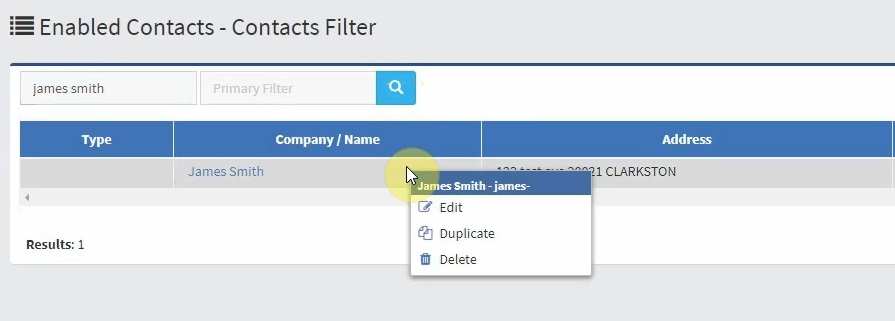
Right click the contact to see a list of possible actions.
To delete a contact, select “Delete”.
To duplicate a contact, select “Duplicate”.
Select “Edit” from the list.
This will open the contact information.
If needed, make any changes and click “Save”.
To add this contact to your Extranet contacts list, click “Add/ Edit Contact’s Extranet Profile”.
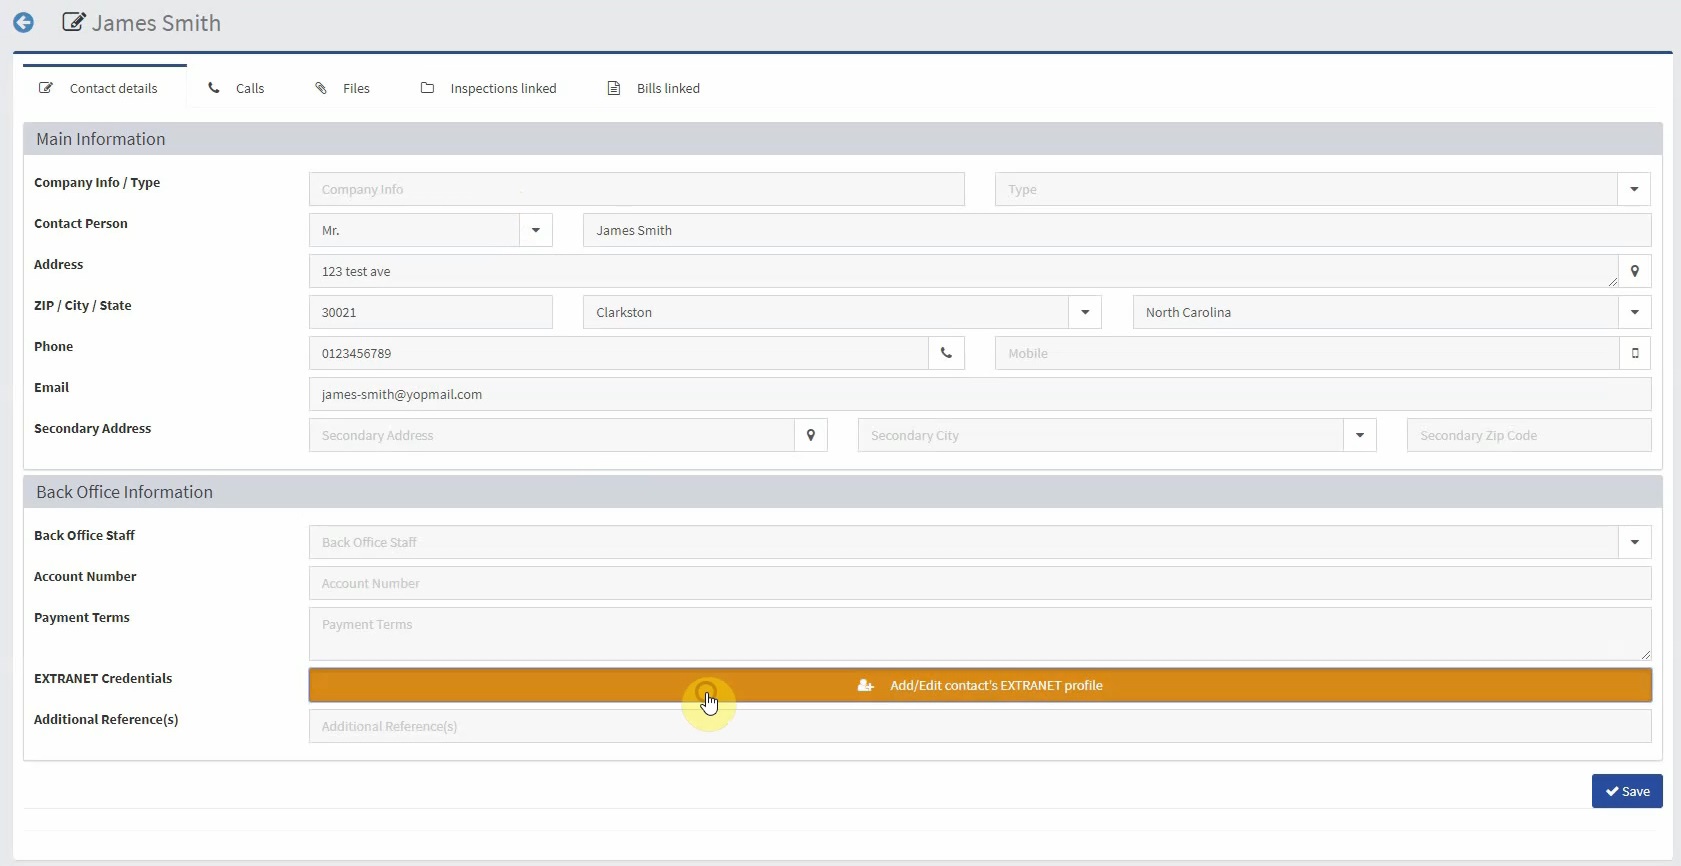
This will open the Extranet.
To save the contact to the Extranet, click “Save”.
For an instructional video on the Extranet Contact list, go to Liciel.us and view our “Using the Extranet” video.